Pages

Friday, June 29, 2018

Color Throwdown #499

Hello friends.  Playing along with this week's Color Throwdown challenge with the beautiful colors of Blue, Yellow, & Green.


Here's what I came up with using these lovely colors:


I started by making my background using PTI's Text & Texture: Roses stamp set and two shades of blue from Gina K (Blue Raspberry & Powder Blue), and then die cutting the dotted rectangle with PTI's Mix & Mat: Flourishes die.  I love that little pop of design all those die cut dots give!


I used PTI's The Sweet Life to stamp my roses and leaves and then fussy cut them out and added them to my background.  At first they got lost against all the pattern of the blue background, so I added a plain white rectangle just inside the dotted area, and then my flowers and leaves showed up much better.  I also added a little sprig from PTI's Spruce & Sprigs set and used GA on the blue berries to make them stand out a bit more.  I finished with a simple sentiment banner and a yellow enamel dot.

Check out all the beautiful and fun cards from the DT and then play along right HERE.

Thanks for stopping by today ... I love it when you do!


Thursday, June 28, 2018

Make It Monday #326 - Inchie Elements

Hello friends.  Lexi is up with this week's challenge at Papertrey Ink's Make It Monday and she has a super FUN technique using INCHIE ELEMENTS!

Apparently inchie elements have been around for awhile, but I had never heard of them until watching Lexi's video HERE.  You're basically stamping on one inch squares and then arranging them like tile mosaics...fun, fun, FUN!!  Here's what I came up with:


I decided to use the Bitty Butterflies stamp set and Cover Plate die because of their perfect size to fit in the one inch squares, and my colors were a given because I still had a few of the solid butterflies already die cut in the Hawaiian Shores and Berry Sorbet from another project...all that was needed was to stamp the other 6 inchies!


After stamping and adhering the solid butterflies to my squares, I arranged them similar to the way the Cover Plate die is lined up, and that left the space for my sentiment.


Once I had stamped my sentiment I added foam tape to the backs of my squares to give the raised and dimensional look, and then finished by adhering to a Hawaiian Shores card base.  Very simple card but I love how it turned out and can't wait to try this technique with some other stamp sets...definitely a FUN challenge!!

You can check out Lexi's video HERE and her FABULOUS card too, and then play along!!

Thanks for stopping by today ... I love it when you do!


Tuesday, June 26, 2018

Oh Crab...Bad Friend, Bad Friend!!

Oh crab!  I forgot your birthday!!  My dear sweet friend Kara had a birthday LAST month and I forgot!!  Had it written down in my  address book, but never remembered to add it to my planner, so it passed by right over my head...grrrrrr!  Luckily for me I know Kara will forgive me because that's just the kind of sweet, sweet friend that she is, and also lucky for me that I just happened to receive in the mail a new stamp set that was perfect to say how sorry I was that I forgot her birthday!!

My Favorite Things stamp company put out an awesome set last month called Just Beclaws that I had to have...and not even knowing how quickly one of the sentiments was going to be so perfect to use for Kara!!  Take a look:


I apologize in advance for my poor photography skills...I do alright with flat lay photography, but when it comes to 3D, I just can't seem to get rid of those shadows!  But anyway, I used Lawn Fawn's Scalloped Box Card Pop-Up Die to create my pop up card, and just covered it with crabs, crabs, and more crabs!!


The DSP paper I used over the Night Of Navy cs is from My Favorite Things Watercolor Wash 6x6 pad, and reminded me of water, so it was perfect to use for my seaside crabs!


I used kraft cardstock for the strips you use inside the box and stamped the little speckles from SU!'s Glorious Grunge in Vintage Photo Distress ink to look like sand for my crabs to sit on.  I also added a few liitle bits of die cut sea grass from an AliExpress die.


The stamp set also comes with an umbrella, so I die cut that from some Pure Poppy Bitty Big DSP (PTI) and then added a few pop dots behind it to give a little more depth and dimension to the umbrella.  And did you notice the googlie eyes on the larger crab in the center??  This was actually a pretty easy card to put together after I finished coloring all the crabs (Copics) and I really like how it turned out!  Hopefully it brought a smile to Kara's face and she knows I didn't intentionally forget her birthday!  It's just one of the downfalls of having OLD friends Kara!!  Hope it was a FABULOUS birthday my friend!!  :0)

Thanks for stopping by today ... I love it when you do!


Monday, June 25, 2018

Papertrey Ink's Monthly Blog Hop - June 2018

Hello friends.  Happy Monday!  And it is indeed a Happy Monday because it's the 25th, and that means it's time for Papertrey Ink's monthly BLOG HOP!!  And what a FUN inspiration photo they gave us to work with this month!!  Take a look!


Now does this photo scream SUMMER or what?!!  Those popsicles look amazing and with temps about to go into the mid 90's later this week in Michigan, I would definitely LOVE to have a whole box of them!!

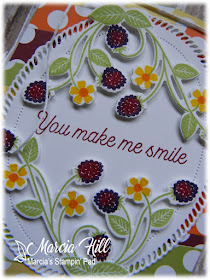
I was totally inspired by all the color in this photo and also the blackberries...and what a perfect opportunity to use a couple of my new PTI items!  The new Corner Adorner: June set from Lizzie and the Shape Shifter: Oval 2 die worked perfectly for my Summer-y card!


I started with my background, and at first I was going to use strips of the Bitty Big DSP in ALL the colors that were in the inspiration photo, but then got to thinking that I couldn't use ALL the colors in my stamped part of the card, so limited myself to Green Parakeet, Harvest Gold, Orange Zest, and Scarlett Jewel.  Would have liked to add some Royal Velvet (like I did around the outside shading of my blackberries) but there is no Bitty Big DSP in Royal Velvet available (hint, hint PTI!).  Anyway, I cut my strips in different widths and then added diagonally across my card base.


Next I stamped my leaves, flowers, and berries (Corner Adorner: June) in the coordinating colors to match the Bitty Big DSP and then die cut them out and placed one at the top (with pop dots) of the Shape Shifter: Oval 2 and one at the bottom (with pop dots) with my sentiment in the middle (also on a diagonal).  A simple white bakers twine bow across the top finished off this bright and Summer-y card.

And now it's time to hop along and see how everyone else interpreted this months inspiration photo...I'm sure with this FABULOUS photo there is going to be all kinds of inspiration to see and ahhh and ooooh over!  You can check it all out right HERE.

Thanks for stopping by today ... I love it when you do!


Merry Monday #296 - RUSTIC

Hey Merry Monday fans...Nina is our hostess this week and she would like to see RUSTIC Christmas cards.


I went in a little different direction from the inspiration photo and created a rustic wreath that was inspired by a Melissa Phillips card HERE.

Rustic Wreath from PTI has long been a favorite of mine, and dressing it up with flowers, berries and snowflakes was a LOT of fun!  I used PTI's Farmer's Market Florals and Beautiful Berries: Winter stamp sets for my florals and PTI's Silver White Winters and Impression Obsessions small snowflake dies for the snowflakes that were colored with Vintage Photo Distress Ink to give the rustic look.  

You can see more inspiration from the DT and find all the info to play along right HERE.

**SPECIAL NOTE**  It is with a sad heart that I tell you that this will be the last Merry Monday challenge.  For many reasons, the creator of the Merry Monday challenge has decided to close it down, so I hope that for this last challenge, we can go out with a bang!  This has been a wonderful ride for me the past 2 years, and I have loved creating cards for this challenge every week!  I have made wonderful friends with the DT and with so many of you in the gallery who have played along!  I'll still be around in blogland (and Instagram), so don't be strangers and come by and visit...you know I love it when you do!  Change can be good and who knows where this will lead for all of us??  So keep making those Christmas cards and getting ahead before December arrives, especially with this last Merry Monday challenge!  Let's flood the gallery with RUSTIC Christmas cards!  Thanks for all the wonderful memories my friends!!  :0)  

Thanks for stopping by today ... I love it when you do!


Saturday, June 23, 2018

Make It Monday #325 - Creating Flowers In Reverse

Hello friends.  Dawn McVey is up with this week's challenge at Make It Monday and she shows us how to make beautiful cards by creating the flowers in reverse...basically leaving your flowers white and adding color with your leaves.

I dragged my feet on this challenge all week...I think mostly because I don't usually buy flower dies as I really like to fussy cut.  My mojo has also been missing a bit this week too, but I made myself go through my dies yesterday, and I actually had more than I thought that I could use.  So anyway, I spent time cutting out a bunch of flowers and leaves yesterday and put my card together this morning.  Here's what I came up with:


I used flowers and leaves from Doodlie-Do, Songbirds, and Friendly Flowers and embossed the flowers in white and also the background with the Cover Up: Quatrefoil stamp.  A small piece of Hawaiian Shores Pattern Paper was added to the bottom of my card just to add a bit more color.


My leaves were stamped with Green Parakeet and Hawaiian Shores ink, and I also cut one of the Songbird branches with Hawaiian Shores cs.


I used pop dots to raise the centers of my white flowers to give a bit more dimension, and then tucked my leaves underneath.  I also used the Make It Market Mini: Garden Gild and Button Stacks for the centers of two of the flowers.  I finished off with a seam binding ribbon in white, a button, and a few iridescent sequins.  And I definitely have a lot of die cut pieces leftover to make a few more cards!

Check out Dawn's BEAUTIFUL cards and video right HERE and then play along! 

Thanks for stopping by today ... I love it when you do!


Tuesday, June 19, 2018

CAS Mix Up June 2018 - Layered Embossing Powders

Hello friends.  This month's challenge at CAS Mix Up is all about Layered Embossing Powders.


I've mentioned before how hooked I am on Lindy's Magical Powders, and this past month I've also been really hooked on seahorses.  I combined both for my card for the CAS Watercolour Reminder Post, and just wasn't ready to stop playing with either the Magicals or the seahorses, so I combined both again and also added the layered embossing.  I started with the Lindy's Magicals using 3 colors:


This is what combining Tibetan Poppy Teal, Cattail Copper Brown, & Ponderosa Pines Olive look like together (wet).  And here's what those combined colors look like on a seahorse...


While my Magicals were drying I worked on my OCEAN background using Loll's SPLASH Technique and Peacock Feathers Distress Ink and water.  I used my heat tool to dry this layer (because I'm impatient!) and then did some water splattering to add the look of bubbles in the water.


Once my water colored background was dry I went back to my Magicals piece and die cut the 2 seahorses (Gina Marie Designs) and then began the process of layering clear embossing powder over each of them.  Because I do not have an electric griddle which would make the whole process so much easier by heating from the bottom rather than the top, my desk was quite a mess after layering 6 layers of embossing powder over each seahorse.  The mess and the time was well worth the effort though when I saw the end result of my seahorses!


I literally took about 40 photos to try and capture the shimmer and sparkle of the Lindys Magical Powders AND the shine from the 6 layers of embossing powder, and came up with one photo that somewhat does these seahorses justice!  I used a stitched rectangle die to cut out my background and then framed around with a white layer and adhered to a white card base.  I pop dotted the seahorses and then added a sentiment that I embossed in white on a back banner from SU!'s Moon Lake stamp set...I thought the sentiment very fitting for my lovely seahorses!!  A few clear Rainstones (PTI) finished off my CAS card.

The DT has some absolutely GORGEOUS cards to inspire you with the Layered Embossing Powder technique, and there are also some real beauties in the gallery as well.  This challenge is open till the 24th, so check it out right HERE.

Thanks for stopping by today ... I love it when you do!


Monday, June 18, 2018

Merry Monday #295 - An Inspiration Challenge

Hey Merry Monday fans...I'm happy to be hosting the challenge this week and I have a simple but lovely inspiration photo for you.


This may be a simple photo, but there really is a LOT to be inspired by!  The woodgrain, the peppermint candies, the colors, the mason jars, the candle light, and the greenery...include a few or a lot of them onto your cards!

 I was inspired by the colors, the greenery, the mason jars, and the candies!  I love the paper in SU!'s Candy Cane Lane pack and 2 of the papers worked perfect for this challenge!  I just embossed in white the outline of the Pint and Quart size jars from PTI right onto the papers and my jars were filled with Christmas goodies!

I stamped a little bit of greenery behind the jars using PTI's Holiday Greens stamp set, and then added a frame in Real Red cardstock using Penny Blacks Snowflake Stitch Frames dies.  A few red and green sequins, some red & white bakers twine, and a Tiny Tag with my sentiment and some jute twine finished off my FUN and FESTIVE card.

We can't wait to see what YOU come up with this week using the inspiration photo.  Check out what the DT came up with and then play along...you will be so happy when December rolls around and you have a stash of Christmas cards already done!  You can find all the info you need to play along right HERE.

Thanks for stopping by today ... I love it when you do!


Saturday, June 16, 2018

CAS Watercolour June 2018 Reminder - OCEAN

Hello friends.  Just a friendly reminder that there's still time to play along with us at CAS Watercolour.  We're looking for OCEAN themed cards and you have until the 24th to enter the challenge.


I have a pretty simple card to share with you today, but because I used Lindy's Magicals it really packs a punch!


I used the Tibetan Poppy Teal color powder with water to create my "ocean" and Cattail Copper Brown for the Seahorse that I cut with a Gina Marie Designs die.


I framed out my "ocean" using a couple rounded square dies (Gina Marie Designs) and stacked 3 of them together for some depth.  The sea horse is pop dotted at the side and then I finished off the card with a whimsical sentiment from PTI's Keep Swimming set.  A very simple card but it just didn't need anything else, so I left it like it was.  It also shimmers like crazy in real life because of the Lindy's Magicals!

You can check out what the rest of the DT came up with and our Guest Designer Robyn Oliver too, for more inspiration right HERE, and then play along with us.  We'd love to see your work in the gallery!!

Thanks for stopping by today ... I love it when you do!


Friday, June 15, 2018

CAS Christmas June 2018 - Masculine Christmas Card

Hello friends.  This month's challenge over at CAS Christmas is to create a Christmas card that is MASCULINE.


When I had been making cards for this month's Twofer Challenge, I still had a portion of unused background that I thought would work well for this month's CAS Christmas challenge.  Here's what a I came up with:


Because it's been awhile since I made this background, I'm guessing here, but I believe it's Brusho's (Cobalt Blue) and salt crystals.  I simply added a Penny Black die called Polar Bears to the bottom of the background and then layered it with a black mat.


I used a snowflake Sizzix embossing folder for my white background to add some snowy interest, and then also matted that with black before adhering it all to a white card base.  A simple sentiment from PTI's Quilted: Winter embossed in silver on a black strip finished off my Masculine Christmas card.

There's some absolutely wonderful inspiration from the DT, so check it all out right HERE and then play along.  This challenge is open till the 24th.

Thanks for stopping by today ... I love it when you do!


Wednesday, June 13, 2018

PTI's Create Along With Us - June 2018

Hello friends.  Playing along with Papertrey Ink's Create Along With Us challenge, where every day this week the cards have gotten more and more beautiful and harder to pick just one favorite!  I was so sure I was going to try and create an underwater sea card after all the beauties from Day 1 and 2, and then today they introduced the new Botanical Bounty II stamp set and I fell just as hard as I did when the 1st set came out!  Then I couldn't decide which designer to CASE as I loved all of them...especially Melissa Phillips, Kelly Lunceford, and Michelle Leone's cards!  I finally decided to CASE Michelle's card (HERE) and just change up the colors a bit.


I've been on a real Berry Sorbet kick lately, so that was my card base choice, and then I die cut the dotted rectangle frame using the Mix & Mat: Flourishes die.  Next I stamped my Hello (Penned Elegance) using Pale Peony and Berry Sorbet inks.


Next, using my MISTI, an ink blending tool, and a sponge dauber, I stamped my flowers and leaves from Botanical Bounty using Pale Peony, Berry Sorbet, Orange Zest, Bright Buttercup, Simply Chartreuse, and Prairie Grass inks.  After fussy cutting them all out I played around with arranging them until I was happy.


A few iridescent sequins and some bakers twine finished off my bright and Summery CASE of Michelle's lovely card.  (see below)

I can't wait to get my hands on the new set and also the Shape Shifter: Oval 2 like Michelle used on her card...SOOO pretty!

No shortage of cards to be inspired by this month at Papertrey Ink...may have to take out a small loan to purchase all the goodies I want from this release!!  Check it all out right HERE to play along.

Thanks for stopping by today ... I love it when you do!


Tuesday, June 12, 2018

Twofer Challenge #6 - Trees

Hello friends.  This month's Twofer Challenge is all about TREES!


I have many tree stamps and dies, but I have to say that after all this time Lovely As A Tree (SU!) is still my favorite tree stamp set!


The line up of trees in this stamp set is so versatile, and I use it for everything from Christmas (duh!!) to Sympathy, Birthday, Thinking Of You, and beyond!  Yep, it's well loved!!


For my first card I wanted a birthday card that could be masculine and Fall-ish, so I masked off the top and bottom of my panel and then ink blended using Wild Honey, Spiced Marmalade, & Fired Brick DOX inks.  (Little tip when stamping over DOX inks with black ink...make sure your ink is completely dry and prepped with an embossing buddy, then ink it up (I used Versafine Black Onyx) and immediately sprinkle CLEAR embossing powder and heat set.  Why??  Your black ink will dry gray colored over the DOX inks, and it doesn't matter what type of black ink you use...trust me on this one!!)  After heat setting my trees, I added my sentiment from PTI's Delightful Dahlia Additions and then mounted to a white card base.


Darnell, does this background look familiar??  Does Bubble Wrap ring a bell?  For my 2nd card I wanted to do a Winter scene and went digging through my box of leftover backgrounds (I always make 2 or 3 or 5 or 6 more than I need when I'm playing with a different media) and found this one where Darnell had challenged us to use Bubble Wrap and ink to create fun backgrounds.  It kinda looks like snow, right?  Well, kinda sorta kinda!  Hey, artistic license and all that, right?!!  I think the group of trees looks fabulous against the background, and I did a simple mounting with Pacific Point cardstock and then adhered that to a white card base and finished with a sentiment from PTI's Winter Hills.

So there you have it...a Fall birthday card and a Winter Christmas or Thinking of You card using SU!'s Lovely As A Tree.  Make sure you check out all the FABULOUS cards from Darnell, the Guest Designer (Maria Rodriguez), and the rest of the DT...LOTS to inspire you this month!!  You can find it all right HERE.

Thanks for stopping by today ... I love it when you do!