Pages

Friday, August 31, 2018

Make It Monday #334 - Glitter Inlays

Hello friends.  Lexi Daly has a FUN (and a little bit messy!!) technique for us with this week's Make It Monday challenge using glitter and die cuts.

I have 2 cards to share with you today since the glitter and mess was already all laying out!  My 1st card uses the Shape Shifters: Square 2 die and the Mum's The Word stamp set.


I used ECD Silk Microfine Glitter in Rust behind my die cut square and then adhered that to a white card base.  My flowers were stamped and fussy cut and arranged around the bottom of the die cut square and my sentiment stamped just below that.  A simple piece of jute twine finished off my card.


Here's a closer up so you can see the sparkle of the rust colored glitter.

For my 2nd card I used the Bold Borders: Shine Die to adhere the glitter to and then just had to try out one of my new stamp sets - Scared Silly!


These little monsters are so FUN to create, and I thought my granddaughter Addy whose favorite color is purple would love a little purple monster!!


Here's another close up photo so you can see the glitter and sparkle better!  I think between the little purple monster and all the sparkle, she's going to love it!!

Check out Lexi's FABULOUS cards and video HERE and then play along.

Thanks for stopping by today ... I love it when you do!


Wednesday, August 29, 2018

PTI's STAMP-A-FAIRE 2018 - Green Thumb Garden Journals

Hello friends.  My last post for Papertrey Ink's Stamp-A-Faire challenges, and this last one had Heather Nichols showing us how to make small 3 1/2 x 5 inch journals for gardening.  What to do if you don't have a green thumb though??  I've been able to keep a Philodendron plant in my house alive for about for about 15 years now because I only remember to water it about once every other month and it seems to be ok with that, and my hubby takes care of the outside gardening...mostly just Hostas.  So as beautiful as Heather's journal was, I would have had nothing to put in it except for maybe stamped flowers!  With that being said, I went in a little different direction and made a prayer journal instead to use with a new bible study class I'll be taking this Fall.


I used DSP from an old PTI pkg. called Text-Style: Fall Prints & Patterns along with one of the frames from the Pierced Feature Frames dies, and then stamped my sentiment (ombre style) in the middle from the New Every Morning stamp set.


Used the Garden Of Faith stamp set and a strip of DSP from the same Fall Prints & Patterns pkg.


Sentiment also from the New Every Morning set and images from the new Fence Line: Autumn set.


Sentiment from the Choose Joy stamp set and die cut gift card holder from the same Fall Prints & Patterns pkg.  My little card has a verse from Roman's that was part of my daily bible reading last week that I had written on a piece of scrap cardstock so I would remember it, and seemed perfect to add to my little holder!  The leaf is from the new Forest Floor: Autumn set.

  
Sentiment and images here are also from the new Forest Floor: Autumn set.  This is as far as I've gotten, but didn't want to miss the deadline for adding my link.  Hope to finish soon and will show the rest of the pages if anyone is interested.

Check out Heather's beautiful journal and instructions HERE.

Thanks for stopping by today ... I love it when you do!


Tuesday, August 28, 2018

PTI's STAMP-A-FAIRE 2018 - Garden Whimsy Pop-Up Box

Hello friends.  Still playing with Papertrey Ink's Stamp-A-Faire challenges and Lexi Daly had a great one featuring a pop-up box using flowers.

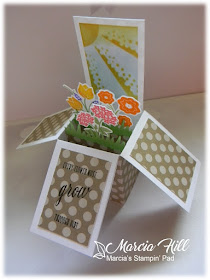
I printed off the pdf file for the pop-up box on some older kraft DSP that is white on one side and polka dotted on the other side, and then put the box together.


I used the sun stencil from the Sun & Surf Collection for the back upper panel to mimic the sun and sky that Lexi used in her pop-up box, and then added more polka dot kraft DSP to the white sides and front of the box, stamping my sentiment from the Friendly Flowers stamp set.


My grass was die cut from an older Impression Obsession die and my flowers were stamped from the Bitty Bouquets stamp set and then fussy cut.  It really went together quite quickly and love that it folds flat for mailing!

You can check out Lexi's adorable box and video right HERE.

Thanks for stopping by today ... I love it when you do!


Monday, August 27, 2018

PTI's STAMP-A-FAIRE 2018 - Planting Your Garden with Dawn

Hello friends.  Another post for Papertrey Ink's STAMP-A-FAIRE event, and this time I'm playing along with Dawn's challenge of Planting Your Garden.

Dawn wanted us to use 8 colors, stencil, and die cut...I did not stencil because I liked the leaves from the Garden Party stamp set and I did not have the dies to create my own stencils, so I left out that part and came up with this:


I used 3 shades of green for my leaves (Green Parakeet, New Leaf, & Ripe Avocado) and then stamped and fussy cut my flowers using Pure Poppy, Scarlet Jewel, Hibiscus Burst, Lovely Lady, Bright Buttercup, Cocoa Bean & Hawaiian Shores inks.  My brown leaves were from Farmer's Market Florals and since I didn't do the stenciling I added the Cover Up: Grid stamp over my  background in Hawaiian Shores like Dawn showed in last weeks Make It Monday challenge...LOVE that look!!  My sentiment was die cut using Big Basics: Wish Big die and Hawaiian Shore cardstock.

Check out Dawn's lovely card and all the fun from the Stamp-A-Faire event right HERE.

Thanks for stopping by today ... I love it when you do!


PTI's Stamp-A-Faire 2018 - Water Your Flowers with Betsy

Hello friends.  Doing a little catch up after a busy weekend and playing along with a few of the challenges from Papertrey Ink's STAMP-A-FAIRE event.

Betsy Veldman has become quite the water color queen and made it look so easy to water color a simple poppy flower...note quite so easy for me but still had FUN!!


I used the Poppy image from the Stemmed Statements set and stamped it first in Soft Stone ink and then did my water coloring using my Kuretake Gansai Tambi water colors.  My sentiment is from the Winter Woods stamp set and then I used the Mix & Mat: Postal dies for my layers.

Check out all the fun right HERE.

Thanks for stopping by today ... I love it when you do!


Friday, August 24, 2018

Color Throwdown #507

Hello friends.  This week's colors at the Color Throwdown challenge are SOOOO pretty...love them!!


I was totally inspired by the leaves on the comforter, pillows, and curtains, so decided an Autumn card with these colors was in order!


I started by using a really OLD die from Cuttlebug (the kind that is a square metal plate with the foam on it...remember those???) for the leaf shape, and then it has a embossing folder to add all the veins and outline.  I used a sponge dauber to add my inks (Green Parakeet, New Leaf, Aqua Mist, & Elegant Eggplant) and then did a little water splattering.  My sentiment is from Clearly Besotted's Autumn Flowers and is stamped in the Elegant Eggplant ink.  A little bit of scoring around the edges finished up my CAS card.


There's still time to play along with this challenge, so check it all out right HERE.  

Thanks for stopping by today ... I love it when you do!


Thursday, August 23, 2018

Make It Monday #333 - Layering Patterns Over Images

Hello friends.  This week's Make It Monday challenge has Dawn showing us how to layer patterns over our stamped images...check out her BEAUTIFUL cards and great video on "how to" right HERE.

Dawn does flowers so well and I totally wanted to pull all my floral stamps out for this challenge, except that all my new goodies from this latest release had just arrived and I just HAD to play!!  So we'll just pretend that all the Autumn gourds are flowers, ok??


Other than the stems these 2 and 3 step gourds are so easy to line up, and the stems were only an issue I think because of my eyesight...getting a little old here friends!!  But anyway, did some masking to be able to fit 5 of them in on my vertical orientation and then used the Cover Up: Grid stamp in Honey Nut ink over my stamped gourds (Simply Gourd-eous).  Next I used one of the To The Point Edger's II dies to cut off the bottom third of my stamped layer and added it to a Honey Nut cardstock base.


I finished by adding my sentiment from the Words To Live By: Gratitude stamp and die set and also added a few iridescent sequins and a piece of jute twine at the top.

This was definitely a FUN challenge and I will use this technique again with actual flowers next time!  Check out Dawn's beautiful cards and video right HERE and then play along!

Thanks for stopping by today ... I love it when you do!


Tuesday, August 21, 2018

Twofer Challenge #8 - Geometric Shapes

Hello friends.  This month the Twofer Challenge is all about GEOMETRIC SHAPES!


Math was never one of my strong suits in school, so I've had a hard time wrapping my head around this challenge!  And just so you don't think I'm a complete dunce, I do know my shapes, so this really shouldn't have been such a hard challenge at all!  In fact, once I got started, it wasn't hard at all...it was just that old math block messing with my head!!  But anyway, I used a PTI die called Bold Borders: Flare Die for both of my cards and I used it mostly for the rectangle shape in the center, but the die has lots of triangles in it too!  That makes it kind of a "twofer" right there, doesn't it?!!


I made a Fall-ish feeling thank you card and a birthday card using the same Bold Border: Flare Die.


For my thank you card I stamped the center rectangle with my ombre sentiment from PTI's New Every Morning stamp set with Aqua Mist, Hawaiian Shores, & Tropical Teal inks.  I used those same inks plus Berry Sorbet, Pale Peony, Kraft, & Cocoa Bean to stamp my leaves from PTI's Leave It Be stamp set, and then arranged them around the bottom and left side of the white die cut Bold Border: Flare that I adhered to my white card base.  I love doing white on white cards!!  A little bit of Aqua Baker's Twine and a few iridescent sequins finished off my thank you card.


My birthday card features the same Bold Borders: Flare Die cut out in Berry Sorbet cs and also used as my background over a white card base.  I also die cut a 2nd one to use as a stencil over the center rectangle with Abandoned Coral DOX ink so my birdies (PTI - Brushed Birds...nope, not even remotely tired of using them yet!!) had a pretty background to sit upon.  A little tag from PTI's Tiny Tags and some white bakers twine finished off this card.

Only a few more days to play along with this challenge (closes on the 24th), so hopefully you haven't procrastinated like me!  LOTS of FABULOUS inspiration from the DT and in the gallery already, so check it all out right HERE and then play along...Darnell and the gang will be so happy to see you there!

Thanks for stopping by today ... I love it when you do!


Monday, August 20, 2018

Heirloom Ornament Snowflakes

Hello friends.  Hope you all had a great weekend!  It was muggy and warm in my neck of the woods this weekend, so I spent most of it in my craft room stitching up some felt snowflakes with PTI's new Heirloom Ornament snowflake die.  Didn't cool me off any, but I sure had FUN...these are very addicting!!


One thing I learned is that cheap felt does NOT work well on these snowflakes...you need a good WOOL felt like PTI sells!  The pink ornament was made with inexpensive felt from the big box craft store, and does not hold it's shape well, and doesn't die cut well either.  Also much flimsier than the other colors I made!


This white wool felt was from my local fabric store, and they sell a few colors, but not all the beautiful colors that PTI sells!  Hard to see in my photos, but I used a gold thread along with my embroidery floss to do the stitching, so along with the iridescent sequins and beads, theses snowflakes really do shimmer and shine!


The Aqua Mist snowflake was the only actual PTI felt I used (I have a bunch of other colors, but none of them look like snowflake colors...more like flower colors!!).  Can you see the difference between the PTI wool felt on the Aqua Mist and the regular pink felt?  The pink snowflake is pretty enough, but a lot harder to stitch on and just very flimsy compared to the Aqua Mist one.


Aren't the blue ones pretty?!  I used silver thread along with the blue and white embroidery floss and they really sparkle IRL!  Here's a close up:


These were definitely FUN and EASY to stitch up and will look great on my Christmas gifts this year and a few for my tree too...after I order some more felt that is!  :0)

Thanks for stopping by today ... I love it when you do!


Friday, August 17, 2018

CAS Christmas - Tree

Hello friends.  This month's challenge at CAS Christmas is all about adding a TREE to your Christmas card.


Here's what I came up with using one of my favorite Tim Holtz tree dies:


I started by die cutting a rectangle into the center of a piece of copy paper and using it as a mask to blend some Bundled Sage distress ink into the center of my card base.  I kept the mask in place and used the ink twice more with 2 older (and retired) SU! background stamps, first the Print Pattern stamp, and then the script from the En Francais stamp over top of the first stamp.  Next I adhered my die cut tree (TH - Woodlands) in Pear Pizazz cs to the card base, and then finished off with a simple piece of jute, a few iridescent sequins, and my sentiment from PTI's Christmas Blessings stamp set.  I love that it's almost one layer too...easy to mail!!


When I pulled out my tree dies, there was one already die cut from gold mirror cs and thought since I had everything already out I'd make a 2nd card.


This one's not one layer, but still pretty minimal, and I used Vintage Photo ink to give it a more "vintage" look rather than the Bundled Sage green of my 1st card.  I like them both...which one do you prefer?

This challenge is open till the 24th and it's a great way to get a head start on those Christmas cards!  There's lots of GORGEOUS inspiration from the DT,  so check it out and play along right HERE.

Thanks for stopping by today ... I love it when you do!


Thursday, August 16, 2018

CAS Watercolour August 2018 Reminder - SUNFLOWERS

Hello friends.  Just a friendly reminder that our CAS Watercolour challenge using SUNFLOWERS is open till the 24th, and we'd love to have you play along with us!


For my card I used an Impression Obsession set (WP639 Sunflower Set) by Dina Kowal that is a 4 step stamp set that I absolutely LOVE!!  Take a look:


I used the Faux Water Color technique for this card and my MISTI...for each of the 4 steps, after I inked the stamps, I spritzed VERY lightly with water.  I emphasized the VERY because I was a little too heavy handed with the water the first time around, and I ended up with a muddy mess...grrrr!  By spritzing just lightly, I was able to get the ink color to move just enough to give the water color effect.  For my inks I used Altenew's Summer Afternoon set of 4 inks, which include Buttercream, Warm Sunshine, Caramel Toffee, & Paper Bag.  I love their sets of coordinating inks...takes all the guess work out of which colors work in a gradient effect!


I used Altenew's Frayed Leaf and Forest Glades inks for the leaves, and the sentiment also comes from the WP639 Sunflower Set.  I added my panel to a white card base and then added a die cut white frame from PTI's Cover Plate: Pretty Frame Die to define the focal point of my card.

Again, this challenge is open till the 24th, so check out the inspiration from the rest of my teammates and our Guest Designer Izzy Scrap, and then play along right HERE.
 
Thanks for stopping by today ... I love it when you do!


Tuesday, August 14, 2018

Create Along With Us - August 2018

Hello friends.  Playing along with this month's Create Along With Us challenge, where during release week, you can pick a favorite card from one of the DT and re-create it with stamps that you have.
It was so hard to choose this week as every card from every designer has been absolutely FABULOUS and just FULL of color...FALL COLOR!  There have been so many new color combinations for Fall that I never would have thought of like Dawn's Peach and Aqua, Melissa Phillip's pastel colors (for Fall?  Yep, totally worked!!), Melissa Bickford's BRIGHT primary colors, and the one that drew me the most...Spring Rain, Ocean Tides, & Enchanted Evening from Laurie Schmidlin!

 
Something about this card just totally draws me, and the way she blended these 3 colors together that I never would have thought of using in the first place, just blows me away!!  I am SO excited about this release and want it ALL...especially the Text & Texture: Leaves like Laurie used for her background!  Obviously not having that stamp yet, I decided to try using Text & Texture: Roses and came up with this:

 
My colors are a little darker than Laurie's as I had to stamp multiple times (using my MISTI) to get even coverage of each color...I think my little cubes are getting dry!  


After stamping the image I trimmed off the edges and then cropped the corners like Laurie did.  My grateful die cut using silver mirror cs came from the Especially You set, along with the rest of the sentiment that I stamped on a white strip.  I used a really OLD punch for my little heart using Pure Poppy cs and didn't stitch it like Laurie did...I love that look but it would not have looked too good with my sewing skills!


While the roses don't necessarily say FALL, I still really like how this card came out and will definitely use this color combination again!

You can check out all the beautiful cards on Papertrey Ink's site and then play along right HERE.


Thanks for stopping by today ... I love it when you do!