Pages

Thursday, September 27, 2018

Make It Monday #337 - Packaging With Printed Papers

Hello friends.  This weeks Make It Monday challenge has Melissa doing a picture tutorial on different packaging techniques with printed papers to get us ready for the upcoming holidays!

I have 2 to share with you today...they're just too much fun to make to stop at one!!  My first one I did a lot of CASE-ing of Melissa's because I just LOVED her paper choices!!


I used the Pillow Box Die with the Aqua Mist Bitty Big DSP and tied a sheer red ribbon around it...LOVE aqua and red together for Christmas!!  I used the Made With Love Tags 2 die and Real Red Bitty Big DSP for the back layer and white for the top layer and then added the cup from Merry Mug, the Be Merry is from the Bold Borders: Yuletide, and the snowflake is from Fancy Flakes.


This close up shows a bit better the sparkling embossing powder I used on the whipped cream, the candy cane strip on the cup, and the snowflake.  It really sparkles IRL!!  I tied the tag to the ribbon with red & white bakers twine.

For my 2nd one, I started with Kraft Bitty Big DSP and the Pillow Box Die and some more sheer red ribbon.


I used the same Made With Love Tags 2 die with Real Red and white cs and then stamped the white part of the tag with the Quoted: Favorite Things stamp set with Real Red and Kraft inks.  I added the Dash Away All die cut from Kraft cs and sponged the edges with Vintage Photo DI, and then pop dotted it on my tag.

 
I finished by tying the tag to the ribbon with red & white bakers twine, and also added another Fancy Flakes snowflake under the sheer red ribbon.

These were both so fun to make, and I already have a couple more cut out that just need to be decorated yet.  Christmas is such a FUN time to craft for!!  Check out Melissa's 3 FABULOUS gift packages HERE and then play along!

Thanks for stopping by today ... I love it when you do!


Tuesday, September 25, 2018

Papertrey Ink Blog Hop - Sept. 2018

Hello friends.  Feels like forever since the last Papertrey Ink Blog Hop, (last month the 25th fell on their Stamp-A-Faire weekend, so they didn't have the blog hop) so I'm thrilled it's the 25th and can play along!  We had a beautiful Fall table setting as inspiration for this hop...take a look!


Isn't is GORGEOUS?!!  Loved everything about this photo, but in the end I went with a real CAS style (which seems to be my favorite style lately!) and just incorporated some of the color, the pumpkins, and the leaves.  Here's what I came up with:


My first thought was to stamp a plaid background because I just love the colors in the tablecloth, but it didn't really go with my vision of CAS!  So anyway, I used an Aliexpress die to do a white on white plaid for my background, and then added the pumpkins from Simply Gord-eous and the leaves from Leaf Prints.


I stamped both on kraft cardstock and had fun doing a bit of blending around the edges and also adding some aged copper embossing enamel to the leaves.  A little banner tag from Stemmed Statements with a piece of rustic twine and a few rainstones finished off my card.

It's always fun to see how everyone else interprets the inspiration photos, so I'm off to hop around!  You can too by clicking right HERE.

Thanks for stopping by today ... I love it when you do!


Monday, September 24, 2018

Washi Christmas Tags

Hello friends and Happy Monday!  Hope you all had a great weekend!  It was cool AND sunny here in my neck of the woods and I couldn't have been happier!  Actually made a roast (with all the fixings!) and apple dumplings for dinner yesterday and also had a great time in my craft room making Christmas Washi tags!  And the house smelled divine while I was crafting away!

Washi Christmas tags?  Dawn McVeigh had a FABULOUS post last week (HERE) showing Autumn tags she had made using Washi tape and they were SOOOO pretty!  Make sure you click on the link to them if you haven't already seen her post!!  Dawn said a lot of us (including me!) had asked her what she uses Washi tape for, and that was why she had done her post.  I've gotten sucked into buying the pretty rolls of tape and then they sit there, other than to hold a die in place or put across the back of an envelope, so Dawn's post really got me going.  Take a look at what I did yesterday:


Yeah, I may have gone a bit crazy, but they were so FUN and EASY to make!!  Dawn added a lot more to her tags, but I kept mine very simple so the Washi Tape and my sentiments were the stars!


I started by cutting 3 1/4 x 3 3/4 inch pieces of white cardstock and then added my strips of washi tape, starting at the bottom and going up until my piece was totally covered.  Then I used the Tag Sale #12 die (PTI) to cut out the ornament shape and oh how pretty!!  Between the edges of the die and the Big Shot, the washi tape is firmly adhered to the cardstock...I was worried that maybe the edges would start to pull up, but they are solidly attached!


My next step was simply die cutting the nesting circles (included with the die) and then stamping the sentiments.  This "be very merry" stamp is an older SU! one and the others are all from PTI's Christmas Blessings stamp set.


I did make a trip to Michael's and Hobby Lobby this weekend to grab a few more rolls and Hobby Lobby had great Christmas rolls on sale for 40% off, so that's where some of my washi tape designs are from and the rest were just what I already had on hand from collecting over the years.

Most years I do a wrapping theme of sorts for our Christmas gifts, and this year I'm going to use just plain kraft paper on all our gifts with red and green tulle for the bows...these tags are going to look fantastic on my packages!!

 
So there you have the recap of my weekend and I couldn't be happier with the head start I got on making tags!  Many thanks to Dawn McVeigh for her wonderful creativity and inspiring me to make my own Washi tags!!  :0)

Thanks for stopping by today ... I love it when you do!


Thursday, September 20, 2018

Make It Monday #336 - Faux Gilded Leaves

Hello friends.  This weeks Make It Monday challenge has Laurie Schmidlin showing us how to combine copper, platinum, & gold embossing powders to create a faux gilded look.  You can check out Laurie's STUNNING card and video right HERE.

Here's what I came up with:


I started with a background using Winter Wisteria cs and ink with last months Text & Texture: Leaves stamp.  Rather than just a cluster of gilded leaves, I decided to make a wreath and decorate it with the leaves and a few flowers.  I used the Rustic Wreath die and then added the copper, platinum, & gold embossing powders.  It looked pretty but it was missing something, and I think it's the last step of stamping over the top of the embossing like Laurie shows in her video.  I did decide to leave it plain though and focus on the leaves from Leave It Be and Leaf Prints.  The larger leaf in the center I stamped on Scarlet Jewel cs to tie in with the flowers from Farmer's Market that I wanted to add.  I also added a little bit of WOW Verdigris embossing enamel  on the center leaf to add a bit more color.  The smaller leaves on each side were stamped on Winter Wisteria cs and embossed with the copper, platinum, & gold embossing powders.  I set my wreath die cut off center and then added the larger frame from the Pierced Feature Frames...I love these frames!!

  
Hopefully you can see the shine a bit better in this close up photo.  To finish I added a piece of twine and a Tiny Tag that was also stamped with the Text & Texture: Leaves stamp set.  Kind of different colors for a fall card, but I really like the way it turned out!

Make sure to check out Laurie's lovely card and great video (HERE) and then play along.  It's a FUN challenge!!  :0)

Thanks for stopping by today ... I love it when you do!


Tuesday, September 18, 2018

CAS Mix Up & CAS Watercolour - Sept. 2018

Hello friends.  One more card to share for this month's CAS Mix Up and CAS Watercolour challenges.  CAS Mix Up is looking for the marker direct to the stamp technique and CAS Watercolour is challenging you to use a TREE on your cards...I combined both for this CAS Christmas card.

I used a stamp from the Deep Red company called Winter Pines and colored it up with 3 different markers (2 SU! and 1 Tombow) and then spritzed it with water before stamping on my cardstock.  I love the simple water colored look of these 3 pine trees clustered together!  I die cut the panel out with a wonky stitched frame die from Gina Marie Designs and then added a die cut deer (Gina Marie Designs) that I sponged with Vintage Photo Distress Oxide ink before pop dotting to my panel.  I mounted this to a white card base and then added a piece of rustic jute and a tag from PTI's Tiny Tags


Both of these challenges are open through next Monday the 24th, so check out all the beautiful inspiration from both teams and then play along with one or both challenges.  You can find the CAS Mix Up info HERE and the CAS Watercolour info right HERE.


Thanks for stopping by today ... I love it when you do!


Sunday, September 16, 2018

CAS Watercolour September 2018 Reminder

Hello friends.  Just a friendly little reminder that there's just over a week left to play along with this month's challenge over at CAS Watercolour.


This month's challenge is all about TREES, and I used an older but beloved SU! set called Sheltering Tree.


I embossed my tree with Early Espresso ink and clear embossing powder, and then stamped my leaves.  This was a bit of a messy process, but I really like the way it came out!  I used my craft mat and sprinkled some Orange Brusho's onto it, and then spritzed with water.  At this point I used the stamp for the leaves and pressed it into the craft mat with the Brusho's and then stamped it over the tree base.  It looked like a giant puddle when I first stamped it and thought I would have to try something else, but once it dried (with the help of my heat tool) it didn't look too bad.  I stamped another layer on top using Crimson Brusho's this time, and again it looked very puddly (is that a word??), but once it dried, I really liked the look of the two colors together!


At this point I added the swing and then attached a strip of Soft Suede cs that I embossed in gold with my sentiment (PTI).  I tied a piece of rustic jute around this panel and then added a layer of fun foam behind it before adhering it to a dry embossed panel that my dear friend Bonnie gifted me last year when I couldn't find the embossing folder anywhere.  (Aren't stamping friends the BEST?!!)  Both panels were attached to a white card base and done.

Make sure you stop by to see all the GORGEOUS inspiration from the DT and our very talented Guest Designer Ros, and then play along with us right HERE.  Remember to keep it CAS (LOTS of WHITE!!) and can't wait to see you in the gallery!

Thanks for stopping by today ... I love it when you do!


Friday, September 14, 2018

Create Along With Us - Sept. 2018

Hello friends.  Every month when Papertrey Ink has their Create Along With Us challenge, I struggle to pick only one card to CASE from their new release designs, but this month was extremely hard as every day I've been seeing cards and projects that I want to copy!!  Their design team has really outdone themselves for this Christmas release!!

I couldn't narrow it down to just one, so I chose 2 (a card and a project) to CASE for this challenge...both from Day 1.  My card is from Laurie Schmidlin and my project from Kelly Lunceford.


So technically I have 3 projects to share with you today...couldn't resist making a couple of Kelly's houses along with Laurie's card.


So let's start with Laurie's card.  She introduced the new Merry Mug set, and I think it's the stripe pattern that you can stamp across the center of the mug that really appeals to me.  I had to improvise a little with what I had on hand, but I think it came out pretty darn close!  The tea cup is from the Fancy Tea Cup die, and then I used Aqua Mist ink to make a stripe pattern using a Winnie & Walter stamp from the Holiday Trimmings set (CP).  My little holly die cut is from the Holly Jolly die and I added some Nuvo Drops in Autumn Red for the berries.  My cream on the top is from an IO stamp and my "Merry Christmas" sentiment is from an older HA stamp.  My background uses the Mix & Mat: Berry Boughs.  I love how Laurie had blended Aqua Mist ink on her 2nd layer, so I did that also.  Such a fun and homespun feel to this card.


I absolutely LOVED Kelly's houses using the Tiny Town dies, and just had to make a couple!  I never thought of using DSP for these houses before...I've always just used colored cardstock.  Aren't they so adorable with the patterned papers though?!  Kelly used Soft Stone Bitty Big DSP for her houses, but I didn't want to totally copy her, so I went with the Kraft Bitty Big DSP in the polka dots and stripes.  Kelly was using the new Sentiment Staples: Christmas set for her tags on top of the houses, but since I don't have those yet, I used a banner and sentiment from Just A Little Something for the tops of my roof, along with the holly die cut from Holly Jolly.


I used red & white twine to close my boxes up and the little wreath's on the front windows are from the Tiny Town: Gingerbread House die set.  I also added tiny little dots of the Nuvo Drops for berries on the wreaths and the holly.  My bottoms to the houses used the Shape Shifters: Circle 3 with Aqua Mist cs.


And here's one last picture showing the striped house:


These were all a lot of FUN to make and I'm so excited to have a couple small gifts boxes ready and another card for my stash.  If you haven't checked out all the excitement and fun with Papertrey Ink's new release, check it all out right HERE...it's going to be an expensive month for me as I want it ALL!!

Thanks for stopping by today ... I love it when you do!


Wednesday, September 12, 2018

Twofer Challenge #9 - LEAVES

Hello friends.  I am so excited because this month's Twofer Challenge is all about LEAVES!!  Can you tell by my header that I LOVE leaves??!!


I used a Gina Marie Designs oak leaf die and came up with these 2 cards:


Don't you just love the colors of Fall?!  I love the cooler temps too, but it's the colors that get me every year!  The reds, yellows, and oranges are spectacular here in Michigan, and although the leaves haven't started changing colors yet, they will be in another couple weeks, and then it will be an explosion of color!!


My first card uses both the leaf dies that come in this set by Gina Marie Designs, and I used a scrap of Yupo paper that I had used alcohol inks on...there was just room enough to cut the 3 leaves...YAY!!!  I made this a very CAS card so as not to take away from the beauty of the colors!  Here's a closer up view:


Before mounting my leaves onto my white panel, I used PTI's Mix & Mat: Flourishes die to die cut the frame with holes...love how it frames out my colorful leaves!  I used a Pure Poppy panel behind the white layer (love how you can see the red behind the holes!) and then attached both to a white card base.  Some jute twine and a Tiny Tag (also PTI) with "thanks" stamped on it finished my 1st card.


For my 2nd card I used the same smaller leaf die...can you see it??


Can you see it NOW??!!  I used my die with an embossing rubber mat so that it only left the outline of the oak leaf and didn't cut it like I used it for the 1st card.  I love the subtle background it made for this adorable little girl from Penny Black...Hello Autumn.  I embossed her in black and then colored her with my Copics, and then fussy cut her out.  I added a Pierced Feature Frame (PTI) around my Honey Nut background and attached both to a white card base.  The little girl is pop dotted to add some dimension to my card too.  I also added some jute twine to finish off this card like the first one.

Make sure you check out all the wonderful inspiration Darnell and the DT have provided to get you started and then play along right HERE.

Thanks for stopping by today ... I love it when you do!


Monday, September 10, 2018

CAS Christmas Sept. 2018 - WREATH

Hello friends.  This month's challenge at CAS Christmas is to use a WREATH on your card.


Well I do happen to have a few wreath's in my collection (hahaha!!), so the only struggle with this challenge was which one to use?  A stamp? A die?  Hmmmmmmm…


I finally decided on an oldie but a goodie from Reverse Confetti Wreaths Confetti Cuts.  I cut one using kraft ink that I had stamped first with SU!'s Sheet Music background stamp, and then cut another of the wreaths from just plain kraft cs.  I left the inside of the piece of the wreath that I had cut with the music to go along with my sentiment of the Christmas Carol "Joy To The World".  My sentiment comes from WPlus9's A Hand Lettered Holiday stamp and die set.  The Poinsettia is a Gina Marie Designs die and the couple pine sprigs I added are from Penny Blacks new Christmassy die set.  I finished with a simple piece of jute twine at the top.

LOTS of beautiful inspiration to inspire you to play along with this month's challenge...you can check it all out right HERE.  This challenge is open till the 24th of this month.

Thanks for stopping by today ... I love it when you do!


Friday, September 7, 2018

Make It Monday #335 - Pop Up Slider Cards

Hello friends.  Betsy is up this week with a FUN Make It Monday challenge using a little bit of creative engineering to make a pop up slider card.

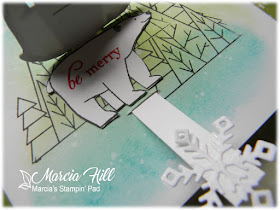
Watched the video twice to make sure I knew what I was doing and still had to really think when it came time to insert the sliding mechanism...good thing I like art better than engineering!  But it was still a FUN technique and I got one more card done for my Christmas stash using the Warmest Wishes stamp set...


Did a little bit of ink blending using Peacock Feathers and Mowed Grass Distress Inks for my background, (and also did a little water splattering to resemble snow) and then did some masking with the tree image from the set.  Stamped my bear twice and fussy cut both out and then used Pure Poppy to ink up the sweater and fussy cut that also to add to the bear.


Because I had my trees in the background there wasn't a really good space to stamp my hidden sentiment, so that's why I stamped and cut out the 2nd bear.  It doesn't get covered completely when the top bear is flat, but the 2nd one doesn't show enough to make it look bad.


In this close up you can see a bit better that the snowflake I added for the pull tab was WOS'd  to make it a little more festive!  My sentiment on the top of the card is from the Think Big Favorites #10 that I curved using my MISTI.

This was definitely a fun technique to play around with!  Check out Betsy's amazing card and video right HERE and then play along.

Thanks for stopping by today ... I love it when you do!


Wednesday, September 5, 2018

CAS Mix Up - Sept. 2018

Hello friends.  The challenge this month at CAS Mix Up is using one of my all time favorite techniques...using markers on your stamps!


I actually have 2 cards to share with you today...both of them using older Penny Black stamps that I found in my stash awhile ago from 2006 & 2007, and also never before used...GASP!!


This one is called Flying Stars (2007) and I used some SU! and Tombow markers to color the stamp and then very lightly misted with water (rather than huff and puff!!) before pressing onto my cardstock.  I love how bright and sunny it came out looking!!


It almost reminds me of embroidery.  I die cut my panel using a wonky stitched frame from Gina Marie Designs and then adhered to a white card base and finished with a sentiment from PTI's Beautiful Berries: Spring and some white baker's twine.

My 2nd card is a bit more Fall feeling with the darker purples (Eggplant) and greens, and uses the other Penny Black stamp I found from 2006 called simply Asters.


I used SU! markers to color the flowers and leaves, and then used what I thought was a LIGHT gray Tombow marker for the Heidi Swapp background...it came out a lot darker than what I had imagined, but it was still pretty, so I finished it into a card using a die to cut the stitched oval (Gina Marie Designs) and stamping the sentiment from PTI's Keep It Simple: Birthday.

This was such a FUN challenge, I just might have to play again!!  The challenge is open till the 24th, and you can check out all the amazing inspiration from the DT and play along right HERE.

Thanks for stopping by today ... I love it when you do!