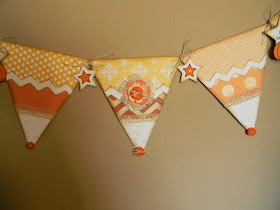
Good morning friends. Today I'd like to share a banner project with you that I made this past weekend after seeing the one Melissa Phillips made on her blog. My photo's aren't the greatest, but I think you should be able to get the main idea! Take a look:
This was SO much fun to make! A bit time consuming, but now that I'm an empty nester, I have more time for things like this. I did not have the banner die that Melissa used, but I just cut 5 pieces of white cardstock at 5 1/2" x 6" and then made a pencil mark in the center of the 5 1/2" end, and then used my cutter to make the 2 diagonal cuts to form a triangle. You can make these any size you want, this is just what I came up with. Then came the fun decorating part...just choose scraps of yellow, orange, and white to make it look like candy corn. I added lace, buttons, chevron strips (PTI die), stars (Spellbinder dies), pumpkins (smallest oval Spellbinder die), flower (PTI die), seam binding ribbon (colored with Pumpkin Pie marker - SU!), and hemp cord to link the 5 triangles together. I also sponged all the edges with Baked Brown Sugar ink (SU!) to give it a bit of a vintage look.
Thanks so much for stopping by today and taking a look, and I hope I've inspired you to try a banner of your own. These can be made for any occasion and my youngest liked mine so much she requested I make her one for her dorm room with her school colors (FSU). Make sure you check out Melissa's blog for her great picture tutorial on how to make these banners. Lots of fun and well worth the time involved! :0) Have a great Wednesday!!


That turned out very pretty. I'll have to stop by to see it in person :)
ReplyDeleteSo cute, Marcia! Well worth the effort!
ReplyDeleteJust darling! I just love every last details. Sweet as can be. Thank you for sharing.
ReplyDeleteMelissa
What a fantastic banner! Love the candy corn look - now I"m craving some and I haven't had any in years. :)
ReplyDelete