Pages

Wednesday, May 27, 2015

Merry Monday #160 - Newsprint

Hello friends.  I'm playing along with the Merry Monday challenge where we are to use newsprint on our Christmas card.  I don't know why, but when I think newsprint, I think "vintage", and that was what I was going to do, but........  I saw a photo on Pinterest that totally changed my mind though, and this is what I came up with:


I wish you could see this card in real life, as the colors are much deeper, but for some reason my camera has lightened it up...grrrrrrrr!  But anyway, I started with a piece of newsprint DSP (SU!) and used Salty Ocean and Shabby Shutters distress inks to add the color.  Next I embossed with white using one of the stamps from Gorgeous Grunge (SU!) to look like falling snow.  My die cut snowflakes (Memory Box and Impression Obsession) were dipped in silver embossing powder before being added to the card, and then I added a sentiment banner with the "be very merry" (SU!) and a few diamond jewels to finish the card.


Don't you just love those ornaments in the inspiration photo?!!  I may have to try my hand at making a few of those!!  There are lots of beautiful cards for you to check out from the Design Team and players, and you can find them all right here. 
 
 
Thanks so much for stopping by...I love it when you do! :0)

Flower Favorites

Hello friends.  Just a quick post today to share a card I originally made for this months blog hop at Papertrey Ink, and then decided to use another card for the hop instead of this one.  I still liked this rainbow colored card though, so here it is:


I used PTI's Flower Favorites to stamp the flowers in Harvest Gold, Orange Zest, New Leaf, Pure Poppy, and Winter Wisteria inks.  For the stripes at the top and bottom I used the Plaid Builder and used some of my SU! markers direct to the stamp and then to the cardstock.  The tag is Fillable Frames #9 and the sentiment is from the Flower Favorites stamp set.  The colorful blocks to the left were to mimic the blocks in the inspiration photo from the blog hop.  My favorite thing about this card and stamp set????  The lady bug!!  It's just the perfect size to be perched on one of the stems and I love it!! :0)

Thanks so much for stopping by today...I love it when you do!! :0)

Monday, May 25, 2015

Papertrey Ink May 2015 Blog Hop

Hello friends.  It's blog hopping time at Papertrey Ink, and that makes for a happy Monday for me...I love seeing all the creativity everyone comes up with!  Especially since I'll admit this month's inspiration photo threw me for a bit of a loop!

Blog Hop Inspiration

I don't think it was the blocks that threw me so much as it was the colors.  For some reason I was only seeing the bright primary colors, and I don't as a rule stamp much with just primary colors.  However, once I started looking a lot more closely, I was able to see all the different rainbow shades, and came up with this:


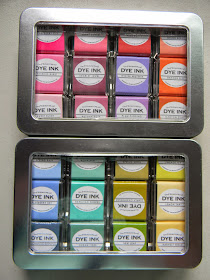
When I first started following Papertrey Ink, I decided to start with just a few of their ink colors in the small cubes, and I ended up loving the size of them so much that I've been adding a few to every order. 


I've got a third case started, but just took a photo of the two full ones to show you how I store them...they are Tim Holtz cases (meant for the distress ink cubes), and they work perfect to store and see at a glance which color I want to use.  Anyways, this was kind of my jumping off point to make today's card.  I simply used a piece of acetate and stamped each cube color onto it, misted it, and then pressed my cardstock (Papertrey Ink's Linen Cardstock) onto it.  After it dried I stamped one of the images from Doodlie - Do in black ink onto the smaller piece, added my sentiment and a few enamel dots along with a piece of black and white bakers twine.  A little hard to see in my photos, but also colored in some of the dots with my white gel pen.  Not my usual style of card, but I have to say that I like how it turned out. :0)

You can check out all the other entries and play along with this months challenge over on Nichole Heady's Blog. 

Thanks so much for stopping by today and have fun hopping! :0)
 

Thursday, May 21, 2015

Merry Monday #159 - Non Evergreen Tree's

Hello friends.  Playing with the Merry Monday challenge today, where we are being asked to use non - evergreen tree's on our Christmas card.  I have lots of Oak and Maple tree stamps, but none of them make me think Christmas.  And of course I have a ton of evergreen tree stamps!  Oh dear, what to use?!!!  Oh wait...don't I have a birch tree winter scene stamp???  Yep, somewhere!  Found it!!  And I even have an idea!  And then I sat there and stared and stared at it...my idea in my head was not going to work, was it?!!  So anyway, I have no white birch tree's to show you this morning.  I have colorful tree's against a silvery night sky...but I actually like it!  What do you think???


My background is a combination of distress inks (Tumbled Glass, Stormy Sky, Faded Jeans, Salty Ocean, & Picked Raspberry), and then I embossed with silver, Hero Arts Merriest Christmas Wish stamp.  I matted this panel to a white card base and then added another white panel over top with a circle die cut (Lil Inkers).  My sentiment is from PTI's Christmas Blessings.


You can check out all the great cards from the DT, players, and get all the info to play along right here. 
 
Thanks so much for stopping by today...I love it when you do! :0)

Wednesday, May 20, 2015

Make it Monday #212 - Fussy Cutting

Hello friends.  Was thrilled when I watched this weeks Make it Monday video, where Ashley shows us some great tips on fussy cutting, as I'm one of those odd ducks who happens to actually like fussy cutting!  However, I never thought of fussy cutting out sentiments, so thank you, thank you Ashley, as I love that idea!

  
I even used one of my Pencil Paper Wrap pencils to outline my sentiment from the Pretty Petals stamp set.


I love this little stamp set...it is SO easy to make a quick and pretty card!  I used Aqua Mist for the flowers, Lemon Tart for the centers, and Limeade Ice for the leaves.  A little hard to see in the photo, but I used Glossy Accents on the flower centers to bring a little "shine" to the card.  I finished with a strip of washi tape, bakers twine, and a few iridescent sequins. Quick, easy, and fun, and now I have a card to put away for next fall when my daughter heads back to college. :0)

You can check out Ashley's video and all the other great card entries right here.

Thanks so much for stopping by today...I love it when you do! :0)

Tuesday, May 19, 2015

Delightful Peony Outline - Take #2

Hello friends.  Back again with another card I made using the leftover die cut from yesterday's background in Smoky Slate with the Delightful Peony Outline die from Memory Box.  It was too pretty to throw away, so this is what came from it:


Made this basically the same way as I did yesterdays card and just changing the color of the flower....Dusty Concord Distress ink.  My background stamp is by Heidi Swapp, and I finished with a sentiment from PTI (Think Big Favorites: #22), a piece of black & white bakers twine, and a few pearls.  I really like the way yesterdays card turned out, but I LOVE the way this one turned out...good reason never to throw anything away!! 

Thanks so much for stopping by...I love it when you do! :0) 

Monday, May 18, 2015

Delightful Peony Outline

Hello friends.  I picked up a new die this past week (well ok, a few dies...it was too hard to pick just one!!), and had fun making a couple of cards this weekend. 


I started with a Smoky Slate panel and stamped it using a Hero Arts Leafy Vines background stamp with Smoky Slate ink.  Next I cut twice with the Delightful Peony Outline die (Memory Box); once from my Smoky Slate background and once from a piece of white cardstock.  My next step was sponging on a white card base using Picked Raspberry, Spiced Marmalade, & Mowed Lawn Distress Inks.  After adhering the Smoky Slate panel to the white card base, I inlaid the white die cut...just love how the color peeks through the open cuts! :0)  I finished the card with a simple banner that I stamped the birthday sentiment from PTI's Keep it Simple: Birthday and a gray enamel dot.

Edited to Add:  Stumbled on a new challenge through Loll Thompson's blog and thought this "might" qualify.


Thanks so much for stopping by today, and check back again tomorrow and I'll share the card I made with the extra die cut I ended up with from the Smoky Slate background panel. :0)

Friday, May 15, 2015

A Blue Birthday

Hello friends.  Just a quick post today.  Last week I needed a really quick card for my nephew who was turning 15, and this is what I came up with:


I used the Text Block: Birthday die from PTI and some royal blue cardstock, and then mounted a small scrap I had of some dotted blue DSP behind it.  A layer of brushed silver and another layer of the blue that I embossed with a large dotted ef placed on a white card base and easy, peasy, I was done!  Quick and simple, but I thought it turned out pretty cool for such a quick card.

Thanks so much for stopping by and have a wonderful weekend! :0)

Wednesday, May 13, 2015

Merry Monday #158 - Stencils


Hello friends.  The challenge over at Merry Monday this week is to use a stencil on your Christmas card.  I had bought a Tim Holtz stencil just before Christmas, but hadn't used it yet and figured this would be a great time to use it.  This stencil (Festive - THS029) is a bit small in places and it took me three tries before I thought it was "ok", but as a whole, I think it turned out pretty well.  Take a look:


I used Old Olive, Mossy Meadow, Soft Suede, and Cherry Cobbler inks and sponge daubers to color in on the stencil, and then embossed in gold my "joy" (Hand Lettered Holiday - WPlus9).  I mounted this layer to a piece of kraft cardstock and then layered that onto a card base of Old Olive.  A little bit of twine finished it off.


You can check out all the great cards by the Design Team and other players right here.

Thanks so much for stopping by today...I love it when you do!

Monday, May 11, 2015

Mom

Hello friends.  Hoping all you moms out there enjoyed a special day yesterday!  Spent time with my family both Saturday night and yesterday, and even got taken to the movies last night (Age of Adeline)! 

The card I'd like to share with you today is one I made for my daughter's MIL and I used a new stamp set from PTI called Flower Favorites.  Take a look:


My card started with a tag (Basic Bookmark #2 - PTI) that I stamped with 2 retired SU! background stamps (En Francais and Pattern) in Smoky Slate that I stamped off first.  I stamped the leaves with Simply Chartreuse ink directly onto the tag, and then used a separate piece of cardstock to stamp the Lupines in Autumn Rose, Hibiscus Burst, & Sweet Blush inks.  I fussy cut the flowers and then used a gelato to soften around the edges before adhering to the tag with some pop dots.  For my card base I made a pocket so that the bookmark could be used later on.

Also made another basket with SU!'s Berry Basket Die for my mom:

 
I actually found a small pot of light purple colored Gerber Daisy's that I put in the basket, but forgot to take a picture of it.  My mom loved it! :0)

Thanks so much for stopping by today...I love it when you do! :0) 

Thursday, May 7, 2015

Make it Monday #211 - Using Gelatos with Stamps

Hello friends.  Playing along with this weeks Make it Monday challenge where Melissa shows us how to use Gelatos to soften the look of our stamped flowers.  I've never used Gelatos before, so had to run to Michael's to get some, and I'm glad I did...really fun technique!  This is what I came up with:


I started with the Basic Bookmark #2 die and white linen cardstock, and then stamped my leaves in Limeade Ice ink (Bitty Bouquets) and my flowers in Hibiscus Burst, Raspberry Fizz, Orange Zest, Harvest Gold, & Lavender Moon inks (Beautiful Blooms).  I added a French script to the background in Smoky Slate ink and a couple pieces of washi tape to the top of the tag.  My "Smile" sentiment banner is from Reasons to Smile.  I used Background Basics: Gingham in Limeade Ice ink on the bottom of my card base, and then embossed the rest in a Cuttlebug dotted embossing folder.  I added a hot pink doily over the top of my card base before attaching the tag, and then finished my card with a few candy colored enamel dots and some bakers twine.

You can check out Melissa's beautiful card and video (and all the other entries) over on Nichole's blog right here.  

Thanks so much for stopping by today...I love it when you do! :0)

Wednesday, May 6, 2015

Merry Monday #157 - Embossing

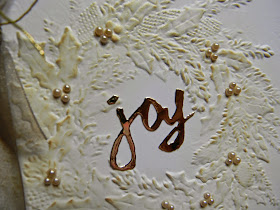
Hello friends.  Playing along with Bonnie's challenge over at Merry Monday's this week, and we are being asked to emboss...either dry or wet.  I had gotten a Spellbinders embossing folder just before Christmas this past year and only had the chance to make one quick card with it, so I pulled it out to use for this challenge.  I'll apologize up front for my photography, but absolutely no sun this week, so just imagine my card a bit brighter than what it is showing.  Take a look:


I used a 5" square panel to emboss the wreath on, and then lightly distressed it with Tim Holtz's "Antique Linen" Distress ink.  The part that you really can't see in the pictures is that I sprayed this layer with Iridescent Gold Glimmer Mist, so IRL there's a really soft shimmer to the card.  I added a bunch of champagne colored pearls for the berries and the joy die cut (PTI) is from gold mirror cardstock.  I layered this panel with more of the gold mirrored cardstock and then a white card base.  A simple gold ribbon and gold cord finished off my card.


You can check out all the other cards from the Design Team and other players right here.

Thanks so much for stopping by today...I love it when you do! :0)

Monday, May 4, 2015

A Little Wine Makes Everything Better......

Hello friends.  Just a quick post today, but wanted to share a card I made for our oldest daughter who had a birthday this weekend.  Found a really cute stamp set from Hero Arts a while back that I knew would be perfect for her as she LOVES wine.  Take a look:


My background stamp is also a Hero Arts stamp (Kelly's Background Stars) and I used a couple  Ombre stamp pads (also Hero Arts) to stamp it.  The die cuts are PTI's "Uncorked".

Here's the inside that I computer generated:


My husband and I babysat for our granddaughter this weekend, and she just started crawling...let the fun begin!


Thanks so much for stopping by today...I love it when you do! :0)

Friday, May 1, 2015

Tulip CASE

Hello friends.  Today I'd like to share a couple cards I CASE'd from Jennifer McGuire.  Her cards were so CAS and just beautiful that I just had to make my own!  I didn't have any of the same stamps or dies that Jennifer used, but the overall outcome makes them look very similar!  Take a look:


I started with a white card base for each card and then took a piece of 5 1/2" by 4 1/4" Smoky Slate cardstock and heat embossed it with Versamark and clear embossing powder and a retired SU! background stamp called "Victorian Lace".  Jennifer used a neat set of dies by MFT to cut her embossed panel into 2 pieces, but since I don't have that set, I improvised and used a PTI die (Tipped Tops Die) to cut my panel in two.  My tulips are a IO stamp that I water colored with my Aqua Painter and Melon Mambo, Calypso Coral, Old Olive, and Pear Pizzazz inks, and then fussy cut out.  My sentiments are both PTI and I finished each card with some pearls and black and white baker's twine.  There were a few steps to this card, but it really all came together quite quickly and easily, and I just love the elegant look of them...thank you Jennifer!! :0)

I'll be back on Monday with a cute little card I made for my oldest daughters birthday who turns 26 today (yes I know, that kind of makes me old, doesn't it?!!).  Thanks so much for stopping by today and have a wonderful weekend!  (We get to babysit Addy tonight, so I know it's going to be a perfect weekend! :0)