Pages

Wednesday, April 30, 2014

Festive Friday #30

Good morning friends.  Playing along with Festive Fridays today and here is my take on this challenge:


And here is the inspiration photo:


Meredith has found some absolutely beautiful inspiration photos this year, and I'm loving being able to interpret them how I see them! :0)  Usually I try to "copy" the inspiration photo, but this time went more with "feelings" and that to me was "woodsy" and "green" - even though the photo shows more "red".  I used SU!'s "The Sounding Joy" stamp set and also the "Weathered" background stamp for my card.  Quite a simple card, but I really like how it turned out! 

There's still LOTS of time to play along and you can check it all out right here .

Thanks so much for stopping by today and have a wonderful Wednesday! :0)

Monday, April 28, 2014

This, That, and the Other

Good morning friends.  Lately I've been playing so many challenges, that I haven't had time to show you "life" things that have been happening.  A week ago my middle daughter and her husband celebrated their first anniversary, so thought I'd share the simple card I made for them. 


I used SU!'s "Flowering Flourishes" stamp set and Gumball Green ink to mimic what was used on her actual wedding invitations, and the sentiment is from PTI's "Think Big Favorites #24", which I embossed in silver.  It looked too plain at this point, so I used a Martha Stewart punch on the left hand side and then placed a small strip of Gumball Green cardstock behind the punchout so it would show up better.  I finished with some green and white bakers twine and a few silver nailheads (Gina K).  A simple card, but really like the way it turned out! :0)

Every year at Easter, I make these little bunny nuggets for my table, and I took a picture meaning to show it to you last week, and then forgot...old age is creepin in, don't ya know?!!  Take a look:


Aren't they cute?!  Usually I do all different colored bodies, but this year I found all different scraps of "green" DSP to use for their bodies to match my color scheme for the table.  I think I had used 11 different DSP, but there were only a few bunnies left for me to photograph after my family scarfed them all down!  (what can I say...we're all chocaholics in my family!!)  For the bodies I used a 1" x 3" strip of DSP, and then the face is a Rubber Stampede stamp (Hobby Lobby) that I stamped on white cs with Momento Tuxedo Black ink, and then colored with a few of my Copics.  For their tails, I used a little glue dot and small white pom poms.  Simple to make and everyone loves them! :0)

In my last Papertrey Ink order, I received an Easter card from their new line of scrapbooking materials, and I loved the yellow polka dotted half of the card so much that I used my new Tag Sale #10 die and made my own little tag to attach to one of my daughters Easter treat bag.  Take a look:


The backside of the card was just white, and I used that to stamp the bunny from that $1 stamp I used on my card a while ago here .  Pretty simple, but cute, cute! :0)

And one last picture to leave you with today.  Our middle daughter and her husband added a miniature Dachsund puppy to their family about a month ago, and finally remembered to take a picture when they were over yesterday.  (this picture is actually my youngest daughter holding Beamer)


Isn't he a cutie?!!  He's 14 weeks old now and weighs about 6lbs. (he'll get to 10lbs full grown).  Nothing sweeter than a puppy, is there?  Well unless it's an actual baby, but I have to be patient and wait till September for that!  :0)

Thanks so much for stopping by today and I hope you all have a wonderful Monday! :0)

Friday, April 25, 2014

Papertrey Ink April Blog Hop

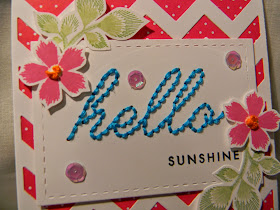
Good morning friends.  The subject of this months blog hop over at Papertrey ink is embroidery and I am so excited to see what everyone comes up with!  I remember our neighbor Mrs. E teaching me how to embroider so I could get one of the Girl Scout badges when I was in 3rd (maybe 4th) grade...long, LONG time ago!  I don't do embroidery anymore (too hooked on card making!), but I had fun adding a few French Knots to the centers of my flowers, and stitching my "hello" sentiment.  And what more perfect stamp set to use than PTI's "Embroidered Blooms"?!!  Take a look:


I started with a white card base and then added a piece of Raspberry Fizz paper (PTI) and the Chevron die plate (PTI) with another piece of white cardstock.  I then stitched my "hello" (PTI's "Quick Stitch Sentiment" die) in turquoise embroidery floss on another piece of white cardstock and then cut that out using one the Lil Inker Stitched Rectangle dies.  (the "sunshine" is from the Wonderful Words: Hello stamp set)  I then stamped 2 flowers and leaves from the "Embroidered Blooms" stamp set in Raspberry Fizz ink and Certainly Celery and Pear Pizazz inks and then fussy cut them out.  I added a few French Knots with orange embroidery floss for the flower centers and then pop dotted them to the rectangle.  Finished with a few sequins and yeah...I have one more card to send my youngest before school ends in 2 weeks! :0)

April-Blog-Hop-Inspiration

Thanks so much for stopping by and make sure you check all the rest of the embroidered cards out...I certainly plan to! :0)


Thursday, April 24, 2014

Merry Monday #105

Hello friends.  A "little" card for the Merry Monday challenge using another stamp I forgot I even had!  I was actually going to enter this card into another challenge too, but missed the deadline...grrrrr!  I've never played with the Dynamic Duos challenge before, but my girlfriend Sue does, and I really loved the color combo they had this week - Rich Razzleberry and black with the option of gold.  But anyway, really like how this card turned out, although I have to warn you ahead of time here that it did not photograph well...you'll just have to trust me that IRL it really is very pretty!  Take a look:


The colors IRL are so much richer and deeper and it comes across as a really warm card.  I used Smoky Slate and SU!'s "French Script" background stamp first, and then stamped the angel image in Rich Razzleberry.  If you click on the photo, you'll be able to see a little better that I also used my Wink of Stella pen in the centers of a few of the snowflakes...they're pretty subtle, but add a nice touch to the card.  The "peace" I cut out of gold cardstock with PTI's "Wonderful Words: Holiday Die Collection". 


Still time to play in this weeks challenge, and if you need a little inspiration to get you started, just head on over to the Merry Monday site here.

NOTE:  In my post yesterday I mentioned we were going to my daughters ultrasound appointment, and many of you asked if we found out whether we were having a grandson or granddaughter.  My daughter and her husband both want to be surprised, so we did not find out the sex.  I have to admit I liked the technicians response to this when she said that she understood perfectly, as what better surprise can there be when that moment comes?  How true!  And it's not like we wouldn't be happy either way, so we will just have to wait until Sept. 10!  It was SO awesome to see his/her little hands and feet moving all over and the heart beating...just a beautiful little miracle...thank you Lord!!! :0)

Enjoy the rest of your day and I'll be back tomorrow with a card for monthly blog hop over at Papertrey Ink.  Thanks so much for stopping by. :0)  

Wednesday, April 23, 2014

Make it Monday #161 - Watercolor Splats

Good morning friends.  Playing along with Papertrey Ink's "Make it Monday" challenge today, and using a technique called watercolor splats.  Making the "splats" is the easy and fun part of this technique, but I have to admit I had to do a few tries at the actual background.  Nicole Heady has a great video on how to do this technique on her site here .  So after a couple tries, here's what I came up with:


I used Raspberry Fizz, Pixie Pink, & Pumpkin Pie inks to do the shading for the background, and then I used my Aqua Painter to make the watercolor splats.  I stitched my "hello" using PTI's "Quick Stitched Sentiment" dies and some orange embroidery floss.  And of course I had to try out my new "Button Stacks II" die (PTI) to add a bit more interest to the card along with a couple iridescent sequins.  Our youngest only has a few more weeks of college left, so figured I better send at least one more card out to her...hopefully this will make her smile while she's studying for her exams! :0)  (of course she'd probably smile more if I sent munchies, but we'll have to see about that!!)

Make sure you take the time to check out all the other entries over at Nicole's blog as there are some amazing cards this week from people who took this technique and went thinking outside of the box!  In fact, check out this amazing card from Nancy Penir here ...stunning!! :0)

Thanks so much for stopping by today and have a wonderful Wednesday.  My husband and I are going to our oldest daughters ultrasound today to see our grandchild and I am SO excited to see this first glimpse of him/her!!  :0)

Monday, April 21, 2014

No - Sew Quilted Baby Card

Good morning friends.  I hope you all had a wonderful Easter weekend!  We celebrated with most of my family on Saturday evening as 2 of our daughters had to work yesterday, and our middle daughter was celebrating her first anniversary with her husband this weekend...hard to believe it's been a year since the big wedding!  It was great to see my oldest daughter too, and especially to see her expanding stomach!  She'll be 20 weeks along this Wednesday, so we're almost half way there!!  My husband and I gave a little "love" gift to them this weekend to help towards a crib or carseat, and of course I had to use a handmade card to put the gift in.  Take a look:


A couple of weeks ago, I got hooked on Papertrey Ink's "Make it Monday" technique by Dawn McVey, and made a few different cards including a baby one.  I used blue & pink scraps of DSP in 1 1/2" squares and then embossed with a dotted circle embossing folder (Sizzix).  I stamped the baby (LOTV) and colored with my Copics (E00, E02, & C1), and then cut out with a Lil Inkers Stitched circle die.  I finished off with a scalloped circle, a sheer ribbon, a baby feet charm, and a few sequins.  Love how this card turned out and my daughter did too! :0)

Thanks so much for stopping by today, and I hope you all have a wonderful Monday!! :0)  

Friday, April 18, 2014

Sending Springtime Smiles

Good morning friends.  Just a quick post this morning, but wanted to share a cute little card to celebrate Easter and Spring.  Found this adorable little bunny stamp for a buck at Hobby Lobby and couldn't resist!  Take a look:


I get suckered in to those $1 stamps quite often, but then I am always disappointed in the quality...not so with this one!  I stamped him with Soft Suede ink and did a little shading with one of my Copics.  I added a touch of pink to his cheeks and ears with a q-tip and some pink chalk (love the way the chalk spreads so nicely in circles for adding little pink cheeks!).  The grass and little dot flowers are from PTI's "Daydreamer" set.  I layered with Lil Inkers Circles & Rectangles Stitched Dies, and then added the sentiment from SU!'s "Easter Blossoms".  Kept it very simple so that cute little bunny was the focal point.  (He reminds me of Beatrix Potter's bunnies!!)

Time to get moving...lots to do for a busy weekend.  I hope all of you have a wonderful weekend celebrating Christ our risen LORD ...a very happy and blessed Easter to all of you! :0)  

Thursday, April 17, 2014

Festive Friday Challenge #29

Good morning friends.  Ever have one of those ideas that you can see so clearly in your head, but it just doesn't come out on paper (or cardstock?!)?  Festive Fridays has shown another amazingly beautiful picture to inspire us for this challenge, and I had an idea come to mind right away last Friday when the picture came out, but it has not come out like the picture in my head...grrrrrrr!  (Actually I know I'm not alone in this, as my friend Sue and I just discussed this yesterday and she's having the same problem...it's wonderful to have someone to share frustrations with!!)  So anyway, the card I'm sharing with you today is no where near the card I had planned to share with you, but it turned out ok and is growing on me! :0)  Take a look:


I started with a white card base, and then layered another layer of white that I embossed with a SU! embossing folder and sponged with some Baked Brown Sugar ink.  I used the largest of the Spellbinders "Floral Ovals" dies and kraft cardstock to put my main image on, and also lightly sponged the edges with white ink (click on the picture for a closer up to see the detail).  I stamped and embossed with white my sentiment (PTI's "Think Big Favorites #21") and then used the candles from PTI's "Birthday Style" with Versa Mark ink over the sentiment.  Added a little bit of greenery with a MS branch punch, and then embellished with a few small pearls. 


I love the mirror in this inspiration photo, and that was kind of what I was trying to replicate in my first card, but couldn't seem to accomplish.  Oh well, maybe another time!  There are some beautiful cards that have been inspired by this photo over at the Festive Friday site, and I encourage you to check them out and play along!  My Christmas card stash really is growing quite nicely and it's only April...yeah!! :0)

Thanks so much for stopping by today and I hope you all have a wonderful Thursday!
 

Wednesday, April 16, 2014

Merry Monday #104 - Slate/Kraft

Good morning friends.  Playing along with Merry Monday today and I'm happy to say my Christmas card stash is growing quite nicely!  (have been slacking off a bit on the insides of the cards though, and really do need to catch up on that!!)  This week the design team over at Merry Monday's has asked us to use the color combo of slate and kraft for our cards, and I have to admit I wasn't too excited when I first saw this combo.  However, my girlfriend Sue told me to take another look, and I'm glad I did, as it really does kind of grow on you and also forces us to think beyond the traditional red and green!  My card turned out extremely simple (would be a great one to mass produce!), but at the same time, I think extremely elegant.  Take a look:


I think I spent more time photographing this card than I actually did making it!  If you click to enlarge the picture, it will look a lot clearer.  I started with a piece of light gray Bazill textured cardstock and embossed with clear embossing powder, using a Hero Arts cling stamp I haven't used in ages (in fact, forgot I even had it!!) called "Starry Night".  IRL, the clear embossing powder over the textured cardstock gives the stamped image almost a satiny glow...really pretty!  I trimmed my image really close, and then layered with kraft, and then white cardstock.  I mounted these layers to another layer of the light gray and then a white card base.  My sentiment is from PTI's "Think Big Favorites #21" and I stamped it in Smoky Slate ink (SU!).  I added a small diamond above the "i" in "greetings" to finish the card off.  Wanted to add a ribbon or something at first, but decided the simplicity of the card is what makes it beautiful just like it is (IMHO that is!).


Make sure you check out all the great inspiration over at the Merry Monday site, and be inspired to make a card that's not your norm...you'll be glad you did! :0)

Thanks so much for stopping by today, and have a wonderful Wednesday!  (There's NO snow on the ground this morning (like yesterday...grrrrrr!!!!!), the sun is shinning, and they say we're on our way to a warm up, so I'm one happy girl today!!) :0) 

Monday, April 14, 2014

Colour Me #15 - Bermuda Bay and Daffodil Delight

Good morning friends.  Nothing like waiting till the last minute, but loved the color combination for the challenge over at Colour Me this week and just had to find time to squeeze in a card!  Actually rather than a regular sized card, I decided to try my hand at these really cute little gift cards that you make using the envelope punch board (SU!) to look like little spools of thread.  I got the idea from over on Becky Roberts site, and you will not be disappointed if you take the time to see all the awesome things she creates!  Here's what I came up using the Bermuda Bay and Daffodil Delight color combination:


Are these not the cutest little cards or what?!!  Really quick and easy to make too!  I started with a kraft cardstock base that I stamped with my "Weathered" background stamp (SU!) and Baked Brown Sugar ink, and then on my white layer, I stamped polka dots with Bermuda Bay ink.  I used yellow and white bakers twine the wrap around the white layer to look like the thread on a spool.  Next I stamped the "For You" from SU!'s "Chalk Talk" set in Bermuda Bay ink on Bermuda Bay cs. (cut out with a 1 3/8" circle punch (SU!)  Next I stamped the little sunflower from PTI's "Doodlie - do" set and colored it with my Aqua Painter and Bermuda Bay and Daffodil Delight ink.  I finished with a few turquoise blue sequins for a little "bling".  These really did go together very quickly and I'm thinking about attaching them to the girls Easter baskets this year! :0)  (yes I know they're too old now really for Easter baskets, but I still love putting them together, so they're getting them!!!)

Make sure you check out all the other entries for this challenge...some great inspiration right here at the Colour Me...! site.


Thanks so much for stopping by today and have a wonderful Monday!  (LOTS of rain here this morning, but April showers bring May flowers, right?!!) :0)

Sunday, April 13, 2014

Merry Monday #103 - Snowman Take Two

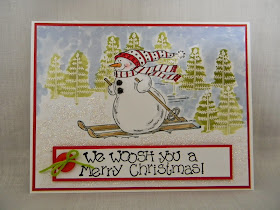
Hello friends.  Just a quick post this afternoon, but I like snowmen too much to just make one card for this weeks challenge, so here's another card:


This was one of my very first stamp sets from SU! ("We Woosh You") back in 1999, and in fact I made my first Christmas card with this set...definitely an oldie but a goodie! :0)  After stamping the snowman, I did some masking so I could line up the pine trees behind him.  I embossed the trees with white embossing powder, and then watercolored them with my Aqua Painter and Old Olive ink.  I also watercolored the sky with Bashful Blue.  The snowman I colored with my Copics.  I glittered the bottom half of the card for my snow, and then finished with the layered and embossed sentiment over the snow.  Also added a button for a little more whimsy.  A fun card that brought back lots of happy memories! :0)  Not a lot of time, but you can still join in the fun over at the Merry Monday site right here .


Thanks so much for stopping by and have a wonderful rest of your weekend!! :0)

Friday, April 11, 2014

Merry Monday #103 & MIM#159 - Take 3

Good morning friends.  Playing along with Merry Mondays (to use a snowman) and also with Papertrey Inks "Make it Monday" (AGAIN!).  I started thinking about the quilting technique called appliqueing and thought I would try to do a winter/Christmas scene with a snowman, and this is what I came up with:


I have to admit I really like how this came out! (definitely click on the photo to enlarge it to see all the detail!!)  I started by going through my stash of DSP scraps and chose papers for the trees, sky, and snow.  I used PTI's Merry and Bright dies for the trees, and the snowman is from PTI's In the Meadow dies...the rest of the paper for the snow and sky I hand cut.  Because the only impression plate die from PTI that I have is the chevron die, I decided to use an embossing folder (Sizzix) for the "quilting" on the card.  The swirls on the embossing folder reminded me of snow, so I thought that was the perfect touch for this card! :0)  I thought about leaving the card like it was, but played around with the sentiment from the In the Meadow stamp set on vellum, and thought that finished off the card nicely.  Added a few gold stars to the tree tops and a little piece of red and white bakers twine to the snowman too for a few extra touches. 

 
 Because I love snowmen SO much, I may have to make another card for this challenge...I have so many cute snowmen stamps just waiting to be used! :0)  LOTS of great cards and inspiration over at the Merry Monday site to check out here if you like snowmen, and also lots of great inspiration over on Heather's blog here if you want to check out Dawn's video and all the No-Sew Quilted cards. 

Thanks so much for stopping by today and I hope you all have a wonderful weekend! :0)

Thursday, April 10, 2014

MIM#159 - Take Two

Good morning friends.  I am still having fun with the Make it Monday challenge over at Papertrey Ink, and have another "No Sew Quilted Card" to share with you today.  The first quilted item I ever made was a pillow using the Log Cabin pattern, and that was the idea behind my card today.  I like the way my card turned out, but I wish I would have used smaller blocks (like maybe 3/4" blocks) so that you could see the actual Log Cabin pattern more.  Oh well, next time!  Anyway, here's my take two:


I started with 1 1/2" blocks of DSP from the "Promise" pad by LOTV, and then embossed with a hexagon EF as I didn't have that die plate from PTI.  (I've discovered that embossing folders work just as wonderfully to give that quilted look as the cover die plates!)  I used a little white rectangle (Lil Inkers) to stamp my sentiment (Wet Paint - PTI), and then stamped and cut out the smallest Dahlia and leaves from "Delightful Dahlia Additions" (PTI).  I have to tell you that I have not used this stamp set that much because I've struggled with lining up the 3 stamps to get the shading - especially the smaller flower!  But I tried something different this time and it worked beautifully for me - I stamped the 3 steps in reverse order.  I started with the smallest shaded stamp and my darkest color, and then the middle shaded stamp and color, and lastly the largest stamp and my lightest color.  By starting with the darkest color rather than the lightest, I was able to see exactly where I needed to line the images up and it came out perfectly!  I'm so excited I figured this out and plan to use this beautiful set (and other layering sets) a LOT more often now! :0)  To finish this card I added a few jumbo iridescent sequins, and even though you really can't see the Log Cabin pattern I was going for, I still really like how this card turned out! 

Thanks so much for stopping by today...I just love it when you do!  And have a wonderful Thursday too...we are going to have another mild day (close to 60...YEAH!!) so I am beyond excited after the looooooooooong winter we had! :0)

Wednesday, April 9, 2014

MIM#159 - No-Sew Quilted Cards

Good morning friends.  I think Spring has finally arrived in West Michigan and I am one happy girl!  I don't even mind being woken up at 5:00 AM by singing birds...what heavenly sounds! :0)  We still have a few snow piles laying around, but I'm thinking they will be history in the next day or two!!  And so in honor of Spring, I'm sharing a really bright and happy card with you this morning.  Dawn McVey over at Papertrey Ink shared a wonderful video on how to make No-Sew Quilted Cards, and I have been having a great time just looking at all the wonderful entries over on Nichole's site. You can check it all out right here .  My mom is a quilter, so I've grown up surrounded by the beauty of this art form, and to translate that art form into a card was just right up my alley!  Take a look at my first attempt:


I used 1 1/2" squares of scrap DSP and then "quilted" them with PTI's vertical Chevron die plate.  I wish I would have added one more rubber mat when I embossed, so that the "quilting" would have stood out more...lesson learned for next time! :0)  I trimmed a little so I could layer this on a Melon Mambo card base so it looked like a quilt border.  I added a sentiment flag with the "Wet Paint" stamp set, and then added a few flowers from "Rosie Posie" - both sets from PTI.  I finished with a few jumbo iridescent sequins. 

Love, love this technique!  Made a couple other cards using this no-sew technique, but have to get them photographed first.  So stay tuned...part two coming soon! :0)

Thanks so much for stopping by today and have a wonderful Wednesday!  My daughter and new grand-doggy Beamer (my son in law works for, owns, and LOVES BMW autos, so that's where the name came from!) are coming for a visit today, so must get motating! :0)

Monday, April 7, 2014

Festive Friday #28

Good morning friends.  I'm playing along with Festive Fridays today and once again, Meredith has provided us with a wonderful inspiration photo to inspire our card.  I've been seeing a lot of clean and simple cards for this challenge, but the inspiration photo takes me in a completely different direction.  Candlelight makes me think warm, soft, vintage, shabby chic, etc. and so that's the way I went.  Take a look:


When I think vintage, I think Melissa Phillips, and when I think Melissa Phillips, I think one of her favorite card sizes (3.5 x 5.5), and so that was my starting point for this card.  I made my tag first (PTI - Tag Sale #5) and stamped it with SU!'s "Weathered" background stamp in Smokey Slate ink.  I also used SU!'s Perfectly Preserved die and stamp set for my jar, which I embossed with silver embossing powder on vellum.  Before adhering the jar to the tag, I added a few red star sequins beneath the jar, and added a few gold stars to the top of the jar (to simulate the candlelight). I also added a piece of cream colored bakers twine to the neck of the jar and a pine sprig (SU!'s "Lovely As A Tree").  I added seam binding ribbon that I dyed with SU!'s Soft Suede refill ink to the top of the tag, and also added a star that I die cut using PTI's Tiny Tags.  The background of the card is all scraps from my DSP stash except for the middle which is a piece of SU!'s Delicate Details Lace Tape (I sponged over the tape with Baked Brown Sugar ink to make the details of the tape "pop" a little more).  I also used PTI's Super Star Border Die for one of the strips of DSP to mimic the stars in the jar.  I finished by adding a button to my lower corner simply because I associate buttons and vintage together.  Here is the inspiration photo that inspired this card:


I may actually have to try making a few of these for Christmas next year, as they would fit in beautifully with how I decorate for the holidays. :0)  Make sure you check out all the rest of the inspiration from the design team and players over at the Festive Friday site here .  There's still time to play, so why not get a jump on those Christmas cards NOW?! :0)  (come next December, you'll be SO glad you did!!)

Thanks so much for stopping by today...I love it when you do!!  Have a wonderful Monday! :0)

Friday, April 4, 2014

Colour Me Challenge #14 - Monochromatic

Good morning friends.  Had time to play along with the Colour Me challenge this week, and it's a monochromatic theme using the color Pumpkin Pie.  Since Easter is just a few short weeks away, and Pumpkin Pie is such a fun and whimsical color, AND the fact that I love bunnies (may have a few around my house!!), it was an easy choice for my card.  Take a look:


When I first started this card, I struggled a little bit with not being able to use green for my flower stems, but I quickly got over it and didn't even struggle when I got to adding "white" grass! :0)  I used PTI's "Polka Dot Parade #1" stamp set for my bunny, flowers, and sentiment.  The grass is a Impression Obsession die, the top white layer was embossed with SU!'s Decorative Dots EF, the button is SU!, and my DSP is Recollections.  I added a few rhinestones for the centers of the flowers and a white pompom for the bunny's tail.


Colour Me is a fairly new challenge for me, but they have some great designers and inspiration to get you thinking along different lines!  There's still plenty of time to play along, so check it out here .

Thanks so much for stopping by today and have a wonderful weekend! :0)

Thursday, April 3, 2014

Merry Monday #102 - Mistletoe

Good morning friends.  This weeks Merry Monday challenge was a challenge for me in more ways than usual!  The challenge was to use mistletoe on your card...except I don't have a single mistletoe stamp or punch in my collection!  Luckily inspiration struck, and this is what I came up with:


Can you tell what I ended up using?  Maybe I should make a "challenge" contest out of this...leave a comment with your guess and I'll do a drawing for a small surprise!  Now back to the card!  I used Tag Sale #4 die (PTI) to place my mistletoe on, but since I knew I was going to place the tag on the same cardstock as the tag, I decided to use a technique I learned many, many years ago, to give a little color to the circle portion of the tag.  I crumpled saran wrap up into a loose ball and then pressed it lightly onto my stamp pad (Old Olive) and then onto my card stock.  (works really great with blue shades of ink if you want to make a nautical card!)  After attaching my mistletoe, I tied bows using a red plaid ribbon (Michael's) and some hemp cord.  I pop dotted the tag to my card base and then added my sentiment in Real Red to the bottom of the card ("Think Big Favorites #21 - PTI). I also added a few pearls for the berries to finish the card.  Very CAS, but I like the way it turned out!


There's LOTS of great inspiration from the design team and players over at the Merry Monday site, so make sure you check it out here .

Thanks so much for stopping by today and have a wonderful Thursday! :0)

Wednesday, April 2, 2014

Make it Monday #158 - Stamping with Watercolor Mediums

Good morning friends.  Playing along with Papertrey Ink's Make it Monday today, and using my golden oldies, but definitely not forgotten, watercolor crayons.  Heather has a great video (and beautiful card!!) showcasing how to use gelatos (or watercolor crayons) directly onto your stamps and then using either an Aqua Painter or spray mist bottle to give that soft and subtle watercolor effect.  I used my "Life" (PTI) stamp set and this is what I came up with: 


I started out using Cameo Coral (SU!) and wasn't real impressed when I first stamped it onto my watercolor paper...it was SO light you could barely see it!  I tried coloring a little harder onto the stamp thinking I just needed to get more color onto it, but as I stamped across the cardstock, each time came out pretty light.  I was tempted to throw it away at this point and try a different color, but persevered and started adding a few other of the stamps using Old Olive, Garden Green, and Ruby Red crayons.  The brighter colors of the Ruby Red and Garden Green made the softer colors of the Cameo Coral and Old Olive become a lovely soft background, and I really like the total effect now.  I stamped my sentiment and added a few iridescent sequins to finish. 

There are some absolutely beautiful cards using this technique over at the Papertrey Ink site here, so if you need some inspiration to get started, this is definitely the place to check it out! :0)

Thanks so much for stopping by today and have a wonderful Wednesday!