Saturday, December 26, 2020

Color Hues #8 - GREEN & BLUE

Hello friends.  Hope you all had a wonderful Christmas?!  Ours was quiet but nice...we even had a bit of snow to make it feel a bit more like Christmas!  

I received a couple new stamps for Christmas, (Thanks Sue!!) from the Colorado Craft Company with the sweet images from Anita Jeram and just had to ink up the Snow Happy set to play along with the current Color Hues Challenge, where they are looking for us to use GREEN & BLUE on our cards.


I wanted to keep my image very CAS, so I just stamped the image in black, and then used only a bit of green and blue to water color and highlight the leaves and snow...


Isn't that just the sweetest scene with the bunny offering a snowball to the deer?!  After I finished water coloring the snow and leaves, I used one of The Greetery's Nordic Frame Dies to die cut the image and then backed it with a piece of Garden Green cardstock (SU!) and then adhered to a white card base.


I also added some Wink of Stella to the snow which you can see just a bit in this close up photo.  A very CAS card but I really like how it turned out!

This challenge ends in just a couple days, but if you got some new goodies for Christmas that would look good in GREENS and BLUES, then check out the Color Hues Challenge and play along!

Thanks for stopping by today ... I love it when you do!


Friday, December 18, 2020

Double D Challenge - POINSETTIA

Hello friends.  Yep, I'm still around...just slower at posting for the next couple of weeks while busy doing other things.  Hope you're all getting things accomplished and not getting too stressed out...and taking time to reflect on the reason for the season!

Today I'm playing along with the Double D Challenge where they have a lovely mood board for inspiration using POINSETTIA'S.  


 Don't you just love all the different colored Poinsettia's that are around now?!  I have a lovely, lovely one that is a mix of deep burgundy and mauve colors, and with the deep green leaves it is just beautiful!  I've been really hooked on a new stamp set this year from WPlus9 called Joyful Poinsettia which includes a background stamp, a single bloom, and beautiful sentiments, and that is what I used on my card for today.  Take a look:


I apologize upfront for my photography skills (or lack of), but with all the gold on this card, it was just really hard to get a decent photo with no glare!  Anyway, I started by embossing the background with gold embossing powder on black cardstock, and then water colored with my Finetec Pearl set, which adds even more shine!!  Once that was dry I added a matte gold layer of cs beneath and then attached to a white card base.


 Here's a close up so you can see the detail a little better.  I also embossed the sentiment in gold on black cs, and then fiddled for a loooooooong time with some gold cording behind the sentiment...I think that was the part that took the longest for this whole card!!  This ended up being a very elegant card which is not my usual CAS style, but have to admit I like the way it came out!  And thrilled that I have one more for next years Christmas card stash...never too early to get a head start in my opinion!!

Make sure you check out all the GORGEOUS inspiration cards from the DT and then play along right HERE.  If I don't end up posting again before Christmas, I want to wish each and every one of you a very blessed Christmas and a happy and healthy New Year!

Thanks for stopping by today ... I love it when you do!


Friday, December 11, 2020

More FUN With The Greetery

Hello friends.  Just a quick and FUN post today sharing some of the cards I made last weekend using my new stamps and dies from The Greetery (The Winter Wanderer Collection).  I posted the 1st card on Instagram earlier in the week but decided to show all of them on my blog because the pictures are bigger and easier to see than the tiny little photos we see on our phones!  (Yes, my eyes are getting OLD and I need the bigger photos to see all the details!!)  So let's get started since I know we are all busy busy this time of year!!


Hope I didn't lose you during ALL the pictures!!  Once I started playing I just couldn't seem to stop!  I spent last Saturday afternoon stamping oodles and oodles of flowers and leaves, and also die cutting them and all the other pieces from the Hoop Wreath set, the Boho Banner and Macrame Diamonds dies, the Catching Snowflakes set, and the Opposites Attract set.  Once I had everything stamped and die cut and set in front of me, the card ideas just kept coming!  I still have SO many pieces stamped and die cut and ready to make into more cards, but I ran out of time!  Oh well, I'll be all set after the first of the year comes and I need to make some quick cards!  Hope you are all doing well and getting ready to celebrate Christmas, even if it will be on a smaller scale this year!  CHRISTmas is NOT cancelled this year friends, so still celebrate the birth of our Lord and Savior...He is the reason for the season!!

Thanks for stopping by today ... I love it when you do!


Wednesday, December 9, 2020

Color Hues #7 and The Flower Challenge #51

Hello friends.  I'm playing along with both the Color Hues Challenge and the The Flower Challenge today...gotta love when you can combine two challenges!!  Color Hues is asking for cards with Blue & Magenta and The Flower Challenge is looking for "embellishments" on your flower cards, so I combined both and came up with this...


I used Penny Black's scarlet majesty cling stamp with SU!'s Magenta Madness ink for the Poinsettia and love how it came out in just the single color!  My sentiment comes from Penny Black's rejoice with joy stamp set and I used Concord & 9th's MIDNIGHT (navy blue) ink.  


I used a few magenta colored sequins for my embellishments on the Poinsettia and that was all the card needed for both challenges and it still came out CAS too!

You can check out all the details for the Color Hues Challenge HERE and the details for The Flower Challenge right HERE.


Thanks for stopping by today ... I love it when you do!


Tuesday, December 8, 2020

Double D Challenge - Santa Hats

Hello friends.  There's a FUN challenge going on over at the Double D Challenge where they are looking for a Santa Hat on our cards.


And isn't this just the sweetest mood board to get us inspired?!  I have had this Penny Black image called hedgy joy for longer than I can remember and have never inked it up, and since it fit this challenge perfectly, it was time!


 Isn't he a cutie?!  I inked him up in Versafine Black Onyx and then heat embossed with clear so I could water color him without the black ink bleeding.  Once he was dry, I fussy cut him out and added him to a background of Snowflake Splendor DSP (SU!) and Penny Black's tree border die cut.  He looks so bright and cheerful against the blue & white background.  

I am also going to add this card to Darnell's NBUS Challenge #21 since this is the first time inking up this little hedgy critter.


 Make sure you check out all the AWESOME inspiration from the Double D DT right HERE and then play along for some FUN!  Great way to finish up those Christmas cards if you still need to!!  :0)

Thanks for stopping by today ... I love it when you do!


Thursday, December 3, 2020

A Little Of This and A Little Of That...

Hello friends.  Not playing with any challenges today, but thought I'd share a little of what I've created recently trying out new techniques and just playing!  Kind of a picture heavy post, but hope you enjoy!!

This first group of pictures is from a ZOOM meeting with friends from over a month ago where we used shaving cream and re-inkers through stencils.  A bit of a messy technique that resulted in some good and some bad...I'll just show the ones I deemed good.  Haha!!  This 1st picture just shows what the plate with the shaving cream and re-inkers looks like.  I did a half and half with different red re-inkers on one side and different shades of green on the other half.


And here's what I came up with using a few different stencils...


The first card was actually my last card where I decided at the last minute to combine the two color families and see what I'd come up with.  I thought for sure it would be a muddy mess and it ended up being my favorite!  I think the key was not over mixing!

This next card was done with a piece of black matte Yupo paper that Julia sent me (thanks Julia!!) and Picked Raspberry and Spiced Marmalade Distress Oxide Sprays.  It ended up looking like a ocean scene to me so I added a seahorse die cut that I added a really thick layer of Glossy Accents to.


This next card was the only background piece I came up with after making about 7 million of them using a Gelli Plate and DOX inks.  I followed a Jennifer McGuire video (HERE) where she made it look SO easy, and my trash container shows that it really wasn't that easy!!  But I do like how this one came out after I finished it into a card!!


These next 3 cards are also from a Jennifer McGuire video (HERE) that I loved and made many more cards than what I'm showing you...it's addicting!!  You just use glitter cardstock (I used a bright silver glitter cardstock (12 x 12) from Michael's) and squirt a little blending solution on and then 2 or 3 colors of alcohol ink, a bit more blending solution and then something to move the ink around.  Jennifer had a blowing type tool but I used a a little bulb device that's meant to put a marker in and then you squeeze the bulb and it's splatters the color of marker you added.  I used just the bulb part to move the ink around and came up with these:


My last card uses a technique that I've seen my friends Loll, Darnell, and Bonnie use, where you ink up your stamp (solid images work best) with Versamark, and then use a dry paintbrush to "paint" your stamp with Lindy's Magicals and then spritz with water before stamping onto your cardstock.


 I'm sorry I couldn't capture the shimmer and shine that you get when you use Lindy's Magicals, but if you've ever used them, you know what I'm talking about!  This technique gives such an awesome water colored look and soooo easy to do!!  You can also get multiple prints from this technique just by spritzing with water after each stamping to use up the ink (color) still left on your stamp.  They'll get lighter as you keep stamping but they're still beautiful!  I also did a set with a Poinsettia from Penny Black (the Holly is also Penny Black) that turned out really pretty but they are all sealed up in envelopes to be mailed out and didn't want to tear one open just to get a picture.

So thanks for sticking with me through this looooooong post, and I hope I've inspired some of you to try some new (or old to some of you) techniques and just have fun!  Take care everyone and stay safe...can't believe how ugly the numbers are right now!  Be kind and wear a mask if you HAVE to go out and save a life.  We'll get through this if we ALL work together!!  :0)


Thanks for stopping by today ... I love it when you do!


Sunday, November 29, 2020

Christmas Kickstart #43 - Twas The Night Before Christmas...

Hello friends.  Playing along with the Christmas Kickstart Challenge where the prompt is "Twas The Night Before Christmas" and I had fun with a Gina Marie Designs die and a glitter paper and alcohol ink technique from Jennifer McGuire.  Take a look...


Trust me when I say this card sparkles like crazy!!  I just used some silver glitter paper from Michael's and 3 different blue alcohol inks to make the background, and everything else is just white cardstock.  I thought this little scene in the Gina Marie Designs die was perfect for this challenge with Santa and his sleigh and reindeers flying through the sky!


You can catch a bit more of the sparkle in this close up and see the detail from the die cut better too!  My sentiment is from PTI's Snowfall Style.  Easy and fun and I think next time I will wear plastic gloves as I think my fingers are permanently stained from the inks...haha!!  Like Jennifer did, I made a bunch of the backgrounds while I had everything out, so you might be seeing some more SPARKLY cards soon!


Make sure you check out the inspiration from Jo and her special guest elf Liz, and then play along...especially if you need to get working on those Christmas cards!  You can find all the details to play along right HERE.

Thanks for stopping by today ... I love it when you do!


Wednesday, November 25, 2020

Spellbinders Merry Stitching

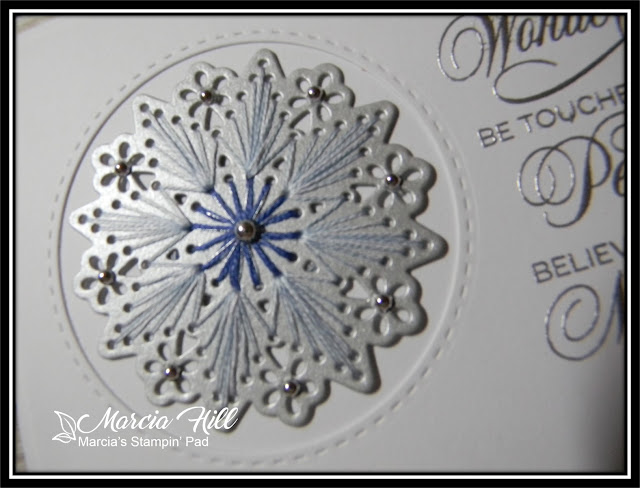
Hello friends.  In my younger years I did quite a bit of sewing/stitching, including counted cross stitch, but not so much in recent years.  Until now...and I happened upon the Spellbinders Large Die Of The Month club and their Merry Stitching Dies!  It comes as a set of 3 (a snowflake, a tree, and a border die), and I've become obsessed with stitching up the snowflake and Christmas tree dies!  They are so quick and easy to do and make amazing cards!!  Mine will probably have to be hand delivered or put in a padded mailer because of the gold and silver baubles (Trinity Stamp Co.) I added to mine, but they make the perfect finishing touch!  So this is a very picture heavy post, and I'm not going to write about every card and just show you the photos.  If you have any questions about how I did any of them or what additional products I used, just feel free to email me.

So lets get started with the Christmas tree cards...


And now for the snowflake cards...


Aren't they all SO pretty?!!  And seriously, SO easy and quick to do!  Just a matter of die cutting the shapes and all the holes and stitching lines are already there for you, so all you have to do is pick out your colors of embroidery floss (I used 2 strands) and I also used some gold and silver thread along with my floss too.  I kept all my backgrounds and sentiments very simple so as not to detract from the main stitching image.  

I hope all my American friends have a wonderful and blessed Thanksgiving tomorrow however you choose to celebrate it!  This year has been so tough, but there is still much to be grateful and thankful for, so I will be counting my blessings tomorrow!

Thanks for stopping by today ... I love it when you do!