Thursday, March 29, 2018

Color Throwdown #486

Hello friends.  Playing along with this weeks Color Throwdown Challenge, and I have to tell you that I am head over heels in LOVE with this color combination!!


I wish I could tell you that I came up with my card idea all on my own, but I was absolutely blown away by a card Marybeth did HERE using a small gingham square stamp from SSS's Choose Joy stamp set and GinaK's Wreath Builder set!  I would have copied Marybeth's card completely if I could have figured out how exactly she did her background, but I do like the way mine came out too...guess it pays to think outside the box!!


I used PTI's Sweet Blush and GinaK's Peach Bellini and Bubblegum Pink inks to make the background, and the sentiment is from the same SSS Choose Joy stamp set as the plaid square I used for the background.  The butterfly is from PTI's Life Is Beautiful.  Pretty simple really, but just love the color combo and the background with the plaid and the sentiment done in a square too...thank you, thank you Marybeth for such a wonderful card to CASE!!


Make sure to leave Marybeth some love on her card (HERE) also, and then check out all the FABULOUS cards from the DT at Color Throwdown and play along...you can find all the info right HERE.
  
Thanks for stopping by today ... I love it when you do!


Wednesday, March 28, 2018

Make It Monday #316 - Stenciled Edges

Hello friends.  This week's Make It Monday challenge is being hosted by Lizzie and she's showing us how stenciling around the edges of our cards adds such a soft and beautiful touch.

My touch isn't quite as light as Lizzie's, as apparently I don't know when to stop!!  I started out using the Cover Plate: Circle Die as a stencil and Aqua Mist ink, but it was SO light that I felt it could barely be seen (the whole idea I think!!).  So why not add some Hawaiian Shores ink and make it a little bolder, right?!  I'm making it sound like my stenciling is right in your face bold, but really it's not bad...just not as soft as Lizzie's!


After I added my stenciling, I started stamping my bouquet with Ocean Tides ink in the lower corner and then adding my fussy cut flowers over all the greenery for a little dimension.  The flowers and leaves are from the new Stitching Garden and it is a beautiful set and very easy to line up the layers with the help of a MISTI.  My sentiment is from the Inspired: Praise set and a few clear sequins finished off this card that will be going to a dear friend of mine who is battling ALS.


Check out Lizzie's video and GORGEOUS card right HERE and then play along!

Thanks for stopping by today ... I love it when you do!


Monday, March 26, 2018

Merry Monday #283 - Puppy

Hey Merry Monday fans...Leanne is challenging us to add a PUPPY to our Christmas cards this week.


Awwwww...isn't that a sweet inspiration photo?!!  We have two dogs (Brinkley and Daisy) in our house so I'm a little partial to this week's challenge!

I made a CAS card using SSS's Furry Christmas and left it just black and white with the exception of the Santa hat which I colored in with my Copics and some Dazzling Diamonds (SU!) glitter.  The sentiment is from PTI's Season's Greetings.  Sorry about the cat sneaking into the card...it was part of the stamp and I didn't know if it would look too good if I masked it out, so she stayed!

We can't wait to see what YOU come up with for this week's challenge using a PUPPY (or 2 or 3)!  Check out what the rest of the DT came up with and then play along with us right HERE.

Thanks for stopping by today ... I love it when you do!


Sunday, March 25, 2018

Papertrey Ink Blog Hop - March 2018

Hello friends.  It's the 25th and that means it's time for Papertrey Ink's monthly BLOG HOP.  This month's inspiration photo is awesome...take a look:


Wouldn't you LOVE to have that arrangement sitting on an entry way table or for your centerpiece on your dining room table??!!  I immediately thought of the Nesting stamp set and that's where my card started.

 
I stamped the nest with Classic Kraft ink and then rocked the edges in Cocoa Bean ink using my MISTI, and then added the leaves with Simply Chartreuse and Ripe Avocado inks.  The die that cuts the nest leaves an opening in the center of it and made a perfect place to tuck my flowers from the Bitty Bouquets in to.  I used Melon Berry and Hibiscus Burst for the tulips and Bright Buttercup for the other little flowers.  I used a layer of Blueberry Sky to mimic the wall and table in the inspiration photo and then added the white die cut layer using the Mix & Mat: Confetti die.  My sentiment I embossed in silver on a strip of vellum using the Tulip Time stamp set.  I know there's no bird in this inspiration photo, but the little guy from the Brushed Birds set just seemed to fit right into that little spot on the side of the basket.  A few sequins and some white baker's twine finished off my card that I'm going to use for my mom's 86th birthday that's coming up in early April.


Time to get hoppin my friends...I just LOVE visiting all the blogs to see how everyone interpreted the photo!  Check it all out right HERE!! 

Thanks for stopping by today ... I love it when you do!


Friday, March 23, 2018

Double "D" Challenge - Just "Wing" It

Hello friends.  The Double "D" Challenge has a fabulous mood board to inspire us this time around with anything related to "WINGS".


I was inspired by the colors in the 3rd photo and the fairy in the 4th photo and came up with this card:


I recently had picked up one of the card making magazines made in the UK, and a lot of them have a freebie gift attached these days.  In this particular one there was a die for a fairy, and it seemed like the perfect opportunity to use it for this challenge.  My background was made using Lindy's Magical Powders - Tibetan Poppy Teal & Witch's Potion Purple.  If you've never seen or used these before, they're like Perfect Pearls on steroids...the shimmer and shine is unbelievable and almost impossible to photograph!  Here's a closer up where I tried really hard to capture it for you:


I kept the card very simple so as not to detract from the background or the silhouette of the fairy, and just mounted it to a white card base and added a embossed sentiment strip at the bottom (PTI's Keep It Simple: Birthday).  A little bit of black baker's twine finished off the card.

Lot's of time left to play along with this challenge, and you can find lots of inspiration from the DT right HERE.

Thanks for stopping by today ... I love it when you do!


Thursday, March 22, 2018

Color Throwdown #485

Hello friends.  The inspiration photo at this week's Color Throwdown challenge is SOOO pretty...I'm in love with the color combination and I really, really like that chair!!


I used a couple CONCORD & 9TH sets and came up with this simple card.

 
I started by embossing the main flower from the You Are Enough set in black and then used a sponge dauber with GinaK's Peach Bellini ink to fill in the petals.  I grounded the flower by adding a strip of plaid I had made using CONCORD & 9TH's Plaid Background stamp with black and Peach Bellini inks.  I placed a black sentiment strip above the plaid (PTI's Keep It Simple: Birthday) and then added a ribbon from SU! (Groovy Guava - retired).  Quite simple but I love that flower and wanted it to be the star of the card.  :0)

There's still a few days left to play along with this week's challenge and you can check it all out right HERE.

Thanks for stopping by today ... I love it when you do!


Wednesday, March 21, 2018

MIM #315 and Twofer Challenge #3

Hello friends.  Playing along with this week's Make It Monday challenge at Papertrey Ink and Darnell's third Twofer challenge.

This week Melissa shows a beautiful card and video on adding embossed enamel splatters to our cards, and I had fun finally getting to use my Forest Floor: Spring stamp set and also the new A Bit More: Butterfly Blooms.


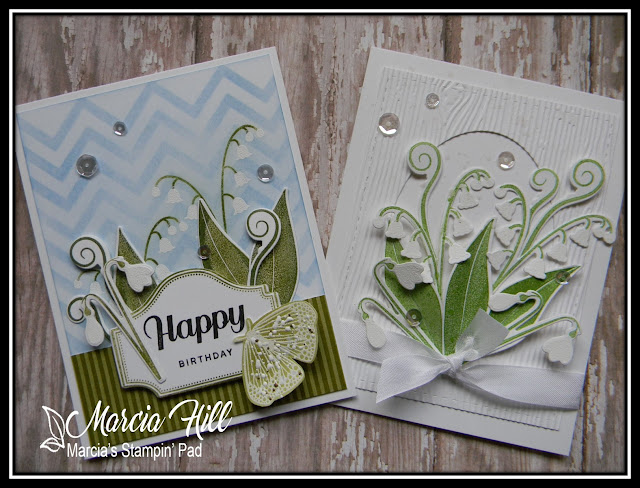
I started by stamping and embossing the two Lily of the Valley sprigs and then added a light blending of Blueberry Sky ink over the panel so the embossed white flowers would show up.  Next I added a bit of stenciling using the same ink to give a bit more definition to my background and added a strip of striped Ripe Avocado to ground the bottom of my card.  The rest of the leaves and sprigs and sentiment were die cut and popped up for some more dimension.  The butterfly I chose to do just like Melissa's as it was SO pretty!  Here is a close up with using the Frantage Shabby White Embossing Enamel:


Because I still had the Forest Floor: Spring stamp set out and I hadn't had a chance to play along with Darnell's 3rd Twofer challenge, I made a 2nd card where this month the challenge is to use blossoms.


I'm afraid I wasn't as creative as Darnell (and some of the other entries too!) by making my blossoms into something other than a flower, but I do like how my 2nd card turned out and it is DIFFERENT than the 1st card.  Here's my photo of the two of them:


Both using the Forest Floor: Spring stamp set, but my 2nd card is all done in a green and white color theme.


I die cut an oval from my panel and then dry embossed it using a woodgrain ef, and that set the stage to add all my leaves and Lily of the Valley.  I die cut them all and then stamped and embossed before mounting with dimensionals to give a lot of dimension to this card.


I even used a stylus on my leaves to fold them up a bit in the center and make them look more realistic.  I added a seam binding ribbon towards the bottom where the pieces all come together to hide that a bit and then finished with some clear sequins and Sheer Shimmer Sparkle Spritz...it really sparkles IRL!!  I left off a sentiment as I'm not sure what I'm going to use this card for yet...it could be birthday, wedding, thinking of you, or even a sympathy card.

There is still time to play along with both of these challenges.  You can play along with this week's Make It Monday challenge right HERE and play along with the Twofer challenge right HERE.

Thanks for stopping by today ... I love it when you do!


Monday, March 19, 2018

Merry Monday #282 - A Inspiration Challenge

Hey Merry Monday fans...it's time for another challenge and this week Linda has a BEAUTIFUL inspiration photo to inspire you!


I was inspired by the golden glow of the candles, the reds, and the greenery and came up with this:

I embossed my candles (SU!'s Merry Patterns) in white and then masked them while I did the greenery.  (I masked them because I knew I was going to stamp them in using red and didn't want it to run while I used water with the greenery) The greenery is also from SU! (Ornamental Pine) and I inked it up in my MISTI using Old Olive and Mossy Meadow inks and then spritzed with water before stamping to give the water color effect.  Then I removed the mask over the candles and added the red and used Delicata Golden Glitz ink for the flames of the candles.  The sentiment comes from PB's Yuletide Wishes.

How will you be inspired by this photo this week??  We can't wait to see your cards in the gallery!!  Check out all the BEAUTIFUL inspiration from the DT and then play along with us right HERE.

Thanks for stopping by today ... I love it when you do!


Saturday, March 17, 2018

My BIG Adventure To The Craft House In Kansas

Hello friends.  Last weekend I went on the trip of a lifetime!  Not to Hawaii, Greece, or Italy, but to Newton, Kansas where the Craft House is located!  It was the trip of a lifetime for me because I got to finally meet 5 friends who have become so dear to me over the course of blogging these past few years!  We all wondered if we would even recognize each other without signs at the airport, but I should have known better...it was instant recognition and immediate hugs and even a few leaking eyes!  And what followed was truly a weekend to remember with lots of talking, laughing, sharing, and of course stamping!!  It was like we'd all been best friends since we were young girls!  Birgit Norton is from Maine, Nancy Penir is from California, Linda Snodgrass is from Washington, Colleen Foelker is from Oregon, Kara Progreba is from Wisconsin, and I'm from Michigan.  Quite a distance for all of us to meet in Kansas, but SO worth it!!

This is an extremely heavy photo post, and I'm not going to bother with all the details, so if you have any questions concerning who's in any of the photos, or what supplies were used on the projects we made, just comment and I'll get back to you! Enjoy!


And this wasn't even all the projects we worked on...I still have more to finish!!  It was in the 70's last weekend in Kansas and coming from cold Michigan, you'd think I would have wanted to be outside, but we were so busy stamping and crafting away (and talking and talking and laughing!!!) that we never got outside to enjoy the warmer temps!  Truly a magical weekend and one I will remember for a lifetime!  Friends...one of God's sweetest gifts!  :0)

Thanks for stopping by today ... I love it when you do!


Friday, March 16, 2018

CAS Watercolour March 2018 Reminder - GARDEN

Hello friends.  Just a friendly reminder that the CAS Watercolour challenge is still open till the 24th of this month and we'd love to see your creations using a GARDEN theme in the gallery.


When searching for stamps that would work for a GARDEN theme card, I found a bunch of small stamps by Judith that worked beautifully for another garden card.


I used the following stamps (F-31, C-55, F-187, C-69, C-29, B-41, and one with no number that I water coloured in pink) and stamped them all first in VersaFine Onyx Black ink.  Next I used my Zigs and Aqua Painter brush to add color.  My sentiment comes from PTI's Flower Favorites, and I also added a die cut frame from PTI's Infinity Frames to finish off my card.

You have till the 24th to play along with this challenge, and can find all the info you need to join in right HERE.

Thanks for stopping by today ... I love it when you do!