Showing posts with label Make It Monday Challenge. Show all posts

Sunday, February 3, 2019

Make It Monday #349 - Negative Die Cut Backgrounds

Hello friends.  Getting in under the wire for this week's Make It Monday challenge where Ashley shows us some FUN ways to use our negative die cuts as backgrounds.

Hadn't had a chance to play with the latest Shape Shifters: Square 4 die yet and also wanted to try Betsy's technique with the colored salt crystals (HERE) and combining the two I came up with this:


For my negative die cut panel I started by finding the center of a piece of white cs (4" x 5 1/4") and then made my first cut with one of the corners of the Shape Shifters: Square 4 set diagonally...hope that makes sense.  My 2nd cut was from the bottom up center and then the two sides to create a diamond shape.  I placed the negative panel over a water colored panel that I did following Betsy's instructions for using colored salt crystals and it makes the prettiest backgrounds with lovely colored little flecks.  I wish I would have taken a picture of the water colored panel first before I covered it with the die cut panel, but here's a closer up picture so you can see a little bit of all the colors:


I added a Raspberry Fizz layer behind the water colored and die cut layers, and then mounted to a white card base.  My flowers are from Gran's Garden and my sentiment is from Winter Woods.

You can check out Ashley's BEAUTIFUL card and video HERE, and if you're quick, play along before the challenge closes tomorrow morning (Monday).  This was a FUN technique and one I will use again!  :0)  

Thanks for stopping by today ... I love it when you do!


Wednesday, January 23, 2019

Make It Monday #348 - LOTSA LETTERS

Hello friends.  This week Michelle Leone has a fun VIDEO for the Make It Monday challenge, showing us how to use LOTSA colorful letters on our cards.

I pulled out a couple of oldies but a goodies from Heather Nichols called Heart Squared and Wonderful Words: Love to come up with this "Love You" card.


I started by stamping the Heart Squared in Hawaiian Shores and then added the 3 die cut LOVE in Pure Poppy, Hawaiian Shores, & Raspberry Fizz.  I still had the Farmer's Market Florals sitting out on my desk so I stamped up a couple flowers and leaves using Lovely Lady, Raspberry Fizz, Pure Poppy, and Hawaiian Shores inks and arranged them over the Heart Squared.

 
You can just see a little of the sparkle on the one leaf in this close up...I added WOS to the leaf centers along with a few iridescent sequins to add some sparkle and shine to my card.  I matted the card with a layer of Hawaiian Shores cs and then added to a white card base and finished off with some white crochet thread at the top.  I apologize for the poor lighting...my middle love looks like it was cut out of Hawaiian Shores, but the flowers and Heart Squared all look like they were stamped in Aqua Mist...grrrrrr!  They really are all the same color IRL!!

Check out Michelle's beautiful cards and video right HERE and then play along.  :0)

Thanks for stopping by today ... I love it when you do!


Friday, January 11, 2019

Make It Monday #347 - Winter Watercolor

Hello friends.  I'm playing along with Papertrey Ink's Make It Monday challenge where Ashely shows us some great tips to make a Winter Watercolor card.  You can check out Ashley's GORGEOUS card and video right HERE.

I didn't stray too far from Ashley's card and used the tree's from the Enchanted Forrest set and came up with this:


I started just like Ashley did with Spring Rain and Blueberry Sky re-inkers and water colored the background.  Once that was dry I stamped the tree's using Ocean Tides, Pinefeather, and Cocoa Bean inks.  I didn't have any gesso so I used white acrylic paint to add the snow to the tree branches and the shadows beneath the tree's.  I also splattered some of the white paint to look like falling snow.  Here's a closer up so you can see better:


I stamped my sentiment from the O' Tannenbaum set and then framed out my Winter scene using the largest Pierced Feature Frames: Ovals in white and then added that to a piece of Bitty Big DSP in Blueberry Sky.  I mounted that all to a top folding white card base and then finished off with a piece of Rustic Jute Twine and a few enamel dots in light blue.  Oh, and did you notice the little bunny peeking out from the side of the oval frame (In The Meadow die)?

This was such a FUN challenge for me and Ashley's video really was filled with wonderful water coloring tips!  Check it out HERE and then play along!

Thanks for stopping by today ... I love it when you do!


Tuesday, December 18, 2018

Make It Monday #345 - Creating Ombre Sentiments

Hello friends.  This week's Make It Monday challenge has Lizzie showing us how to make OMBRE SENTIMENTS...you can check out her video and awesome card HERE.

We had our Christmas celebrations early this year, so when yesterday came with the new Make It Monday video, I was all excited thinking I had the whole day, even the whole week to play with the challenge and any others that caught my eye too!  As soon as I watched the video I had an idea pop into my head using the Bold Borders: Flurries die and got right to work!  And unfortunately it was one of those ideas that looked great in my head, but didn't translate so well onto cardstock!  And of course it was one of those where it would have been so much easier to just pick a different idea, but stubborn ol' me couldn't accept defeat and kept going!  I did end up with a card I like, just not what I first saw in my head!


I wanted not only sentiment to be ombre, but the card as well, so I started by blending Spring Rain, Blueberry Sky, & Enchanted Evening inks together and then die cut using the Bold Borders: Flurries die.  I sprayed quite liberally with Sheer Shimmer Sparkle Spritz and then adhered to a white card base...so far, so good!  My idea next was to use the sentiment "dashing through the snow in a one horse open sleigh" from the In The Meadow stamp set and make it ombre like I had with the snowflakes die.  The problem??  Sentiment was too long and wouldn't fit in the small rectangle in the center of the card!  I had also wanted to die cut the horse and sleigh image in black (silhouette) to coordinate with the sentiment and that was too large for the small rectangle opening too....grrrrr!  Plan B.  Find a smaller sentiment and image...I do need a birthday card for January, so the birthday sentiment from the In The Meadow set would work fine...except there's not enough of it to really make it ombre with 3 colors!!  Plan C.  Only use two colors for the sentiment...Blueberry Sky and Enchanted Evening.  To be able to use the sledding image on my snow hills and include the sentiment meant having to cut down the snowhills, and that meant stamping the sentiment over 2 layers...the MISTI sure came in handy here!!  OK, done grumbling here as my card didn't turn out too bad...just wasn't what I had first saw in my head!  And here's a closer up shot so you can see some of the shimmer...it really does SPARKLE in real life!!


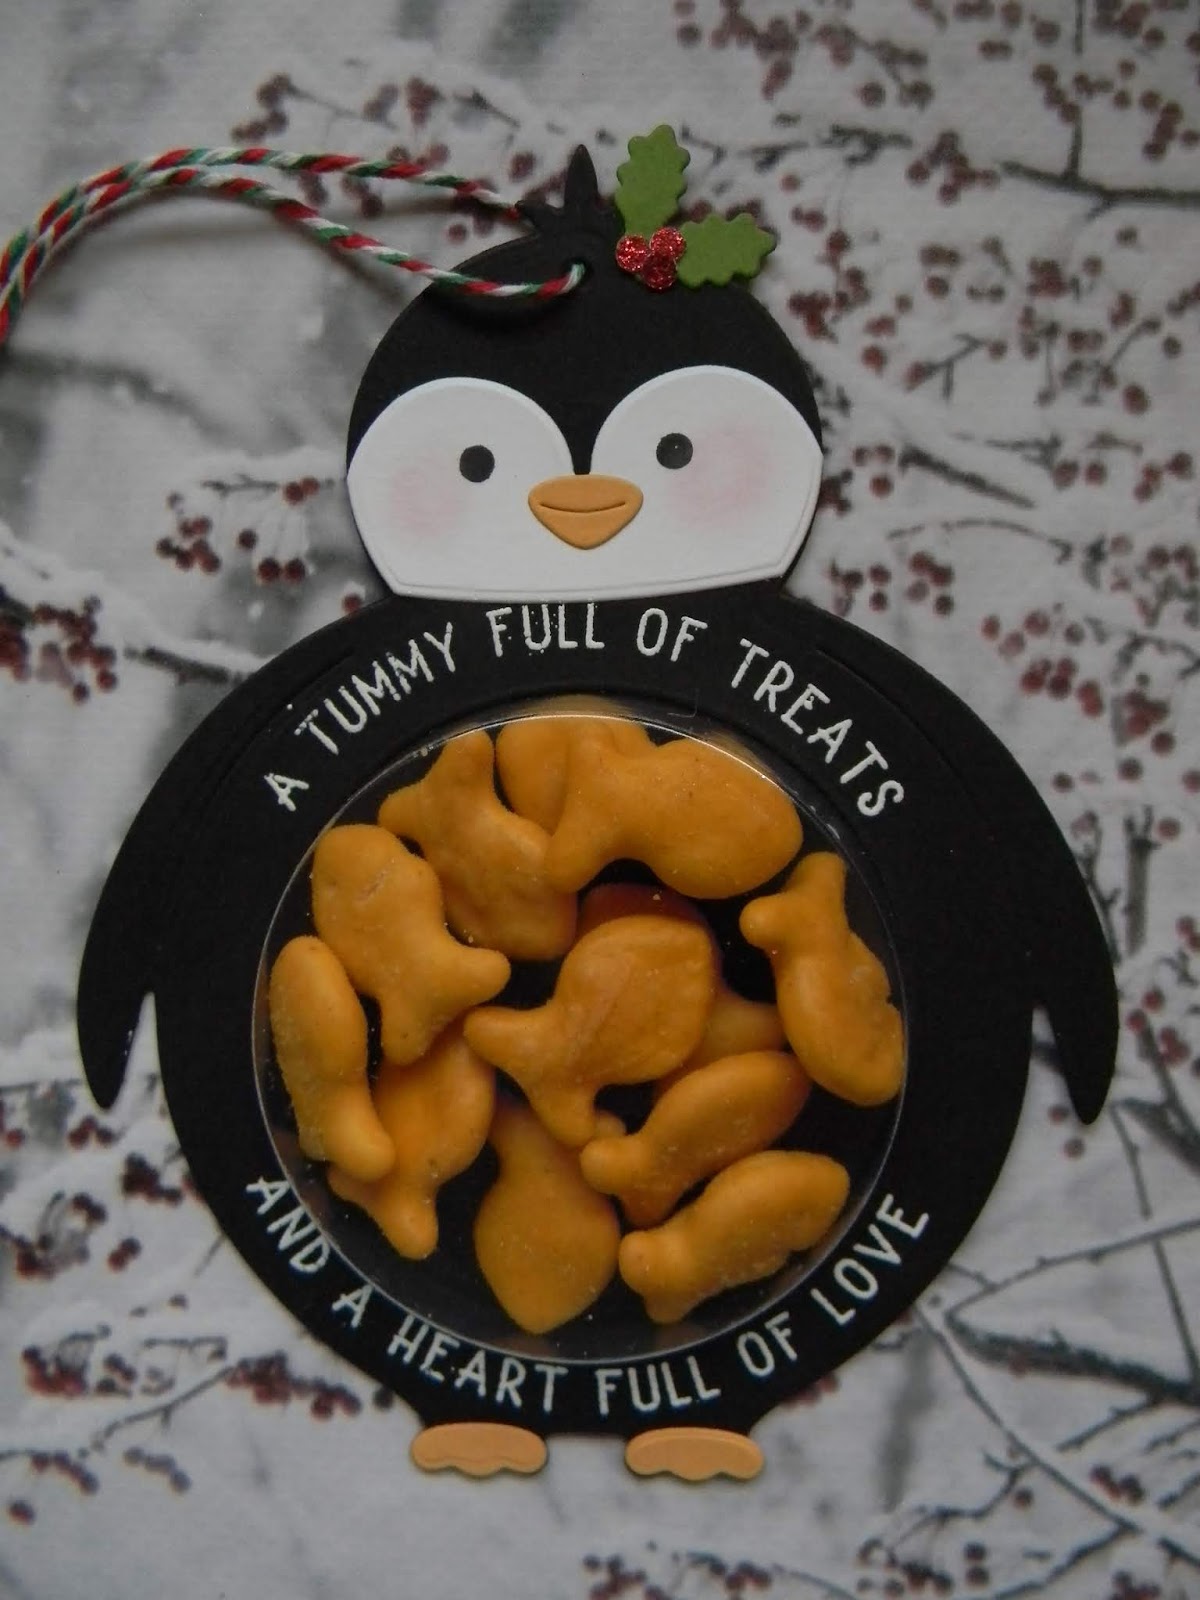
Also had to show you how cute the Penguin Potbellies that I made for my granddaughter and grandson turned out:


My 4 year old granddaughter got such a kick out of there being goldfish in his stomach!!  (They got enough chocolate in their Rudolph Bags that I didn't feel guilty about putting crackers in the Penguin's belly!!)  Took the idea from Marybeth Lopez and added a zip strip on the back so they wouldn't have to destroy the Penguin to get the treats out.


My zip strip came from the Just A Little Something stamp and die set.

Make sure you check out Lizzie's lovely card and video HERE and then play along for a chance to win a $25 gift certificate to Papertrey Ink...I just won a couple weeks ago and it makes shopping so much more FUN!!  :0)

Thanks for stopping by today ... I love it when you do!


Wednesday, December 5, 2018

Make It Monday #344 - Deck Your Dies

Hello friends.  Melissa Phillips has a GORGEOUS card for this week's Make It Monday challenge where she shows us how to deck out our word dies by using DSP, Glitter Paper, Felt, or any other number of different mediums.

My card is one of those that ended up totally different than what I imagined when I first started!  Some cards come together so easily, and then others like this one go through many, many renovations!!  But in the end I was happy with the way it turned out!


My first thought was to use Dawn's Say It Simply: Holly Jolly word die, but it covered my whole card so it was hard to add anything else!  I finally ended up pulling out an oldie but goodie...Wonderful Words: Snow.  I die cut it 4 times and did the top layer with the Bitty Big DSP in Aqua Mist and then coated the top of it with some Dazzling Diamonds glitter.  I used the Snowfall Style Stencil Collection stencils with Aqua Mist ink on my white panel and then with Vintage Photo DI on my kraft panel that I then die cut with the Mix & Mat: Berry Boughs.


I also added a die cut snowflake from Fancy Flakes (that I also glittered up!) and then added my deer from the Dash Away All die on top of the snowflake.  I also stamped the deer using a CP floral tree stamp with the Vintage Photo DI to give it a little pizazz!!  I stamped the "dashing through the" sentiment in Pure Poppy on a white strip to add some red to the card along with a little bit of baker's twine around the deer's neck.  A tiny drop of Black Nuvo Drops was used for the deer's eye.

Make sure you check out Melissa's lovely, lovely card and all the info to play along with this challenge right HERE.     

Thanks for stopping by today ... I love it when you do!


Wednesday, November 28, 2018

Make It Monday #305 Revisited - Love Of Layers

Hello friends.  Because of the holidays last week, Papertrey Ink is revisiting an older Make It Monday challenge (#305) called Love of Layers with Laurie Schmidlin.  I loved the challenge then (see my post HERE), and I sure had FUN playing along again this time!  So much fun in fact that I have 2 cards to share with you today!


I started with the Bold Borders: Flurries die and cut it with plain white cardstock and layered it onto a white card base...I love white on white!!  I used a piece of Aqua Mist cs that I stamped with Aqua Mist ink and a diagonal stripe background stamp (SSS) cut to fit into the rectangle in the center and then layered a couple Snowfall Style 1 snowflakes cut with Aqua Mist and white cs.  The Aqua Mist snowflake I sprayed with some Sheer Shimmer Sparkle Spritz that you can see a little bit with this close up:


On top of the snowflakes I added the "Joy" die cut that comes with the Bold Borders: Flurries … LOVE to use this word at Christmas!!  I die cut it twice and offset it and also added foam tape behind it to add dimension.  A small gold dot in the center of the snowflake and a few Rainstones finished up my layered card.


For my 2nd card I used the Bold Borders: Yuletide die.  Actually the die cut was already done because I had saved it from using it as a stencil to make an envelope HERE, and decided to use it as a card front.  I added it to a white card base and then stamped my sentiment from Year Of Psalms: October in the center.  I had to do a little surgery on the Psalms 96:11 part of the stamp as it was too far over under the word "glad" and then was covered up by the frame...so I cut it off and stamped it separately centered under the "Be glad" part of the sentiment.  Then I started using Autumn Rose, Scarlett Jewel, and Ocean Tides inks with the Pleasing Envelopes set (I think this is one of my FAVORITE sets from this year!!) so it would coordinate with the colors I had used on the frame, and then fussy cut them out and added them to the frame.  Lots of lovely layers!!


You can see a little bit in this close up that I also added the Sheer Shimmer Sparkle Spritz to the frame before I added it to the card base...really makes the whole card shimmer IRL!!  I finished with a few iridescent sequins, and now I have a few more cards for my Christmas stash!  I think I have enough now (I send out close to a 100 cards every year) and really need to sit down and start addressing them!

Check out Laurie's beautiful card and video right HERE and then play along!  

Thanks for stopping by today ... I love it when you do!


Thursday, November 8, 2018

Make It Monday #342 - Envelope Bags with Patterned Paper

Hello friends.  Lexi is doing this week's Make It Monday challenge with a technique that I did years and years ago with envelopes, but back then we called it "bagalopes"!  I never thought to do it with patterned paper though and they sure are pretty!!

I used the Pure Poppy Bitty Big plaid paper to make my gift bag and had to do it twice!  I think I scored too hard the first time and the paper was ripping in the seams...grrrr!  Did a lighter touch the 2nd time and came up with this:


I still had a tag I'd made last year using the Dash Away All die and the Snowflake Medallion die and it fit beautifully on the front of my bag!  Here's a closer up so you can see the detail:


The Snowflake Medallion die is just done with plain white cs, and then the next layer is a black snowflake (part of the Medallion die) that I added red glitter to the tips of.  The Dash Away All deer was die cut from some plaid I made with Pure Poppy cs and Pure Poppy and black inks.  A little drop of black Nuvo Drops made the eye and then I also added a Tiny Tag and attached with a mini clothespin at the top of the bag to keep it closed.  Pretty quick project as I already had the snowflake/deer tag made, but I love how it turned out and will make a great presentation for a small gift!  :0)

You can check out Lexi's beautiful gift bags and great video for how to's right HERE and then play along!

Thanks for stopping by today ... I love it when you do!


Tuesday, October 30, 2018

Make It Monday #341 - Painted Brushstroke Backgrounds

Hello friends.  Dawn has a FUN technique called Painted Brushstroke Backgrounds for this week's Make It Monday challenge...you can check it all out right HERE!

I have a couple cards to share today as after I painted my 1st background, I didn't think it was too pretty, so I tried again.  My 2nd one didn't look that much better, but after I decided to just go with it and make them into cards, I loved the look!!


I used Craft Smart's Pink Bliss, Apple Tart, Ocean Breeze, & Red acrylic paints to paint my backgrounds.


For my 1st card I used the Bold Borders: Flurries die on one of my backgrounds and then adhered to a white card base.  Before I die cut either background, I sprayed them with Sheer Shimmer and Sparkle Spritz and I so wish I could capture that in the photo's as both of these cards really SPARKLE!!  I almost didn't buy this die because I thought I had enough snowflake dies, but I really, really liked the font for the JOY die, and I'm so glad now that I purchased it!  I layered 4 more JOY die cuts behind the colored one and adhered it to the center, and at this point I decided it didn't need anything else...between the colors, the sparkle, all the snowflakes, and the dimensional JOY die cut, this card just didn't need anything else!  So really a very quick and easy card that really packs a punch!!


For my 2nd card I used Dawn's idea and just used the negative of the Say It Simply: Merry & Bright die and adhered to a white card base.  I added a few of the smallest Fancy Flakes cut in half and finished with some white baker's twine.  Once again, very simple but all the SPARKLE really takes this card up another notch!  I still have the positive die cut from this card to make a 3rd card with, but didn't want to totally overwhelm ya!!  :0)


The little rectangle center piece that was left over from the Bold Borders: Flurries die was just to pretty to throw away, so I rounded the corners on one end and attached it to a tag die from the Holiday Tag Along Mini Kit.  Easy peasy and again, lots of SPARKLE!!

Check out Dawn's BEAUTIFUL cards and video and then play along right HERE  … it really is a FUN challenge!!

Thanks for stopping by today ... I love it when you do!


Friday, October 26, 2018

Make It Monday #340 - Banner-ific!

Hello friends.  Michelle has a FUN and BEAUTIFUL project for this week's Make It Monday challenge...you can check out her lovely, lovely banner and video right HERE.

I would have loved to copy Michelle's banner completely as it is SO pretty...loved every little detail and especially the color combo she used!  I didn't want to be a copy-cat though, so I got out my new Warmer Together set and came up with this:


I wish I had a wide angle lens so you could see what it looks like all stretched out, but...  I started with the Made With Love Tags 2 and cut the bottom piece from the Aqua Mist Bitty Big DSP and the top layer from gray cs.  Next I die cut three of the medium Fancy Flakes snowflakes in Aqua Mist cs and quite liberally doused them diamond glitter! Next came the fun part of adding the penguins from the Warmer Together set.


Aren't they just the sweetest?!  I have to tell you though that I had a heck of a time lining these little guys up until I decided to stamp them in backwards order.  I stamped the black faces first, then the Weathervane gray for the feathers, and lastly the solid body stamps with Soft Stone ink.  I used
Summer Sunrise for the feet and beaks.


I decided to make this banner for my oldest daughter who has 2 children, so I stamped all 4 penguins that come in the set...one is supposed to represent our son in law, one our daughter, and the 2 smallest penguins represent Addy and Landon!  I think they'll get a kick out of this!  I finished the banner with the smallest snowflake die from the Fancy Flakes set in white for between the tags and also glittered them up in a major way...this banner really SPARKLES!!

 This was definitely a FUN challenge this week, so check out Michelle's video and lovely, lovely banner right HERE and then play along!

Thanks for stopping by today ... I love it when you do!


Wednesday, October 10, 2018

Make It Monday #339 - Patterned Frames

Hello friends.  This week's Make It Monday challenge has Ashley showing us how fun it is to use stamping or patterned papers on our frames to dress us up our cards!

I needed a masculine card for my brother-in-laws birthday card, so I used the Text & Texture: Wood Slices stamp set and came up with this:


I used the medium sized die from the Pierced Feature Frames and die cut my stamped piece, and also cut 2 extra frames from scrap white cardstock to make my frame a little more dimensional.  I used a piece of kraft cs and one of the Noted: Pinked A2 Vertical dies to put behind my frame, and then added my birthday sentiment in the center using the Pen & Ink stamp set.  My little inlaid leaves are from the Phrase Play #7 die set and I used Honey Nut, Scarlet Jewel, Summer Sunrise, & So Saffron cardstocks.  I also heat embossed the edges of the leaves in copper.


Here's a close up so you can see the copper embossing a bit better.  A little bit of rustic twine finished off my masculine card.

Check out Ashley's beautiful card and video HERE and then play along.

Thanks for stopping by today ... I love it when you do!


Friday, October 5, 2018

Make It Monday #338 - Incorporating Packaging Dies Into Your Cards

Hello friends.  Lizzie is up this week for the Make It Monday challenge and would like us to incorporate packaging dies into our cards.

I have a couple cards to share today, and my 1st card is a CASE of Kim Heggins card that I just absolutely fell in LOVE with using the die from the Quilted: Winter set.


I can't seem to get enough of the Aqua/Red color combo lately, so I used Aqua Mist cs for my card base and then the die was cut with Pure Poppy Bitty Big DSP.  I was going to use the mug from the new Merry Mug set, but it was too large with the mouse when I put the tag over it, so went back to my all time favorite Fancy Tea Cup die and it worked perfectly!


And who can resist a mouse (Christmas Critters) in a tea cup??!!  I used several of the snowflake stamps from Snowfall Style with Aqua Mist ink to stamp my background and card base before assembling the shaker part of the card.  I used a little bit of baker's twine for the top of the tag and then put my sentiment on the inside as the outside was busy enough for a smaller card.

My 2nd card is more in keeping with the current season, and I used the center of the Shape Shifters: Circle 3 die along with the Tag Sale #4 die to come up with this card:


I kept my color palette pretty simple using Honey Nut and Rustic Cream cs along with the Honey Nut Bitty Big DSP.  I also used Dawn's Scallop Stackers: Medium Die for the background and the Words To Live By: Gratitude stamp and die set for my sentiment.  The little die cut banner is from the Just A Little Something set.  a few sequins and some lace, twine, and seam binding ribbon finished off my card.

You can find Lizzies CUTE card and video right HERE to play along.

Thanks for stopping by today ... I love it when you do!


Thursday, September 27, 2018

Make It Monday #337 - Packaging With Printed Papers

Hello friends.  This weeks Make It Monday challenge has Melissa doing a picture tutorial on different packaging techniques with printed papers to get us ready for the upcoming holidays!

I have 2 to share with you today...they're just too much fun to make to stop at one!!  My first one I did a lot of CASE-ing of Melissa's because I just LOVED her paper choices!!


I used the Pillow Box Die with the Aqua Mist Bitty Big DSP and tied a sheer red ribbon around it...LOVE aqua and red together for Christmas!!  I used the Made With Love Tags 2 die and Real Red Bitty Big DSP for the back layer and white for the top layer and then added the cup from Merry Mug, the Be Merry is from the Bold Borders: Yuletide, and the snowflake is from Fancy Flakes.


This close up shows a bit better the sparkling embossing powder I used on the whipped cream, the candy cane strip on the cup, and the snowflake.  It really sparkles IRL!!  I tied the tag to the ribbon with red & white bakers twine.

For my 2nd one, I started with Kraft Bitty Big DSP and the Pillow Box Die and some more sheer red ribbon.


I used the same Made With Love Tags 2 die with Real Red and white cs and then stamped the white part of the tag with the Quoted: Favorite Things stamp set with Real Red and Kraft inks.  I added the Dash Away All die cut from Kraft cs and sponged the edges with Vintage Photo DI, and then pop dotted it on my tag.

 
I finished by tying the tag to the ribbon with red & white bakers twine, and also added another Fancy Flakes snowflake under the sheer red ribbon.

These were both so fun to make, and I already have a couple more cut out that just need to be decorated yet.  Christmas is such a FUN time to craft for!!  Check out Melissa's 3 FABULOUS gift packages HERE and then play along!

Thanks for stopping by today ... I love it when you do!


Thursday, September 20, 2018

Make It Monday #336 - Faux Gilded Leaves

Hello friends.  This weeks Make It Monday challenge has Laurie Schmidlin showing us how to combine copper, platinum, & gold embossing powders to create a faux gilded look.  You can check out Laurie's STUNNING card and video right HERE.

Here's what I came up with:


I started with a background using Winter Wisteria cs and ink with last months Text & Texture: Leaves stamp.  Rather than just a cluster of gilded leaves, I decided to make a wreath and decorate it with the leaves and a few flowers.  I used the Rustic Wreath die and then added the copper, platinum, & gold embossing powders.  It looked pretty but it was missing something, and I think it's the last step of stamping over the top of the embossing like Laurie shows in her video.  I did decide to leave it plain though and focus on the leaves from Leave It Be and Leaf Prints.  The larger leaf in the center I stamped on Scarlet Jewel cs to tie in with the flowers from Farmer's Market that I wanted to add.  I also added a little bit of WOW Verdigris embossing enamel  on the center leaf to add a bit more color.  The smaller leaves on each side were stamped on Winter Wisteria cs and embossed with the copper, platinum, & gold embossing powders.  I set my wreath die cut off center and then added the larger frame from the Pierced Feature Frames...I love these frames!!

  
Hopefully you can see the shine a bit better in this close up photo.  To finish I added a piece of twine and a Tiny Tag that was also stamped with the Text & Texture: Leaves stamp set.  Kind of different colors for a fall card, but I really like the way it turned out!

Make sure to check out Laurie's lovely card and great video (HERE) and then play along.  It's a FUN challenge!!  :0)

Thanks for stopping by today ... I love it when you do!


Friday, September 7, 2018

Make It Monday #335 - Pop Up Slider Cards

Hello friends.  Betsy is up this week with a FUN Make It Monday challenge using a little bit of creative engineering to make a pop up slider card.

Watched the video twice to make sure I knew what I was doing and still had to really think when it came time to insert the sliding mechanism...good thing I like art better than engineering!  But it was still a FUN technique and I got one more card done for my Christmas stash using the Warmest Wishes stamp set...


Did a little bit of ink blending using Peacock Feathers and Mowed Grass Distress Inks for my background, (and also did a little water splattering to resemble snow) and then did some masking with the tree image from the set.  Stamped my bear twice and fussy cut both out and then used Pure Poppy to ink up the sweater and fussy cut that also to add to the bear.


Because I had my trees in the background there wasn't a really good space to stamp my hidden sentiment, so that's why I stamped and cut out the 2nd bear.  It doesn't get covered completely when the top bear is flat, but the 2nd one doesn't show enough to make it look bad.


In this close up you can see a bit better that the snowflake I added for the pull tab was WOS'd  to make it a little more festive!  My sentiment on the top of the card is from the Think Big Favorites #10 that I curved using my MISTI.

This was definitely a fun technique to play around with!  Check out Betsy's amazing card and video right HERE and then play along.

Thanks for stopping by today ... I love it when you do!