Showing posts with label Playing Cards with Michele. Show all posts

Monday, July 3, 2023

Stenciling Back to Back with Michele

Hello friends.  Michele and I had another play date this past week, and although we did more talking (and eating) than we did stamping, we had a wonderful day together and did manage to create 2 cards each to share with you!  I was lucky enough to be one of the Grand Prize Winners in May from Pinkfresh Studios and it had just arrived in the mail a couple days before Michele came, so I saved it so we could open it together as we both LOVE PFS products.  Stenciling seems to be our jam when we get together, and included in all my new goodies was a beautiful set called Pretty Blossoms, that included the stamp (it's a red rubber background one), the die, and the stencils.  So let's get to it and we'll show you what we created!


I did my stenciling in shades of coral, pinks & turquoise inks (PFS inks) and then used the die to cut out the white spaces.  I added foam tape behind the flowers and leaves and added to a layer of Ocean Mist cardstock (Gina K) and then mounted to top folding white card base.  It still needed something so I added the Stitched Scalloped Rectangle Die (PFS) in white to the top and it framed it out perfectly.


To finish I added my die cut sentiment from the Circle Florals stamp and die set (PFS) and also added a few Disco Ball Sequins from Gina K for a bit of bling.  The depth on this card with having part of the background cut out really makes this card special and so much prettier than my photos show!!


My 2nd card is very bright compared to my 1st card and I had fun masking off sections of the stencil so I could make the flowers all different colors as opposed to my 1st card.  When I added my white circle for my sentiment (Diagonal Stitched Circles - PFS), it covered up a few of the florals, so I stenciled and fussy cut the pink flower and added it over the portion of the circle.  I added my stacked sentiment (Perfect Sentiments - PFS), but it still looked glaringly white to me (the circle), so I added a few silver metallic pearls and a snippet of the Leafy Branch that I die cut from vellum.  Much better!!


   I also added glitter to all the green leaves for some sparkle because why not?!!  The two cards are very similar in some ways, but still different enough with their colors that I'm very happy with the way they turned out!

Play dates with Michele are ALWAYS fun and this was a much needed time together for both of us!  Like I said earlier, we didn't do as much stamping as we usually do, but there was lots of catching up to do on life and I treasure that part of our friendship!!  And again, we had to take time to eat, and a Summertime taco salad sure hit the spot, along with the payday bars Michele brought...yummmmmm!!  You can check out what Michele did with these Pretty Blossoms stencils right HERE...I'm going to check them out too as I always LOVE her creative takes on everything!  Thanks again for coming over Michele and sharing a much needed friend day!!

hanks for stopping by today ... I love it when you do!


Wednesday, April 26, 2023

Sharing Stencils & Lunch with My Friend

Hello friends.  Can you believe Michele and I had another play day so soon after our last one?!  We're making up for lost time, and as usual had a FABULOUS time talking, laughing, stamping, and sharing a meal together!  A play day with Michele is like a day full of sunshine and we just had the best time!  We even had a fun video chat with our sweet friend Birgit who so wanted to come play with us, but Maine is just too much of a drive from Michigan...dang it!!  Anyway, I have 3 cards to share with you today, so sit back and relax and let's get to it!!


Aren't these Wonderful Tulips sooooo pretty?!  Michele designs for Doodlebugs, and this hot foil plate and the coordinating stencils from Spellbinders she got from Doodlebugs is AMAZING!!  Michele had already foiled the image in black foil for me and then I just colored it in with the stencils using Gina K inks.  I love how there's a matching die that cuts around the right hand side of the tulips, and then the bottom and left side are straight so you can adhere them right to your card base edge.  


  I foiled my background too in PINK foil (Spellbinders) with the Geometric Optical Background Foil Plate (also Spellbinders) and then put foam strips on the back of the tulips for some dimension from the background.  The sentiment also comes from the Wonderful Tulips set and I finished with a few PFS Blush Glitter Drops.  I love, LOVE how this card turned out!!  I made a 2nd card with this tulip set, but you'll have to wait for an upcoming Color Hues Challenge to see that one!!


I also stamped and stenciled these next two cards using Michele's PFS's Poppy Mix set and love how these turned out too!  I didn't want to do too much to this and take away from all the beautiful stenciling, so I just added PFS's Simply Diamonds Cover Plate Die over top of it, and then added my stamped and die cut sentiment from the Perfect Sentiments set, and finished with a few Disco Ball Sequins from Gina K.


At first I wasn't sure I liked the way this one turned out after stenciling it, but after actually making it into a card, it's grown on me quite a bit!!  I cut off a portion of it on a diagonal and then added it to a layer I used PFS's Stitched Diamonds Cover Plate Die on.  I added a pink strip to ground the two layers and then added my sentiment (also from PFS's Perfect Sentiments) and one of the flowers from the lower half I cut off.  A few clear gems and this card was finished.

Michele always has the best toys to play with and we always have fun creating together!  Make sure you check out Michele's post HERE to see what she worked on while we were together...you know she'll knock your socks off as usual!!  Thanks so much for sharing Michele...I just LOVE our play times together!!  And thank you for the delicious lunch too...you can make that again ANYTIME!!!!!!!!!  :0)
 

Thanks for stopping by today ... I love it when you do!


Tuesday, March 28, 2023

Playing Cards with Friends

Hello friends.  FINALLY had another play date with my sweet friend Michele last week, and it was SO good to be together again after such a loooooooong Winter!  I think it was early November the last time we got together, and that is just too long to not see each other!  But we made up for it with LOTS of hugs, laughing, stamping, and of course lunch!!  

Michele had a BIG win with Pinkfresh Studio back in January and won their whole release that was filled with oodles and oodles of wonderful stamps, dies, and stencils, so we decided on the Blooming Peony stamp and stencil that was in the release to play together with.  I went a little bold with my colors and Michele went softer with hers, but we both loved how they turned out.  Here's mine...


This is all stenciling my friends, and I just LOVE how it turned out!  You start with a stencil that masks all the flowers and leaves so you can blend in your background color, and I just used leftover ink on my turquoise blending brush.  Then I used pinks and oranges (one of my favorite color combos!!!!!) for my flowers and shades of greens and turquoises for my leaves.  I used a Spellbinders Hemstitch Die to add the framing around my panel and then added to a white card base.


Took me a few tries before I FINALLY got a picture that showed the shimmer of the pink foiling I did for my sentiment (Spellbinders - Essential Glimmer Sentiments), but I'm glad I persevered so you could see it...adds such a nice touch to the card!  I finished with a few brushed gold butterflies from SU!.

My next two cards use the Detailed Leaf Stamp and coordinating stencils and die from Pinkfresh that Michele brought along...


I used more pinks and oranges to stencil in the leaves and then used the coordinating die to die cut it out.  I used Waffleflowers Woven Pattern Die (also Michele's) for my background...I love, LOVE this die!!


The sentiment is part of the stamp and die set, and I finished with a few glitter drops in Blush from PFS.


Using the Detailed Leaf Stamp again with blues and greens this time.  Instead of die cutting the image this time, I ran the panel through my Fern embossing folder (SU!) and then matted with a Teal layer before attaching to a white card base.  I used the same sentiment and wrapped some gold thread behind it to add a little shine.  I also finished with a few gold metallic pearls.


My last card uses the Wonderful In Every Way stamp and stencil set.  This set is sold out right now and I can see why...so simple but oh so beautiful!!  I stenciled with pinks and purples for the flowers and some lighter greens for the leaves.  I used the largest Slim Ornate Banner Die to die cut my image and then adhered to a white card base with foam strips behind the image for some dimension.  I also added some twine around the top before adhering to the card base.  The sentiment is also from the Wonderful In Every Way stamp set and was die cut before adding to my card.  Michele had brought me some Altenew Enamel Dots in pretty shades of green, and I added a few of those to finish off this card.

I know...looooong post, so thanks for sticking with me for so long!  I hope you enjoyed all my creations using all these wonderful Pinkfresh Studio goodies that Michele brought and shared with me, and I know Michele has lots of goodies to share with you too, so make sure you head over to her blog to see what she came up with right HERE.  She will knock your socks off as usual with her fabulous talent!  Thank you, thank you, THANK YOU Michele!!  I had SO much fun last week and can't wait to do it again...you're the best!!

Thanks for stopping by today ... I love it when you do!


Monday, September 5, 2022

Playing Cards with Michele

Hello friends.  My sweet friend Michele and I got together again to play cards a couple weeks ago...and talk and laugh and laugh and have lunch (I made the lunch and Michele provided the yummy dessert!!), and even more laughing and talking, and yes, even some crafting!  We discovered that we each had just purchased PFS's Grow Wild Stencils and decided to share what we each had made using them.  Let's get started!


I love PFS stencils because of the ease of use in lining everything up, and this stencil set lined up so beautifully I didn't even mind that I hadn't purchased the coordinating stamp set and die!  I used 3 shades of yellow inks (Lemon Whip, Sunshine, & Sweet Mustard - all PFS) to stencil the flower layers with some leftover orange on my blending brush for the flower centers.  The leaves were done with Light & Medium Spruce inks (Gina K).  


I used an older MFT hello die (I think it was a freebie with an order) to die cut the word towards the bottom of my card panel, and then die cut the word again twice more from just plain white cardstock to stack beneath the stenciled cut before replacing back into the stamped layer.  I added a few gold metallic pearls (PFS) to finish off this simple card.


 My 2nd card is my favorite I think.  I used shades of pink this time (Ballet Slipper, Sparkling Rose, & Bubble Gum - PFS) with yellow for the flower centers, and Jelly Bean Green & Fresh Asparagus inks for the leaves (Gina K).  Next I used PFS Slim Ornate Banner Dies to die cut the decorative edges of my stenciled panel and then placed on a white card base that I had embossed with SU!'s Subtle embossing folder.  


  My birthday die was cut twice...once from white and once from black and then I offset them a bit so they would show up better on my stenciled part of the card.  I added a few Disco Ball Sequins (Gina K) and some black & white baker's twine to finish off this card.


My last card was done in shades of purple (Light, Medium & Dark Lilac - Gina K), with yellow flower centers and the same greens as my 2nd card for the leaves.  I did some fussy cutting on one side of my panel before attaching to a card base that I added black & white striped dsp (PTI) to at the bottom.  


My "thanks" was foiled in silver on black cs using PFS Fancy Script Words and was also stacked with additional die cuts for a bit of dimension.  I added a piece of black & silver ribbon (SU!) to the side, and then finished with a few silver metallic pearls added to the flower centers and a few randomly on the dsp.  

OK, that's it for me this time, but please, PLEASE go over to Michele's Blog to see what she has done with this same set of stencils...it will definitely be worth your time!  Thanks Michele for coming my way this time, and for the FUN day and wonderful dessert...and of course the AWESOME friendship!!  Aren't stamping friends just the BEST??!!

Thanks for stopping by today ... I love it when you do!


Tuesday, June 28, 2022

Playing Cards with Michele - June 2022

Hello friends.  Had another play date with my sweet friend Michele a couple of weeks ago, although I think we did more talking than playing this time around!  Sometimes friends just need to talk and catch up and listen, and if there's one thing I've learned from the past 2 years, it's not to take any friendship for granted, and the value of an in person hug!  So talk we did, but never fear, we did do some stamping too!  And eating!  I've mentioned before that Michele used to be a caterer and is a FABULOUS cook!  We met at her house this time and she prepared egg drop soup, egg rolls, and Chinese Almond cookies...all homemade and absolutely delicious!!  Loved it all and HAD to have the cookie recipe...I think it's going to be one of my all time favorites!!

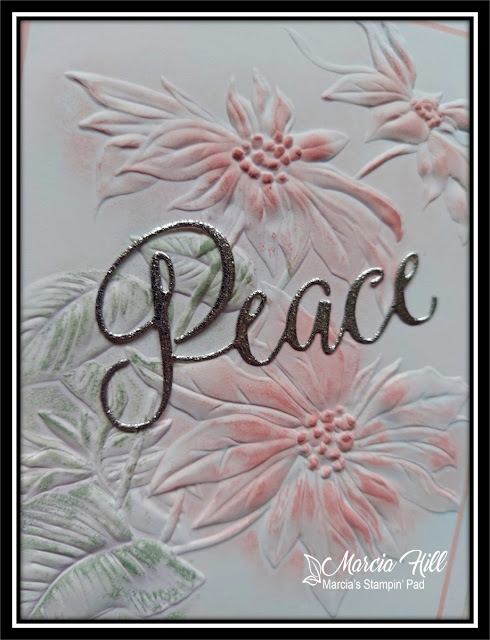
I brought to Michele's one of my new items from The Greetery called It's A Wrap: Posy Pocket die, and we decided this would be the item we both made cards with to share with you all.  My first two cards are kind of mirror images using the positive and negative from the Frosted Frames die set (The Greetery) with the posy pocket wrap.  Take a look:


I'm loving how "vintage looking" these both came out!


This first card uses the Seed Catalog Background stamp with the Frosted Frames dies and then decorated with the posy wrap filled with the Plucked Dies (the Dandelions) and the BotaniCuts: Pussy Willow Dies.  The posy wrap was stamped with the Windowpane Plaid Background stamp before I die cut it.  All my coloring on the dandelions and pussy willows were done with DOX inks and splattered with dark brown ink.  The little tag is from PTI's Tiny Tags stamp and die set.  Everything else on this card is from The Greetery.  

My 2nd card uses all the same stamps and dies, but just the reverse of the first card.  I did add a bit of glitter to the dandelions in this card for a bit of sparkle and shine.


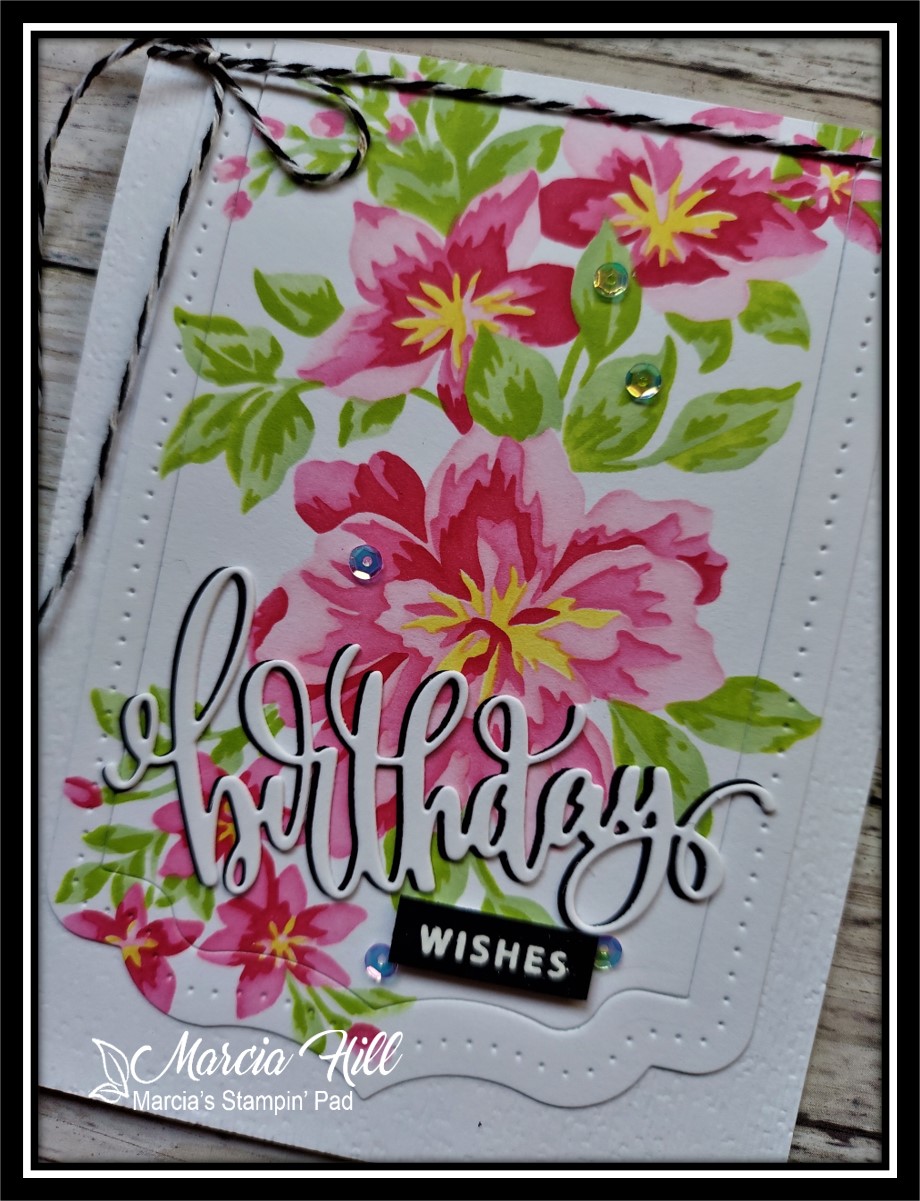
My next card is pretty busy and BRIGHT, but I think it's my favorite!!  Michele and I both have a love of pink & orange together, and she gifted me with a pad of dsp from PTI that's all pinks and oranges...I absolutely LOVE it!!  Thanks so much Michele!!  Anyway, I used one of the dsp's to cut my posy wrap from and filled it with blooms and oranges from PFS's Citrus Blooms stamp and die and stencil set.  


 My oranges all have Glossy Accents added to them, and the leaves have WOS on them, so this whole wrap is filled with shimmer and shine!  My background is also from PFS (Lemon Lush) and I also used The Greetery's Postal Frame Die behind the stamped background.  My sentiment is from The Greetery's Lemon Blossom stamp set and I heat embossed it on black and fussy cut around it.  I finished this card with a few Disco Ball sequins from Gina K.


My last card, I promise!!  Another sweet friend (Lisa) had recently gifted me with a few die cut wraps from Simply Graphic (Flower Wrap) because I was falling in love with her cards using this die cut wrap (this was before I had The Greetery one!) and was feeling a little left out!  Aren't stamping friends the greatest?!!  (Thank you again Lisa!!)  Anyway, Lisa had made a card HERE that I just had to CASE since I also had the Impression Obsession 
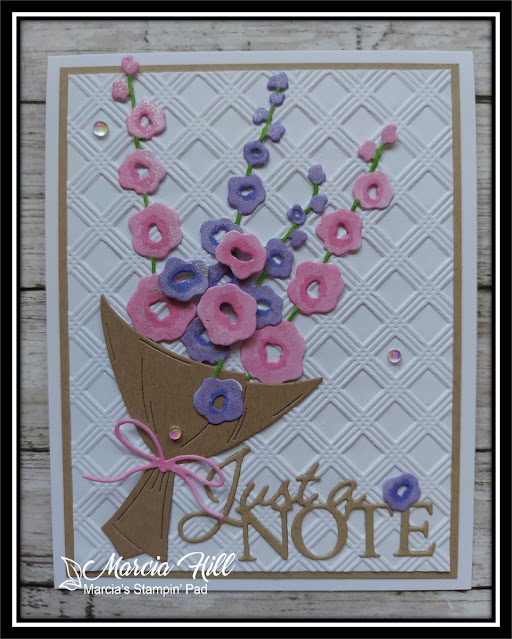
Hollyhocks dies.  I used an Altenew Basic Plaid 3D embossing folder for my background and then added the wrap filled with my pink & purple Hollyhocks (Copic colored).  Hard to see in my photo but I used WOS on my flowers, so they really sparkle IRL!  My die cut sentiment is from MB's Just A Note Posh Script die, and I added a few of the Trinity Stamps Crystal Ball Dewdrop Baubles to finish off my card.

If you've stuck with me this long, thank you, thank you!!  I know it was a long post, but...  I'm so excited to see what Michele did with these posy wraps, so join me in hopping over to her site right HERE and check it out...I am never disappointed and you won't be either!  Thank you again Michele for hosting our get together, and most of all for your sweet friendship...I am blessed!! 

Thanks for stopping by today ... I love it when you do!


Wednesday, March 16, 2022

Playing Cards with Michele - March 2022

Hello friends.  It's been a loooooong 3 months since Michele and I have played cards together, and even though we only live an hour apart, we do have to play by Winters rules!  Grrrrrr!  But, when we do finally get together, it's always the best time!!  

We both had different stamps/dies of each others that we wanted to play with, but decided that Papertrey Inks's Feathered Friends #19 was the common denominator this time around, so here's what I came up with using this sweet & chubby little feathered friend!!


   Michele gifted me the sweet little frame from Altenew, and I layered two of them together for a bit of dimension on top of a panel that I embossed with SU!'s Subtle embossing folder.  My little Feathered Friend #19 was stamped in shades of blues, and then also layered up for even more dimension.


My sentiment is a Gina K sentiment strip from her last kit, and I also added a few Rainstones (PTI) to finish off this CAS card.


Michele brought her PFS's Folk Art Print stencils, and I ink blended a couple up...this one in my favorite greens (SU!'s Evening Evergreen & Soft Succulent) and then pinks and oranges (Gina K).  I added a stacked scalloped frame die (PFS), and then another one of those ADORABLE birds stamped in the pinks and oranges to match my background.


My gold embossed sentiment is also from PFS and finished off this colorful card quite nicely!  (Although you can't see it, I also added WOS to the little birds feathers!)


Michele had made a card awhile back using a Lisa Horton embossing folder (Foxglove) that I absolutely fell in love with, so she brought that along for me to play with!  I tried inking up the inside of the folder first, but wasn't happy with the look, so I just embossed and then added a very light inking with blender brushes...purple and green.  The color is so subtle, but I wanted the beautiful embossed texture to be the star of the card!!


I finished this card with a die cut sentiment from Memory Box (Posh Script Thank You) that I popped up on foam strips, and a prisma foiled butterfly (PFS's Small Butterflies) that I stenciled with a light and darker purple to coordinate with the Foxgloves.

I have a couple other cards that are works in progress, and I'll share those at a later date.  I can hardly wait to see what Michele has made with some of my goodies and how she used that sweet and chubby little bird too!  Thank you, thank you Michele for another wonderful play day...I still don't get out too much, so these play days and your friendship mean the world to me!!  And of course you sharing your goodies with me too!   Friends...one of Gods greatest gifts!!  :0)

Thanks for stopping by today ... I love it when you do!


Wednesday, December 8, 2021

Christmas with Michele!

Hello friends.  Last week it was my turn to travel to my sweet friend Michele's house and play cards.  As usual, we did a lot more hugging, talking, and laughing than we did making cards, but never fear...we do have a few to share with you today!  And let me not be remiss in mentioning that Michele served a FABULOUS lunch of Thanksgiving leftovers that still has my mouth watering!!  I don't know how many of you know that Michele used to be a caterer, and boy can that girl cook!  I rounded off our lunch with my peanut butter brownies, and even Michele's hubby gave them a 2 thumbs up!  But then, what's not to love about chocolate and peanut butter...the two just go together!!

OK, enough chatter and let's get to the cards.  I have two to share with you today, using a SSS die called Etched Berry Branch and a 3D embossing folder from Tim Holtz called simply Poinsettia.  


My Etched Berry Branch die cut was colored with sponge daubers and Distress Oxide inks, and then splattered with white acrylic paint.  My dry embossed background uses a MB embossing folder called Gracious Leaves that is probably one of my favorite buys of this year!  I matted this layer with a piece of black cs and mounted both to top folding white card base.  My sentiment is a die also from MB called Special Merry Christmas and was die cut from gold mirror cs.


Pretty simple, but I really like the way it turned out!  My 2nd card uses the Tim Holtz 3D embossing folder called Poinsettia and is also a very simple card.


This card would be a very easy one to mass produce, and still looks so elegant and like you spent a lot of time on it!  I used Altenew's blending brushes for this card, and their brushes are flat and not curved and rounded like most other companies.  I inked two of the brushes up with Bundled Sage and Victorian Velvet Distress Oxide inks and then brushed the inside of the embossing folder on the depressed side of the folder (NOT the raised side).  I then simply added my cs and ran it through my Big Shot, and voila!  A colored AND embossed Poinsettia!!  


I matted my embossed layer with a piece of Sweet Blush cs (PTI) and then adhered both to a top folding white card base.  I finished simply with a die cut sentiment from Gina K using a scrap of sparkling silver cs.

Make sure you head on over to Michele's blog to see what she created using the same die and embossing folder...she never disappoints, so make sure you check out her awesome creativity!  I hope you enjoyed our play time together as much as Michele and I love getting together and playing cards!

Thanks for stopping by today ... I love it when you do!


Wednesday, October 27, 2021

Playing Cards with Michele...AGAIN!

Hello friends.  Had another play day with my sweet friend Michele, and of course just had the best day using each others goodies, LOTS of laughing, and because it's cooler now, even a big pot of chili for lunch along with Michele's toasted cornbread...yummmmmm!  

I stamped and die cut enough of all the goodies Michele brought for me to play with to make 10 or more cards, but don't worry, I only have 3 to share with you today!  Haha!!  Seriously though, it is so wonderful to be able to share each others stamps, dies, & stencils so we don't feel as though we HAVE to buy everything!!  Michele brought a bunch of stamps and dies from The Stamp Market and Pinkfresh Studios that I had a great time playing with, and we both used my Holiday Botanical Background (also Pinkfresh Studios) stencils to create a card with.  So let's get started...


Let's start with this simple card using Michele's Holly Jolly stamp and die set.  I die cut the Holly Jolly with white and red cs and attached to a background using a SSS 3D embossing folder called Holiday Greenery.  Next I added the Holly Leaves that I stamped and fussy cut just under the tail of the Jolly, and then pop dotted the berries that were also stamped and fussy cut.  I used some WOS of the Holly Leaves and some Glossy Accents on the berries.  CAS and done!


Next up is the Pinkfresh Studios Garden Roses stencil set that Michele brought, and I stenciled in Fall colors with yellows and oranges and outlined using the stamp set in dark brown.  I am totally in LOVE with the way this one turned out...even the brown leaves which I saw Lea Lawson do on a PFS live!  I used SU!'s Subtle embossing folder on my card base, and then stacked 3 of PFS's Ornate Oval Frame die cuts together to give some dimension and to lift my roses up off the card base. 


 The "happy" die cut is from The Greetery and I die cut that once from gold mirror cs and twice from white, before slipping my gold embossed "birthday" strip through the loops of the "p" and "y".  I finished with a few gold pearls (PFS) and just couldn't be happier with the way this card turned out!


My last card uses the Holiday Botanical Background stencils (PFS) that both Michele and I used, and I used a variety of Distress Inks to do my blending with.  I used The Greetery's Crimped Frame Dies on this stenciled piece, and then matted with SU!'s Mossy Meadow and Mellow Moss (retired) cs.


I also used The Greetery's new Abundant Joy dies (that I am totally in LOVE with!!) for the center of my card, and offset the Mellow Moss and Mossy Meadows base piece to match up with the layering of the card base and matting layers.  I finished this card up with some PFS gems to add a little sparkle, and love the way this one turned out too!

Aren't stamping friends truly just the BEST??!!  I feel so blessed to have made so many wonderful friendships through this craft!!  Thank you Michele for once again sharing your goodies with me, and most of all spending the day with me...I treasure your friendship!!  Make sure you hop on over to Michele's blog to see what came up with using some of my goodies...I know you won't be disappointed!!  

Thanks for stopping by today ... I love it when you do!


Wednesday, April 28, 2021

Playing Cards with Michele...IN PERSON!!!

Hello friends.  It finally happened!  After over a year of not seeing each other in person, Michele and I got together last week and had a "play date"!  Oh let me tell you, it did the soul so good to be together in person, and to share our love of card making with each other!!  We spent the morning talking, laughing, hugging, (we've both had both our vaccinations!) and of course playing!  Michele had asked me to bring all my Pinkfresh Studio stuff along, and we both had fun using the Layered Sunburst Stencil (blended with multiple colors of DOX inks), and here's how I finished mine off...


  Michele and I both share a love of Anita Jeram's little critters (Colorado Craft Co. - Birthday Wishing), so I stamped my image once on my colorful sunburst, and then again on a plain piece of white cardstock.  I colored the image with my Copics and then die cut.  Before gluing down my die cut image over the stamped image on the sunburst, I snipped off the balloon so that the stamped image of the balloon on the sunburst would show.  


 To finish off my card, I used The Greetery's Crimped Frame Dies to cut my sunburst panel and then attached to a white card base.  My die cut "Celebrate" is also from The Greetery (Birthday Blooms), and I also added a few sequins (Gina K) for a little sparkle and shine. 

Michele also graciously let me borrow an Altenew stamp set called Statement Flowers, and in keeping with the rainbow theme, I came up with this quick and simple card...


I used some washi tape to tape off my edges first, and then ink blended in rainbow order using Gina K inks.  After carefully removing the washi tape, I put my panel in my MISTI and then stamped the image several times using Catherine Pooler's Twilight ink until I was happy with the gray color.  I trimmed the panel down just a bit and then added to a white card base using foam tape on the back to add a little dimension.  To finish I heat embossed the "Hello" (from the stamp set) in white on a small piece of black, and also added foam tape to the back before adding to the card.  A couple more sequins and I was done!

I can hardly wait to see what Michele did with her Layered Sunburst Stencil piece, so hop on over to her blog along with me and check it out...Michele NEVER disappoints!!  And thank you, thank you Michele for the BEST day last week...I can't express in words how much I NEEDED that friend time together, and I'm already looking forward to our next get together!!  :0) 

Thanks for stopping by today ... I love it when you do!