Thursday, June 30, 2016

Make It Monday #254 - Stenciling with Texture Paste

Hello Friends.  Ashley has a great video on adding color to texture paste in this weeks Make It Monday challenge, and it's one of those challenges where you don't know how cool it's going to look until you remove the stencil...fun, fun, fun!

   
I played around first with the Modern Background (PTI) stencils, a Tim Holtz Flourish stencil, and making one of my own stencils using acetate and the leaves from the Songbirds die.  If you enlarge the photo, you'll see the leaves did not turn out so great...paste and ink crept under the stencil...grrrr!

Here's what I came up with using the 2 top squares:


I cut out a small card using the new Scalloped Note Card die in Hawaiian Shores cs, added my square with the texture paste that was painted with Hawaiian Shores & Aqua Mist inks, a spray of flowers from the new Forget-Me-Not set and the die cut "gift" from the Don't Forget to Write Home kit, and inked them up with Pink Lady, Scarlett Jewel, Aqua Mist, & Hawaiian Shores inks.  A little flower shaped tag (from Tiny Tags) made a great spot to put my "A" on.  Here's the inside:


Here's my 2nd card that I used the Flourish stencil on:


Used the same Forget-Me-Not set again but with Amethyst Allure and Royal Velvet inks and cs.  I also threaded some white bakers twine through the holes to add a little extra visual interest along the outside.  I used to have some really skinny ribbon (like maybe an 1/8" wide?) that I think would have looked really pretty woven through the holes too, but could not find it!

Here's a closer up shot of the flowers showing the sparkle from my Spectrum Noir Sparkle Pen:


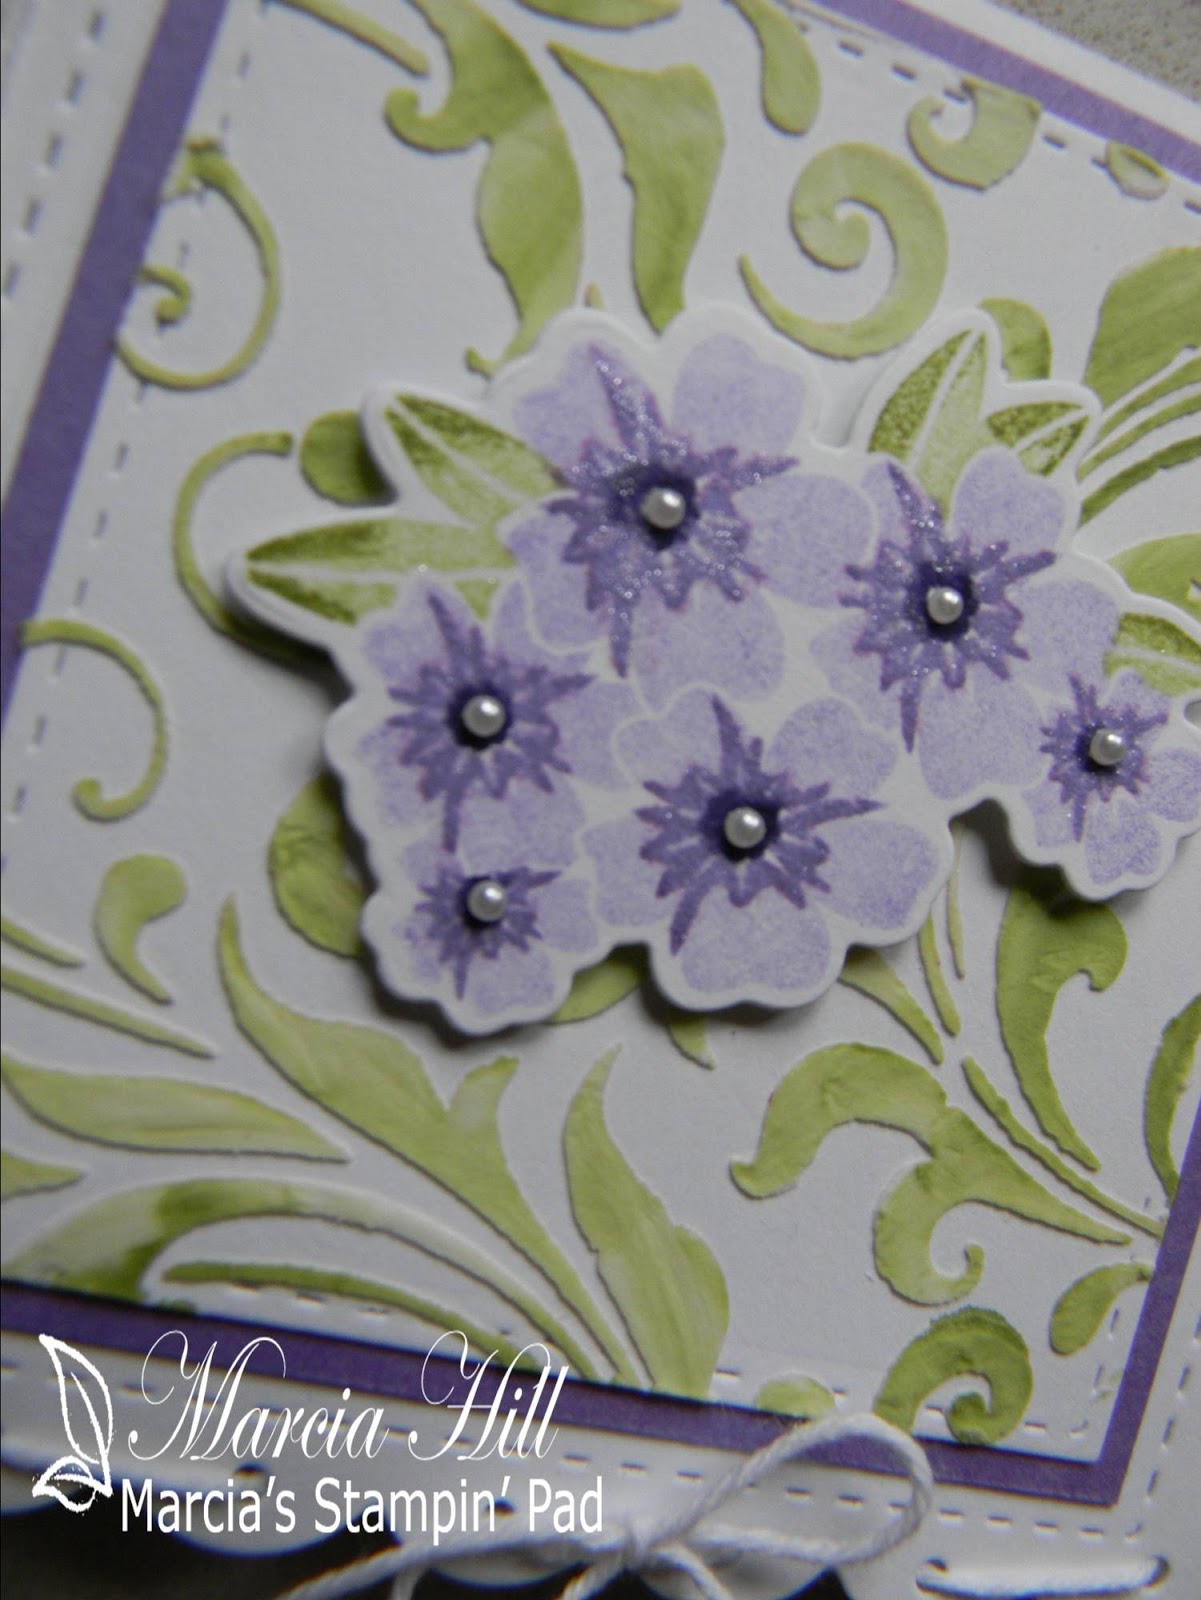
Still a little hard to see even in this close up, but trust me...in both cards those little flowers really shimmer!!  :0)

This really was a great way to add multiple colors to your embossing paste without having to make separate little pots of each color.  Make sure you check out Ashley's video and BEAUTIFUL card, and then play along...lots of fun and you can find it all right HERE.  

Thanks so much for stopping by today...I love it when you do!  :0)

Wednesday, June 29, 2016

Birgit & Marcia's June 2016 Patriotic Challenge

Hello friends.  Birgit and I are challenging ourselves with a Patriotic theme this month, so red, white, & blue are the colors of the day today!!    Although I don't think my cards are too original, I had a lot of fun doing this challenge, so let's get started!


My first card uses a quilt and star die from Gina Marie Designs, a tag using a Casual Fridays die (left blank because I'm not sure what I'm going to use this card for yet), scraps of red, white, & blue DSP, and some thick Cherry Cobbler baker's twine (SU!). 


This next card uses PTI's Friendship Jar Flowers stamp set and Just The Jar: Quart stamp set.  I embossed the jar with silver on vellum and stamped the flowers in Americana, Blueberry Sky, Spring Rain, Enchanted Evening, & Ocean Tides inks.  My "celebrate" sentiment is a die cut from the Wet Paint collection (PTI), and the stars are die cut with a Gina Marie Designs die.

 
Sorry about the photography skills on this card...in real life it's a much deeper and brighter color!  I made a stencil with PTI's Cover Plate: Waves die and then blended Salty Ocean, Stormy Sky, & Fired Brick distress inks to mimic our flag.  I splattered some water drops over the blue to give the impression of stars and then embossed in gold and silver, stamps from Meadow Greens and Friendly Flowers to look like fireworks.  (My husband thought they were snowflakes and totally missed the whole symbolism behind this card...am still shaking my head over that !!)  My celebrate die cut is once again from the Wet Paint collection and is cut out of holographic silver cardstock.


This card uses another PTI stamp set called Colorful Words.  I stamped 4 rows of this stamp in Smoky Slate ink and embossed it once with black and colored in the spaces using a Copic R29 marker.  I used another Gina Marie Design die for the blue frame with the wonky stitching, and then added some die cut stars and sequin stars.  A little strand of red & white bakers twine finished off this card.


My last card is probably my favorite, and once again I used a PTI set called Ahoy.  I used some scrap nautical DSP for the bottom of this A1 size card, and then stamped the top half using Real Red, Cherry Cobbler, Night of Navy, & Smoky Slate inks.  A little hard to tell from the photo, but I embossed the anchor in silver, and the star sequins are silver, even though they look a little gold in the photo.  The little flag I die cut is from MFT Blueprints #27.

I can hardly wait to see what my sweet friend Birgit came up with for this challenge...I know it will be fantastic, so make sure you stop over and see what she came up with too!

Thanks so much for stopping by and leaving us comments too...we love it!  And if you ever have any ideas on what you'd like to see in our next challenges, don't hesitate to let us know...we're always open to suggestions!  :0)

Monday, June 27, 2016

Merry Monday #211 - Blue, Gold, and White/Silver


Hello friends.  I'm delighted to be a Guest Designer again over at the Merry Monday challenge, and this week the challenge is to use blue, gold, and white/silver on your Christmas card.  The inspiration photo (see below) made me think of a stamp set from SU! that I ordered last Fall and had not used yet, and a new (to me) product called Shimmer Sheetz by Elizabeth Craft Designs, and I came up with this:


This was a pretty simple card to make (other than poking out all the million little pieces after die cutting the ornaments!!), and I really like the elegant look to it!  I started by using the dies from SU!'s Embellished Ornaments with a gold mirrored cardstock and then attaching a piece of the Shimmer Sheetz behind the die cuts.  These sheets are like a piece of acetate and come in a variety of iridescent colors.  The blue sheets have a range of color from light to dark blue depending on how the light hits it and I wish my camera could have captured the real beauty of it...grrrrr!!  But anyway, trust me that this card is so shimmery and sparkly in real life!  I kept my background CAS so as not to take away from the ornaments and just added my gold embossed sentiment (also from Embellished Ornaments).  A bit of gold cording to hang my ornaments and layering with another piece of the gold cardstock and a white card base finished off this simple but elegant card.


This is the last week to play along with the Merry Monday challenge for the Summer (July & August and then they'll return in September), so check out all the beautiful creations from the DT and then play along!  You can find all the info to join in right HERE. 

Thanks so much for stopping by today...I love it when you do!

Saturday, June 25, 2016

Colour Q - cQc#347

WOW...2 posts in one day and a Saturday too!  I'm not real familiar with the Colour Q challenges, but after seeing my good friend Birgit's card/post using the colors from the current challenge, I just had to play along!


I had to use colors "close to" since I didn't have any of the above ones, but I think I still came out ok.  I used Smoky Slate, Early Espresso, Tangelo Twist, Blushing Bride, Flirty Flamingo, and came up with this:


 I used PTI's Sentiment Splits: Thank You set and stamped the image in Early Espresso and then stamped again with Versamark (and with the help of my MISTI!) and clear embossing powder.  Next I used my Aqua Painter and the inks listed above to color in the leaves and flowers.  Because the Blushing Bride ink was SO light, I went over it with another layer of Flirty Flamingo and liked it much better.  It's a little hard to tell in my photo, but there is definitely a difference between the top flower (Tangelo Twist) and the two bottom flowers (Blushing Bride & Flirty Flamingo).  Obviously I didn't use the "thank you" from the stamp set, but instead used a Happy Birthday from PTI's Keep it Simple: Birthday.  A few sequins finished off this CAS card.

Not a whole lot of time to play along with this color challenge, but still enough if you want to check it out!  Some absolutely beautiful inspiration from the DT and players, and you can check it all out right HERE.

Thanks so much for stopping by...I love it when you do!


PTI June 2016 Blog Hop Challenge

Hello friends.  It's the 25th and that means it's time for the monthly blog hop over at Papertrey Ink.  Beautiful inspiration this month by artist Yellina James called the Reef.  Nichole suggested pulling out our favorite flower sets for this challenge, but I struggled with that big time!  I know I'm going to see all kinds of beautiful projects from every one today using flowers (and I'll be saying "now why didn't I think of that?!!"), but I take everything so literally, so my card is a sea scene.  Take a look:


My photograph is a little overexposed, so it doesn't show the true colors of my blended background that I really love!  I started with Aqua Mist, Blueberry Sky, & then Amethyst Allure inks blended from the bottom up.  I love the way the white Cover Plate: Waves die really pops against my background!  Using vellum, I embossed with white and die cut the sailboats and sun from What the Doodle: Waves and What the Doodle: Sun.  I used a couple of my Copic markers on the backs of the sailboats to add some color to the stripes on the sails.  I also added some fish from the Keep Swimming stamp set in the same color inks I blended the background with.  I left off a sentiment as I thought it took away from the card, and also because I'm not sure what I'm going to use this one for yet. 

Here's the beautiful inspiration photo we had to work with:

June blog hop

Find out how everyone else was inspired by this photo and then play along!  You can find all the info you need right HERE.  Have fun hopping!!

Thanks so much for stopping by today...I love it when you do!

Thursday, June 23, 2016

Merry Monday #210 - Peace, Joy, and/or Love


Hello friends.  The challenge at Merry Monday this week is to add the words Peace, Love, and/or Joy to our Christmas cards.  I have an older SU! stamp that uses the words Love & Joy that I thought would be perfect for this challenge...take a look:


I blended Autumn Rose and Scarlet Jewel inks for my sentiment and then used an embossing folder to get the lines around the edges to frame it.  Next I used the pine bough from SU!'s Ornamental Pine set and inked it up with Old Olive and Always Artichoke inks, and then misted the stamp before stamping it on my card base.  I love the water colored look this gives the pine branches!  Lastly I added a fussy cut pine cone that I stamped in Baked Brown Sugar ink and then embossed with a little white and glitter for some snow and sparkle.  Here's a closer up view:


There's still time to play and the DT has some amazing cards done as inspiration for you, so check it out and get going on those Christmas cards...you'll be so glad you did when December arrives!!  You can find all the info you need to play along right HERE.


Thanks so much for stopping by today...I love it when you do!

Tuesday, June 21, 2016

Make It Monday #253 - Reverse Stenciling

Hello friends.  Betsy is heading up the challenge this week over at Make It Monday, and made the most gorgeous card using a technique called Reverse Stenciling.  I would have CASE'd her card completely if I had had all the supplies...it is that BEAUTIFUL!!  You can check it out HERE.  Since I didn't have the stencil she used (yet!), I used one of the ones from the Modern Background stencil pack and came up with this:


I loved how Betsy angled her stencil and just had to copy that!  I do not have a brayer, so I just used my Raspberry Fizz and Orange Zest ink cubes directly to the stencil, misted, and then pressed into my cardstock...love how it came out!!  My die cut (Big Hugs) was cut out 4 times and the top one was sponged with Raspberry Fizz and Orange Zest inks.  The sentiment is also from the Big Hugs stamp set.  I added a butterfly from the Color Pop: Butterfly kit and sparkled it up a bit with a Spectrum Noir Sparkle pen.  You can see it better in this close up:


This was definitely a fun technique and one I will be doing again!  Head on over to Nichole's blog and check out Betsy's video and fabulous card and then play along!  You can find all the info right HERE.

Thanks so much for stopping by today...I love it when you do!  :0)

Thursday, June 16, 2016

June 2016 Create Along With Us

Hello friends.  The inspiration over at Papertrey Ink this month is unbelievable, and trying to pick just one card to CASE was almost impossible!  But I have to admit I was totally blown away by a monochromatic card by Kay Miller done all in blues, and tried my best to re-create it.  Here is Kay's card:


And here is my take on it:


I used Weathered Wood and Chipped Sapphire distress inks for my background and just one of the blooms from Brushed Blooms with Spring Rain, Blueberry Sky, Enchanted Evening, and Smoky Slate inks.  Since I don't have the "Grace" die yet, I used the Inspired: Praise die and stamp set for my sentiment.  I also used a Spectrum Noir Sparkle Pen on the leaves and a little bit on the flower, but it's hard to see in my picture.  Here's a closer up view:


I loved the intensity of the blues on Kay's card and wish I could have captured that with my card, but I'm still pleased with the way it turned out! 

There's still plenty of time to play along yet, so head on over to Nichole's Blog and check out all the inspiration! 

Create-along-with-us-heading

Thanks so much for stopping by today...I love it when you do!  :0)

Wednesday, June 15, 2016

Merry Monday #209 - Lesley's Inspiration Challenge

Hello friends.  The challenge at Merry Monday this week is an inspiration photo, and I absolutely LOVE it!  Take a look:


How can you not be inspired by this photo?!!  I took it pretty literally and used a tea cup, the colors, the greenery, and flowers and came up with this:


I started with a 4 X 4 card base and then added a scalloped die cut square (Gina Marie Designs) and a red and white gingham DSP square.  Next I die cut my Fancy Tea Cup die (PTI) with Americana cs (PTI) for the back piece and white for the top piece, which I also added a bit of gold embossing to.  Next I used a Cheery Lynne die (Holly Flourish) and a Poppystamps die (Leafy Sprig) with Old Olive cs and Always Artichoke cs (SU!) and also added a little coordinating ink sponged onto the leaves.  My flowers are from an old EK Success punch, and I also sponged those with some Lemon Tart (PTI) ink.  A little tag from PTI's Tiny Tags and some tiny pearls finished up my card.

There is still time to play in this challenge, so go check out all the beautiful inspiration and play along!  You can find all the info you need right HERE. 

Thanks so much for stopping by today...I love it when you do!  :0)

Monday, June 13, 2016

Altenew's June Inspiration Challenge

Hello friends.  Playing along with the June Inspiration Challenge over at Altenew.  I absolutely fell in love with the soft yellows in the inspiration photo and had to play along!  Also gave me a good excuse to play with my new Majestic Blooms set too! Here's the inspiration photo:
 
photo inspiration challenge_June_2


And here's my take on the inspiration photo:


I used Altenew's Buttercream and Warm Sunshine inks and white embossing powder for my flower and then fussy cut it out.  The leaves I stamped with Mint Julep and New Leaf inks (PTI) and then fussy cut them out also.  I added a strip of striped gray and white DSP and a thin strip of silver glitter paper to the bottom of my card base and then added my flower and leaves.  It still looked kind of plain to me, so I added a couple of the open leaf stamps in Smoky Slate ink (SU!), and then my sentiment in black.  A few iridescent sequins finished off my card. 

There are some absolutely GORGEOUS cards from the DT and players in the gallery, so check them all out right HERE.

Thanks so much for stopping by today...I love it when you do!!

Friday, June 10, 2016

Garden Variety

Hello friends.  Just a quick post today to share a couple cards I made recently using PTI's Garden Variety stamp set.


This is one of those stamps sets that I HAD to have and then it sat there forever and ever!  Once I got it out I had lots of fun and wondered why I waited so long to use it!  I made both of them very vintage like and did quite a bit of distressing with Tea Dye and Walnut Stain distress inks.  The backgrounds on both are scraps of DSP that I stamped and stenciled over before adding all the little details that are in the Garden Variety stamp set.  (except for the die cut butterfly and leaf sprig on the 1st card which are both Gina Marie Designs, and the little heart tag on the 2nd card that is from PTI's Tiny Tags stamp and die set)  Fun, fun little cards that I'm sure someone will enjoy receiving in the mail!

Thanks so much for stopping by today and have a wonderful weekend!  :0)

Thursday, June 9, 2016

Make It Monday #252 - Shadowing with Copic Markers

Hello friends.  Playing along with this weeks Make It Monday challenge where Danielle Flanders shows us how to get more depth with our die cut sentiments by adding shading with a Copic marker.  I am using the What the Doodle: Waves stamp set again (I love all the What the Doodle sets, but I am seriously in LOVE with the Wave set!!) along with the Inspired: Praise set.  Here's what I came up with:


I used the "splash" technique from Loll Thompson for my background using Enchanted Evening, Blueberry Sky, & Spring Rain inks for the first layer, and then Aqua Mist for the 2nd layer.  After it was dry I embossed the waves in white.  Here's a closer up view for you:


Next I used my MISTI to line up my sentiments (and also so I could double stamp them to get the black ink as bold as possible), and then added my die cut "Praise".  I used a C3 Copic marker to go around my diecut, and I really do like the way it gives more depth with such a simple technique!  I added a little bit of bakers twine and some Rainstones to finish off this encouraging card for my friend who is dealing with ALS. 

You can check out Danielle's beautiful card and video right HERE.

I am also adding this card to the CAS Mix Up June Challenge where Die Cuts need to be used. 


Thanks so much for stopping by today...I love it when you do!  :0)

Tuesday, June 7, 2016

Merry Monday #208 - Cards for Kids

Hello friends.  Playing along with Merry Monday where the challenge this week is to create a card for kids.  In my book, that means a card for my granddaughter Addy!  Take a look:


I had never used the penguin from PTI's Pompom Pals stamp set, so this seemed like the perfect opportunity, and of course I had to use pinks!  I embossed with black, and then used my Copics (C3, C5, RV02, RV04, RV09, YR68, & YR18 ) to color in this little cutie.  I used a Gina Marie Designs scalloped circle die to cut out my circle in both the white cardstock and the Melon Mambo (SU!) cardstock.  My sentiment is from PTI's Think Big Favorites #20.  I added a few stars (that I used a Spectrum Noir Sparkle Pen on) and sequins to finish off my card.


There are some absolutely adorable cards this week from the DT, so check them out and play along!  You can find all the info you need right HERE.

Thanks so much for stopping by...I love it when you do!  :0)

Friday, June 3, 2016

Strike Up the Band - MFTWSC283

Hello friends.  Playing along with the Wednesday Sketch Challenge over at My Favorite Things, and finally had a chance to break out one of the newer Birdie Brown stamp sets called Strike Up the Band.  Here's the sketch layout:


And here's my card:


The little bunnies in this set are SOOOO cute, and this particular one reminds me of my son in law who plays the clarinet in the Army National Guard Band.  I colored him with my Copics and then added a little Weathered Wood distress ink to the background.  My ovals and stars were cut using Gina Marie Designs dies, my background paper is Paper Studio, and the sentiment is also from the Strike Up the Band set.

There's still time to play along with this challenge, so break out those My Favorite Things stamps and play along!  You can find all the info you need to play right HERE. 

Thanks so much for stopping by and hope you all have a wonderful weekend!  :0)