Monday, February 27, 2023

Having FUN with Papertrey Inks' Spring Release

Hello friends.  I had a great weekend playing with 3 new items from PTI's new Spring release that came out last week (it shipped super fast!!) and thought I'd share some of it with you.  I would have bought the whole release it was so good, but money constraints and all that!  I made good use of the 3 things I did buy though and added in some older PTI products too.  This is a pretty picture heavy post, and I'm not going to explain a lot of how I made each card, but if you have any questions, feel free to ask in the comment section and I'll get back to you.

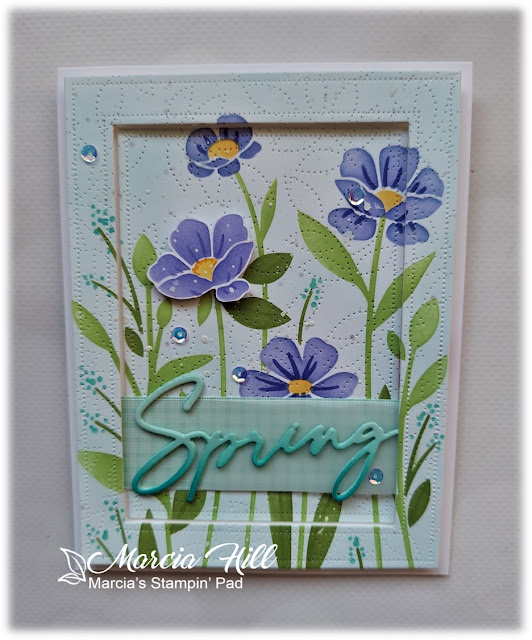
My first card uses the new Wild Blooms Stencil Set and the older Pierced Feature Frames Dies...


Definitely makes you think SPRING, doesn't it?!


The Spring die cut is from The Greetery and the dotted leaf background is from MB's Pinpoint Leaf Plate.


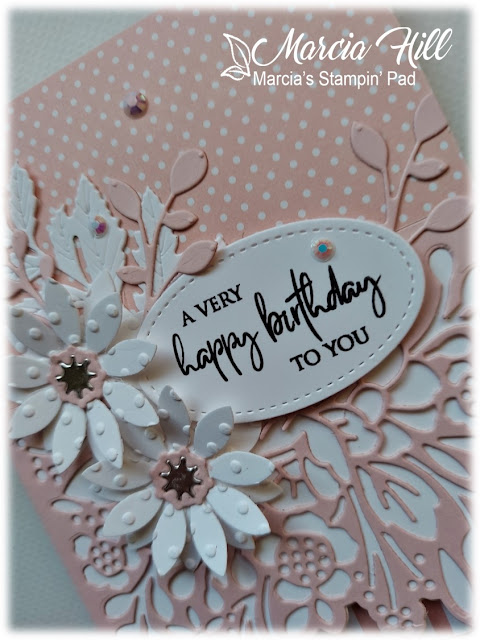
This one was based off a CASE of one of Melissa Phillips cards...I just LOVE her work!!  The die cut layer is from the new Elegant Edges: Spring Flowers.  The flowers are from PTI's Into The Blooms: Dahlias and DSP is Bitty Big Sweet Blush.  


The sentiment is from a Penny Black set and gems are PFS.


As much as I love that new stencil, I think this is my favorite card that I basically CASE'd from Seeka.  (PTI Designer)  Ink blended the background and used the Elegant Edge: Spring Flowers die over top.  The sentiment is another from Penny Black and one of my all time favorite sentiments!


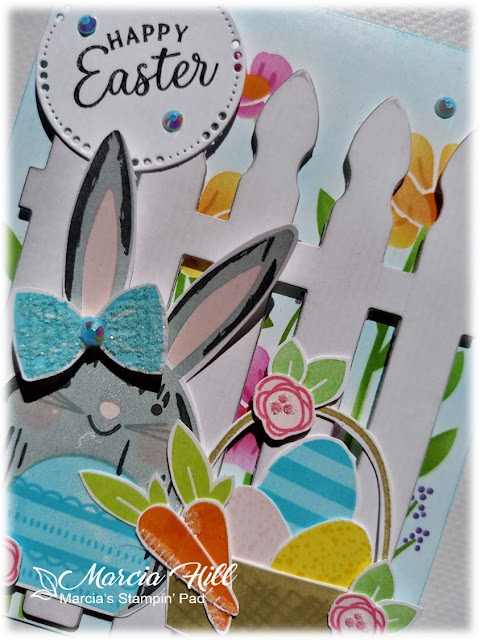
This was a FUN one to make using the new Happy Bunnies stamp set.  I didn't buy the die set and was pretty proud of the way I fussy cut everything...especially inside the handle of the basket!  I also used the large Fence Die (PTI) behind the bunny and basket.


Lots of fun little elements to use in this stamp set, and I also stenciled the background using that Wild Blooms set again...it's pretty addicting!!

If you're still with me, thanks for hanging out that long with me...I appreciate it and hope you enjoyed seeing how I spent the weekend.  Well back to my nursing duties...we made it 3 years without either hubby or I getting Covid and guess who tested positive yesterday??!!  One of his co-workers came down with it last week, so it's still out there friends, and we all need to still be vigilant.  We've both been boosted so hopefully it will be a mild case for him and I won't get it!!  Of course he is a guy, so I don't know if the word "mild" even applies...

Thanks for stopping by today ... I love it when you do!


Friday, February 24, 2023

Peace On Earth Challenge #34

Hello friends.  I'm playing with the Peace On Earth Challenge today and they have a FABULOUS mood board for us to follow...


Don't you just LOVE red and white for Christmas??!  It's one of my favorite color combinations for the holidays!!  I mean I love all the color combinations, but there's just something that's more than "traditional" about red & white at Christmas and I really do LOVE it!!  Having said that, I didn't really follow the striped or candy cane suggestion in the photo, but came up with this so I could finally play with TH's Twig & Stump die set!  Take a look...


I mean come on...how can you NOT fall in LOVE with these two?!!  Twig just totally cracks me up with that kind of "blank" look on his face!  (He's probably wondering why we're all wishing Winter would end!!)   Anyway, after assembling all the die cut pieces (there are a few...Tim's good at that!!), I adhered them both plus a Woodlands tree (TH) to a white panel that I'd embossed with an older retired SU! folder called Winter Snow, and then added that panel to a white card base that I'd added a panel of polka dotted dsp from PTI.


Tim does such a great job with all the little details in his dies and one of my favorite things in this set is the arms for the snowmen...he has them going in multiple directions so you can choose what their arms are doing...so fun!  For my sentiment I kept it simple and added a star stamped with "very merry" from PTI's Tiny Tags set along with some black & white baker's twine.

Lots and lots of wonderful inspiration from the DT, so take a look right HERE if you're like me and want to keep making Christmas cards all year long so you're ready when December comes!  This challenge is open till Thursday March 2nd @ 8:00PM.

Thanks for stopping by today ... I love it when you do!


Tuesday, February 21, 2023

Double D Challenge - BIRDS

Hello friends.  Playing along with the Double D Challenge today and they are looking for BIRDS this time around.  I may have a few...


 I really wished I'd had a Woodpecker stamp or die like the top left photo, but made do with a puffy little bluebird from PTI (Feathered Friends Mini 4) that I've had for quite awhile and never inked up.  Here's what I came up with...


Isn't he a cutie?!  Had to stamp a few to get one that lined up just right, but I've got the hang of it now!  :0)  I used my new embossing folder from Spellbinders (Hydrangea Blooms) for my background, and then settled my birdie on a branch from The Greetery's Big Branches Ruscus Die that I splattered with a bit of white and black ink.  


  I had a leftover bloom from Spellbinders Be Bold Blooms die set and added it to my branch to make my card a bit more Spring like.  Hard to tell in my photo, but my sentiment is foiled in gold using Spellbinder's Everyday Sentiments II hot foil plate set.  A single gold metallic pearl (PFS) finished off my card.

Think my card needs to also go over to Darnell's NBUS Challenge too, since this is the birdies debut today after sitting in my stamp bin for ages and ages!!


If you LOVE birds like I do, make sure you check out all the BEAUTIFUL cards from the DT right HERE and then play along.  This challenge is open till Feb. 26th @ 8:00PM.

Thanks for stopping by today ... I love it when you do!


Thursday, February 16, 2023

Color Hues Challenge #58 - LIME GREEN & CYAN

Hello friends.  Time for a new challenge at Color Hues and this time we're looking for LIME GREEN and CYAN.


I had to google CYAN as it looked a lot like Aqua to me, but there is a touch of green in CYAN that I wasn't seeing in my computer colors.  I ended up finding a couple Catherine Pooler inks that worked well I think...Lime Rickey and Fiesta Blue.  Take a look and see what you think...


I started by taking my 2 ink colors (one at a time) and smooshing them onto a piece of acetate, spritzed with water, and then smooshed my cardstock onto the ink.  Once it was dry I used a stencil (Gina K - Brick Wall) and some light gray ink and lightly went over my smooshed panel.  I also used the same gray ink and a script stamp from The Greetery's Pretty Postmarks stamp set and once again lightly stamped over the smooshed colors, although it's very hard to see in my photos...grrrr!!


Next I stamped my image using Gina K's Pretty Posy stamp set in black, along with the "wishes" from the same stamp set.  I also did a bit of black splattering at this point.  I die cut my panel and attached to The Greetery's Postal Frames Die and then tied a piece of crochet thread around these two layers before attaching to a top folding white card base.  My final step was embossing the "birthday" sentiment on a small strip of black cardstock in white and attaching with foam tape for a little dimension.  I also added a silver gem (PFS) for a bit of bling.  Not my usual style of card, but I really like how it turned out!

It's YOUR turn now, so check out the rest of the inspiration from our talented DT and GD, and then play along right HERE.  This challenge is open till the 28th @ 9:00AM

Thanks for stopping by today ... I love it when you do!


Monday, February 13, 2023

Peace On Earth Challenge #33

Hello friends.  Playing along with the Peace On Earth Challenge and they have the most absolutely BEAUTIFUL mood board to inspire us.


To me, the hearts signify what Christmas is all about...LOVE!  And how perfect to include a heart on our Christmas cards...I love this idea!!  I got a new Poinsettia die for Christmas, and paired with the new Heart Arrow Die from The Greetery, I came up with this CAS card...


I started with a white panel that I die cut the Heart Arrow Die with, and then embossed the panel with SSS's Holiday Greenery EF.  I die cut the Heart Arrow Die a 2nd time in Real Red cs and inlaid it into the embossed white panel.  Next I smooshed a piece of white cs with water and Real Red ink, let it dry, and then die cut with Waffle Flowers Layered Poinsettia Dies.  I absolutely LOVE the tiny holes that are cut out with each layer of the leaves on these dies!  Here's a closer up so you can see...


I also used some scrap dsp (I think it's SU!) to cut the leaves from and I love the little bit of contrast they give from all the red & white.  I finished with a strip sentiment from Gina K and some PFS Ruby Glitter Drops.

There are so many GORGEOUS inspiration cards from the DT and already in the gallery, so check it all out right HERE and play along if you're looking to stay ahead with your Christmas cards this year.  This challenge ends on the 16th @ 8:00PM.


Thanks for stopping by today ... I love it when you do!


Friday, February 10, 2023

Double D Challenge - HEARTS

Hello friends.  Playing along with the Double D Challenge today with a cute little Valentine card for my hubby.


I was inspired not only by the beautiful hearts mood board, but also by Bonnie Klass's cute CCC/Anita Jeram card (HERE).  I have quite a collection of the cute little critters myself (have I mentioned before how much I like paper mice better than the real ones??!!) and after seeing Bonnie's darling card I went digging through my stash to see what I had, and came up with the Ever Thine stamp set, and came up with this card...


  I started by making a background using Gina K's Layered Hearts stencils, using red, pink & orange inks that was left on my ink blending brushes.  


I matted my stenciled layer to a piece of black cardstock and then adhered both a white card base. Next I die cut a Heart Arrow Die (The Greetery)  and added to my stenciled background before attaching my cute little PAPER mouse from the Ever Thine stamp set.  I did pop him up with some foam tape for a little dimension, and then finished with just a few clear sequins.

There is LOTS of FABULOUS inspiration for you from the DT over at the Double D Challenge, so if you need to finish up those Valentines, this is a terrific spot for inspiration!  This challenge is open till the 12th @ 8:00PM

Thanks for stopping by today ... I love it when you do!


Tuesday, February 7, 2023

The Flower Challenge #77

Hello friends.  The Flower Challenge is back and this month they would like to see our latest flower stamps or dies.


Well this was an easy one for me as probably 90% of my stamp buys are flowers, and I just happened to have bought the Magnolia Pattern stamp and coordinating stencils from the latest PFS release.  Here's what I came up with for my 1st play with this new set...

What I loved most about this stamp/stencil combo was that after you finish stamping your background stamp in black and then using the stencils to add color, there's still black & white left on this image!  I used a variety of Gina K and PFS inks in light pinks, corals, greens, & teals to do my stenciling and then added to a top folding white card base.  


At this point I stamped and stenciled a single flower and fussy cut it out, and then added it to a gold foiled diamond (PFS - Nested Diamonds) with a bit of foam tape behind it, and then added my gold foiled sentiment (PFS - Fancy Script Words) just below the fussy cut flower.  To finish I added a few gold metallic pearls (PFS).  

Make sure you check out all the BEAUTIFUL inspiration from the talented DT and then play  along with your new goodies right HERE.  This challenge closes on the 25th @ 5:00PM.   
 

Thanks for stopping by today ... I love it when you do!


Wednesday, February 1, 2023

Color Hues Challenge #57 - Coral & Sage

Hello friends.  It's time for another Color Hues Challenge and this time we're looking for the colors CORAL and SAGE on your cards.


These colors are just perfect for florals, but I went with leaves and berries from a PFS Christmas set called Berry Branch and just love how it turned out!  Take a look...


 I embossed the image in silver and then used the coordinating stencils to color in the Coral Cabana ink (Catherine Pooler) and Soft Succulent ink (SU!).  After die cutting the image, I mounted it to the Ornate Oval Frame Die (PFS) and adhered both to a panel that I used the Stitched Diamonds Cover Plate Die (PFS) on.


  My sentiment (Perfect Sentiments - PFS) was embossed in silver and looks SO much better in real life.  I finished this card with a few Iridescent Gems from PFS.

We can't wait to see what YOU come up with using these two colors, so check out what the DT and our GD came up with for some more inspiration, and then play along with us right HERE.  This challenge will be open till the 14th @ 9:00AM.

Thanks for stopping by today ... I love it when you do!