Wednesday, October 26, 2022

Christmas Kickstart #67 - Poinsettias & Posies

Hello friends.  Working on my Christmas card stash again and today I'm playing along with the Christmas Kickstart Challenge where they are looking for Poinsettias & Posies.

I had just received my monthly Spellbinders Glimmer of the Month Poinsettia Spray that worked perfectly for this challenge, and came up with this card...


I foiled the image and sentiment with Aura foil (it's a gold foil that picks up so many different colors when the light hits it!) and then colored the Poinsettias, leaves, and berries with my Copics.  I left a few of the other "posies" uncolored so I was basically highlighting just the Poinsettias and berries.  


 Can you see the different colors in the foiling here?  It is so pretty in real life!!  I also used the same Aura foil on the Essential Duo Lines Glimmer Rectangles (Spellbinders) around the outside edges of my top panel.  I die cut the Poinsettia Spray and sentiment out with the coordinating dies, along with two more for a little added dimension, before gluing down over the foiled Duo lines and attaching to a white card base.


This challenge is open till the end of the month, and there's lots of beautiful inspiration from Jo and her guest elf Janet all right HERE if you'd like to play along and get going on those Christmas cards!!


Thanks for stopping by today ... I love it when you do!


Monday, October 24, 2022

Color Hues #51 - ORANGE & GREEN

Hello friends.  I should be making Christmas cards, but you know I love color challenges and Color Hues has a fun one right now using ORANGE and GREEN!


The colors have been absolutely GORGEOUS this Fall here in Michigan, so I just had to make a leaf card.  I also wanted to try a new design that Jennifer McGuire showed making a card using partial vellum (HERE).  Here's what I came up with...


 I started by using Taylored Expressions Fall Foliage Background stamp and stencils using SU!'s Pumpkin Pie, Terracotta Tile (for the deeper orange), and Old Olive inks.  Then came the scary part of cutting the pretty stenciled and stamped (the stamp inks up the leaf veins) panel on a diagonal and then attaching to a vellum card base.


I used a skinny strip of Pumpkin Pie cs to delineate between the stamped area and vellum and it also worked perfect to add my sentiment from SSS's Tiny Words stamp set.  Next I used The Greetery's BotaniCuts: Mighty Oak dies to cut the leaves and veins in both white and also Pumpkin Pie & Old Olive, and then pop dotted them to the card front.  I also added some glitter to the veins so they would stand out a bit more, and a small piece of Old Olive ribbon (SU!) to the center of the cluster.


  Here's a photo of the card standing up so you get a better idea of what the partial part of vellum looks like with the stamped and stenciled portion showing through from the inside of the card.  Just a little something different to try, and I love how it turned out!

This challenge is open till the 28th @ 9:00AM and you can check out all the BEAUTIFUL inspiration the DT has for you using ORANGE & GREEN right HERE

Also adding this card to the new Crazy is our fame - STENCILS are our game Challenge which you can find right HERE.


Thanks for stopping by today ... I love it when you do!


Thursday, October 20, 2022

Peace On Earth Christmas Challenge #26

Hello friends.  Anyone else feeling behind on getting their Christmas cards done this year??!!  I usually make them all year long and am pretty much done by this time of year...NOT this year!!  Grrr!!  All to say you might be seeing quite a bit of Christmas for the next couple months!

Peace On Earth Christmas Challenge is helping me out today with a FABULOUS mood board to inspire, and I'm loving ALL the wreaths in the photos!!


The wreaths, the greenery, I love it all!!  Other than the red bows, all the colors seemed darker and more traditional, so I chose to work with two of my most favorite colors from SU! this past year...Soft Succulent and Evening Evergreen, and a stencil set from PFS called Thrill of Hope Wreath.  Here's what I came up with...


Rather than stenciling my wreath on white like I normally would have done, I stenciled right onto the Soft Succulent cardstock using Gina K's Light Spruce, Medium Spruce, & Dark Spruce inks, and Fired Brick Distress Ink for the berries.


Once I finished stenciling, I ran my piece through a new Spellbinders embossing folder called Scattered Christmas to add dimension and more interest.  I matted my layers with gold mirror cardstock and also Evening Evergreen cardstock.


Had a burst of sunshine come through when I took this photo, so it's a little brighter than the 2 previous photos, but I kept it because it shows off the foiled sentiment better (Spellbinders Glimmer of the Month with Aura foil).  The little gold starbursts and dots are from The Greetery's Twinkle Background Die.  This card is also one of my favorite folds where you score your 11 x 4 1/4 card base at 5 1/2 and 4 1/4 and adhere the 1 1/4" on the inside so the card opens up to a square 4 1/4 x 4 1/4.  Just something a little different than the A2 card fold.

If you're like me and need to get going on those Christmas cards, the Peace On Earth Christmas  Challenge can help you out too!  Lots of BEAUTIFUL inspiration from the DT and this challenge is open till Nov. 3 @ 8:00PM.

Edited to add:  Also adding this card to the new Stencil Fun Challenge...this challenge is an anything goes monthly challenge with the optional twist this month of using Halloween colors.  Obviously, I did NOT use Halloween colors on this Christmas card, but I definitely used the Thrill of Hope stencil from PFS!


Thanks for stopping by today ... I love it when you do!


Monday, October 17, 2022

The Flower Challenge - Use A Sentiment

Hello friends.  Playing along with The Flower Challenge and this month they would like us to use a sentiment on our flower cards.  It is also their 6th birthday...where has the time gone?!!


A few days ago, my friend Bonnie reminded me of a retired SU! set that I had forgotten about, so I pulled it out to make a card for this challenge.


I used the Painted Harvest stamp set (SU!) and Old Olive, Pumpkin Pie, Crushed Curry, Mango Melody, & Crumb Cake inks to stamp my flowers and foliage, and then ran the whole piece through with SSS's Fall Foliage embossing folder.  I love the look of the embossed leaves along with the stamping!!


My sentiment is from The Greetery's Sentiment Suite: Birthday and was die cut with a couple circle dies from Gina K's ML#7 die set.  The ribbon is Old Olive from SU! and I finished with a few Sparkling Champagne Metallic Pearls from PFS.

Make sure you check out all the fabulous inspiration from the DT and then play along right HERE.  This challenge is open till the 25th, so plenty of time to play along and help them celebrate their 6th birthday!

Thanks for stopping by today ... I love it when you do!


Thursday, October 13, 2022

Color Hues #50 - ORANGE & PURPLE

Hello friends.  Playing with the Color Hues Challenge today where they are looking for cards with ORANGE and PURPLE...you know, Halloween colors!


This challenge really is perfect timing for Halloween, but I went in the Fall direction instead...


I hadn't had a chance to pull out one of my favorite stamp sets from MFT (Harvest Mouse) yet, and I don't think I've missed a Fall season yet using this sweet image since I got the stamp set a few years back!  To stay within the color guidelines of only using orange and purple, I didn't do any coloring of the mouse and only colored some of the leaves with my Copics (YR16, YR18, BV11, BV13).


After die cutting my mouse out, I pop dotted him to the inside of a scalloped die cut circle (PFS) and then added my sentiment from PB's Hello Autumn.  The Harvest Mouse set also has a few small pumpkins included in the set, so I stamped and colored and die cut those out too and added to the sides of my sentiment.


And one last close up of this sweet little guy to remind us all (and especially me!) that stamped mice are much cuter than the ones that decide to take up residence inside your walls...and if he doesn't leave soon before inviting his whole family to spend the Winter at our house, I think I'm going to go off the deep end!  I like stamped mice better.  I like stamped mice better!  I like stamped mice better!!  I like stamped mice...  I'm ok, seriously.  I think...

Anyway, you too can play along with this fun color challenge right HERE and you have until the 14th @ 9:00AM to link up.  Make sure you check out all the FABULOUS inspiration from the DT and already in the gallery if you need any ideas to jumpstart your creative juices!!  

Thanks for stopping by today ... I love it when you do!


Tuesday, October 11, 2022

Pinkfresh Studio's Create & Connect Christmas Event

Hello friends.  This past weekend I spoiled myself by doing Pinkfresh Studio's Create & Connect Christmas Event, which consisted of four 2 hour classes taught by Heather Hoffman, Carissa Wiley, Lea Lawson, & Laura Bassen.  The kit they send you is filled with never before released Christmas stamps, dies, stencils & cover plate dies, and also the coolest little mini blending brushes that are perfect for adding shading to all those smaller areas in a stencil!  Each class was fast paced, but if you did your "homework" beforehand, it wasn't too hard to keep up.  There were 2 classes Saturday, and 2 classes Sunday, and yes, by the end I was tuckered, but had a lot of beautiful Christmas cards to add to my stash!  It was a fun, FUN event, and I hope I can do it again next year!

My post is a little picture heavy today, so just sit back and enjoy.  Remember also that none of the products I used are available to the public yet...only the 1084 who took the classes received the new items.  PFS is usually pretty quick to release new items after an event, so hopefully if you see anything I used that you really want for yourself, it will be available soon.  OK, here we go...


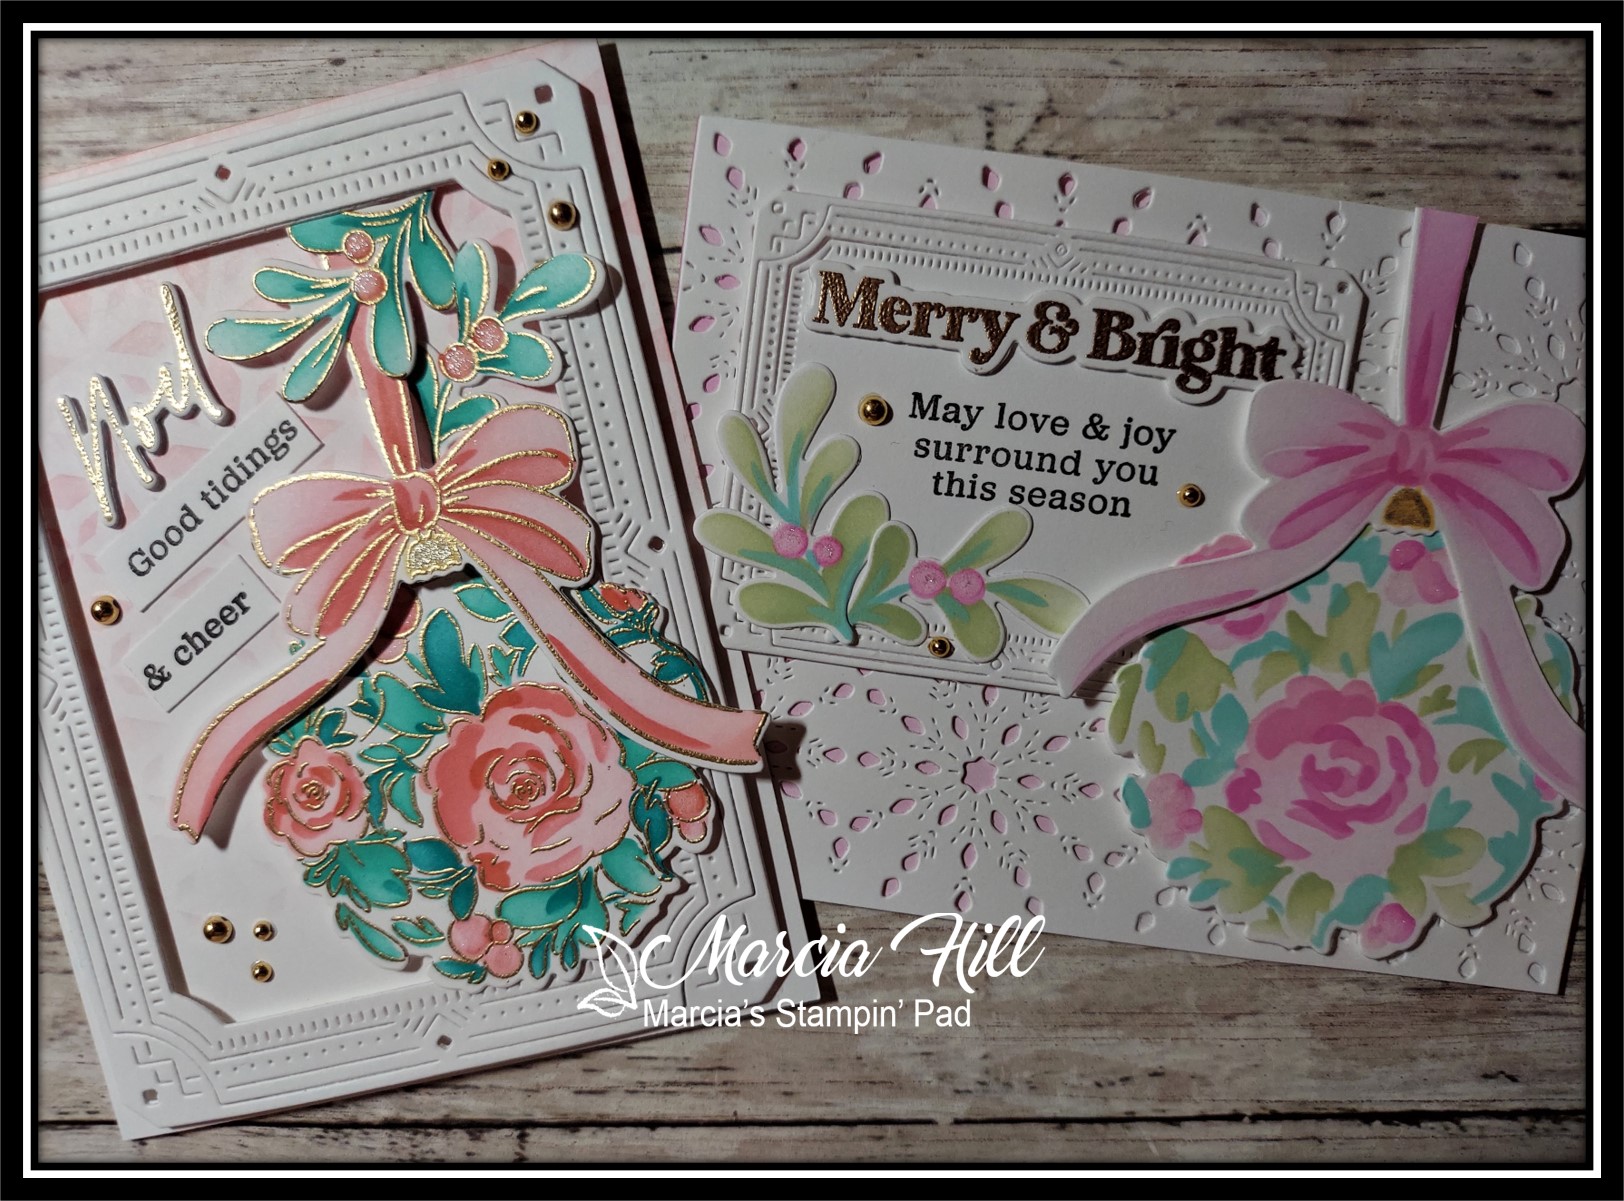
This first class was taught by Heather Hoffman, and we got to use this beautiful new bauble ornament stamp, stencil, & die set.  The card on the left was heat embossed with gold before stenciling, while the card on the right was just stenciled with no heat embossing or stamping.  I think I like the embossing on it a bit better as it defines the florals better.  Such a beautiful set to play with and I will definitely be using these products again!!


 Our 2nd class was taught by Carissa Wiley, and while her cards were a lot more involved, she walked us through step by step and they turned out beautifully!


Carissa had also shared a "PINK" version of the 1st card, and of course I had to try it out...


I loved both color combinations and let me tell you that all of these cards bring new meaning to the words SPARKLE & SHINE!!


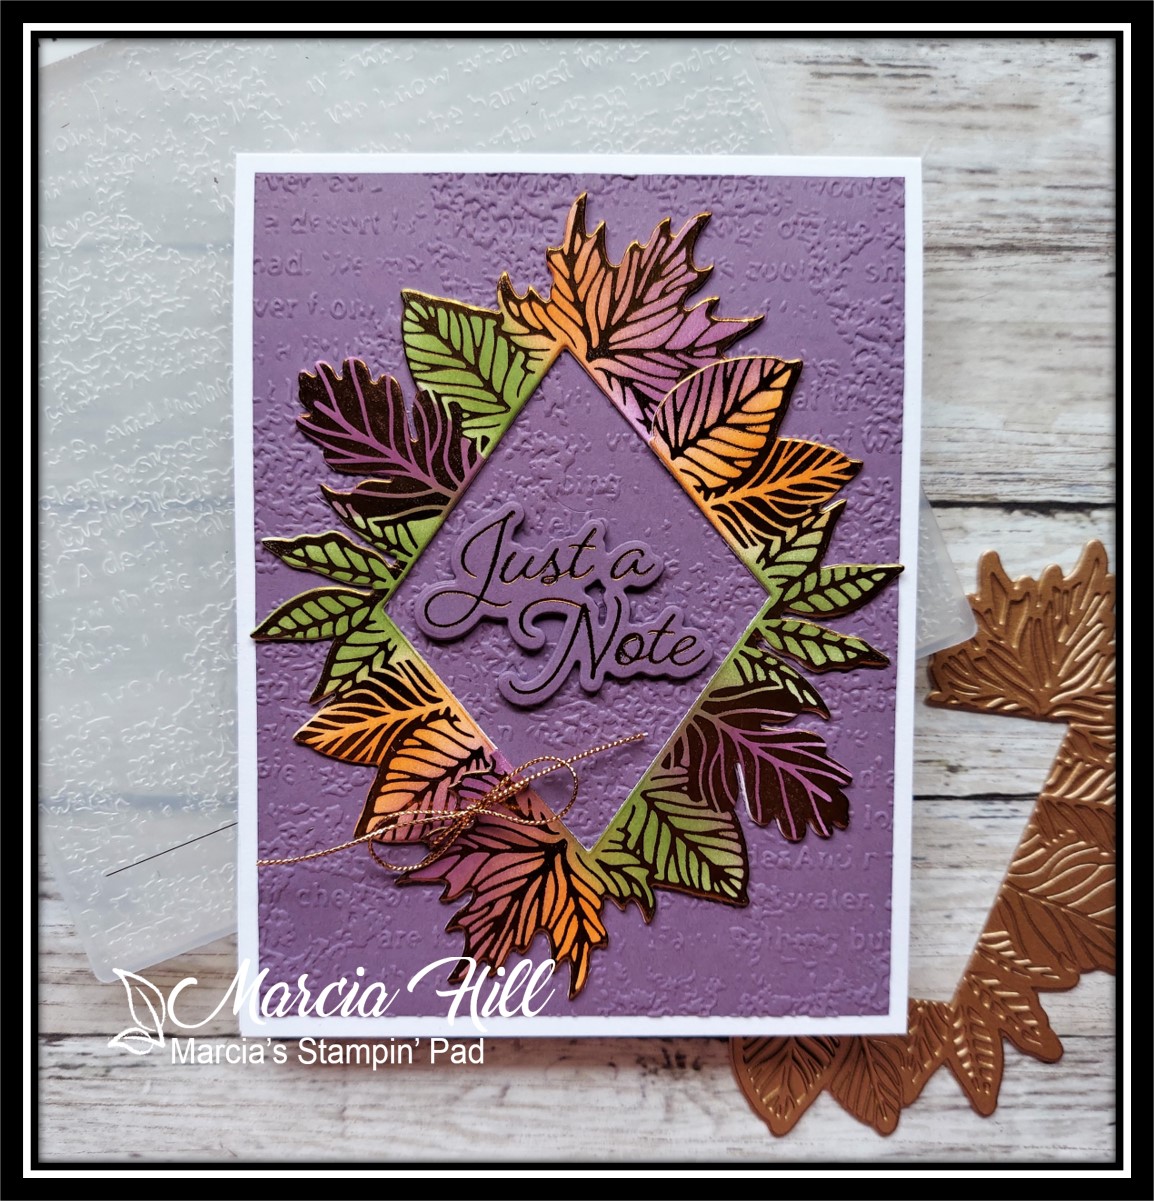
Class 3 was taught by Lea Lawson and our first card was a twofer using a background stamp that was gold embossed and stenciled and then cut in 2 on a diagonal so you could make 2 cards!  Both of these cards also use the Snowflake cover plate die that's been used in most of my other cards too, and it just makes the most BEAUTIFUL backgrounds!  It is a real pain to get all the little chards poked out of the cardstock and the die, but SO worth the extra effort!  


This card also used the Mistletoe and Holly background stamp, but not cut in half this time.  Lea used gold glitter cardstock for her frame, but I had run out of what gold glitter cardstock I had on hand with my other cards, so I substituted the gold mirror cardstock for the frame (which is also part of the kit).  


 Our last class was taught by Laura Bassen, and while Laura's style is a much less ornate and more clean, her cards were no less beautiful than all the others!  I loved using the set of 3 stencils for the backgrounds on both cards and the different color combos on the leaf and berry stamps.  

Are you still with me??!!  I know this was a picture heavy post, but didn't want to leave anything out as it was such a FUN weekend and just filled with ideas using all these new supplies!  PFS really impressed me with everything included in this kit, and of course all four classes and the instructors...definitely a weekend to remember!!  These events are a little pricey upfront, but you do get your money's worth and they're just fun, Fun, FUN!!!  


Thanks for stopping by today ... I love it when you do!


Thursday, October 6, 2022

Double D October 2022 - Octoberfest

Hello friends.  Playing along with the current Double D Challenge where they have aptly named their mood board OCTOBERFEST!


I was inspired by the colorful leaves in the top right photo and decided to give my new Spellbinders hot foil plate (Thankful For You) a try and came up with this card...


I used copper foil on white Hammermill cardstock and foiled the piece twice to make the diamond shaped center.  The foil plate also comes with a die so you can die cut the pieces.  I used my blender brushes to add purple, orange & green to the leaves.


I die cut another two pieces from white cardstock to add some dimension to the back of the leaves before gluing the two pieces together, and then added it to an embossed layer of Perfect Plum (SU!) cardstock using SU!'s Timeworn Type embossing folder.  


I used Memory Box's Posh Just A Note foil plate and die with the same copper foil for my sentiment, and then finished with a piece of copper cord (SU!) that I tied around the lower left section of the leaves.  I wish my photography skills were better at capturing the SHINE that is unique to hot foiling...it is just SO pretty in real life!!

I would like to add this card also to the Double D Four Seasons Challenge AND Darnell's NBUS Challenge #43 since this is my first time using this foil plate.


Thanks for stopping by today ... I love it when you do!


Monday, October 3, 2022

Two Old Bats Halloween Challenge - Oct. 2022

Hello friends.  Tis the month for ghosts and goblins, so I'm playing along with the Two Old Bats Halloween Challenge where this month it's Anything Goes Halloween!


My sweet friend Michele let me borrow her Pumpkin House die set from PTI and here's what I came up with...


I started by blending my nighttime sky with a few different blue inks and then splattered some diluted white acrylic paint to look like stars.  Next came the really fun part of die cutting all 762 pieces (just kidding...not that many pieces, but there are a LOT!!) from white cardstock and then coloring them all up with my sponge daubers and DOX inks for most of the pieces, and my blending brushes and Copics for a few of the others!


 Once everything was arranged, I glued everything down and also added some glitter to the moon and two stars.  That cute little door on the pumpkin is put on with the 2 hinges so the door can actually swing open, but I opted to add a foam dot to the back to make it look partially open and not flap open!


My final touch was adding two vellum ghosts (PTI's Tiny Town: Spooksville Manor) because Michele and Bonnie had both used vellum ghosts on a couple cards they made and I just loved the idea...thanks ladies!!

This card will be heading its way to someone special later this month!  Thanks again Michele for letting me borrow this fun set...I loved playing with it!  There's also a lot more Halloween inspiration from the DT right HERE, so get out those Halloween bats and cats and everything else Halloweenish and play along!!  This challenge is open till Oct. 28.

Thanks for stopping by today ... I love it when you do!