Wednesday, August 31, 2022

Lovely Silhouettes

Hello friends.  Just a fun post today sharing a set of notecards I made using The Greetery's Lovely Silhouettes stamp set and a beautiful color combination and inspiration from Dawn of WPlus9 (HERE).

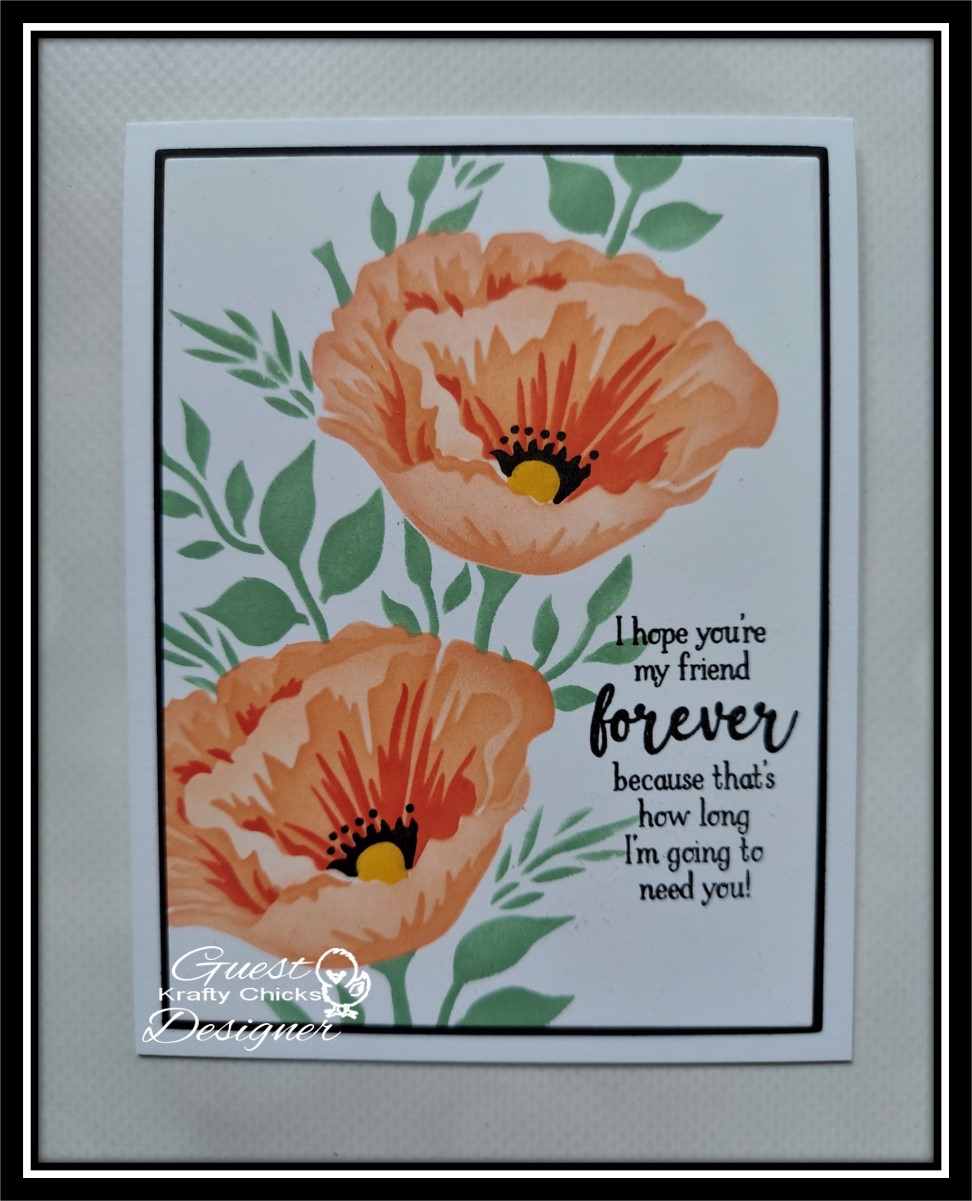
The first 3 cards all use the same stamps, colors, and sentiment...the colors are DOX inks (Abandoned Coral, Fossilized Amber, Broken China, & Peeled Paint) and the sentiment is a freebie from Taylored Expressions that I received with an order several years ago that I just love!  Take a look... 


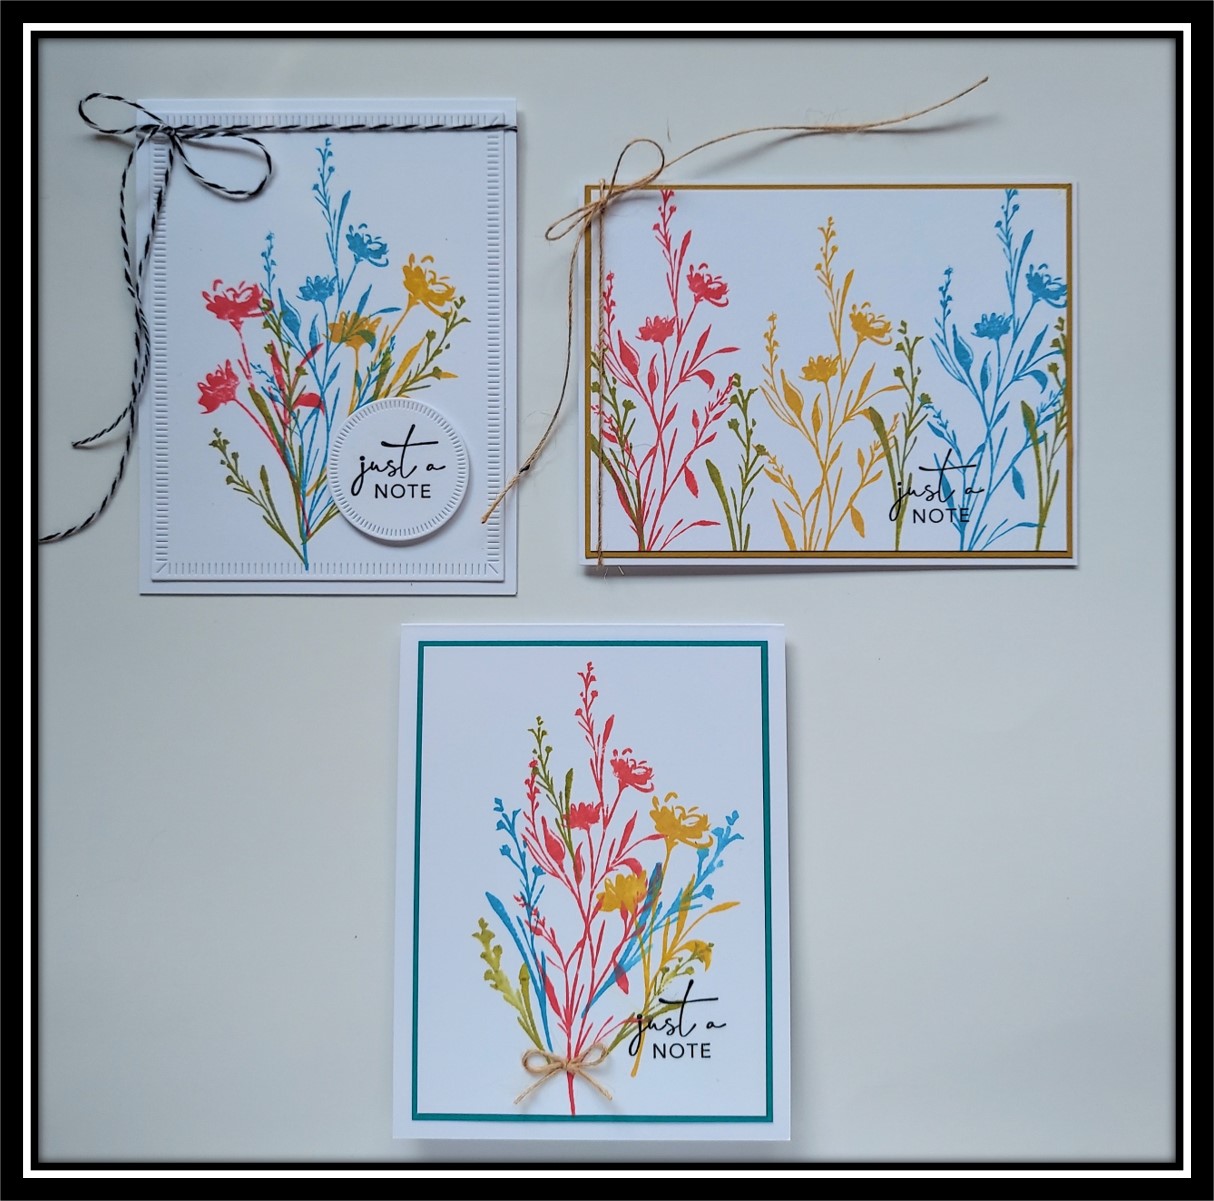
The cards are all basically the same with just a few differences.  This one uses The Greetery's Crimped Rectangle Dies and Crimped Circle Dies, and a bit of black & white baker's twine.


This one is simply matted with a piece of C&9th Peacock cardstock and a tiny twine bow for a embellishment.  Once again, very CAS!


My only horizontal card, this one is matted with a piece of Gina K's Prickly Pear cs, and also has a twine bow wrapped around the side. 


My last card is different only in that it uses a different sentiment.  My "just a NOTE" sentiment just didn't fit on this card the way it did the others, so I used a pre-printed sentiment strip from Gina K.

I am so tickled with the way this set of CAS cards came out and want to thank Dawn of WPlus9 so much for the lovely, lovely inspiration!   

Thanks for stopping by today ... I love it when you do!


Monday, August 29, 2022

Christmas Kickstart #65 - Never In A Nativity

Hello friends.  Playing along with the Christmas Kickstart Challenge where they have a FUN one going on this month called Never In A Nativity...so in other words, a Christmas design that you wouldn't find in a nativity scene!

I have a twofer for you today, using a new Spellbinders die set called Parcel & Post Mailbox.  Take a look...


 I fell in LOVE with these sweet mailboxes and just HAD to have them!  Let's start with the one on the left...


I started with a Real Red card base and added a white panel that was embossed using a SU! Winter Snow embossing folder.  I die cut the mailbox from Real Red cs and sponged all the edges with Cherry Cobbler ink.  The sentiment was gold foiled using an additional set from Spellbinders called Christmas Mailbox Greetings.  The mailbox set comes with all the decorating dies too, and I die cut all the flowers and leaves from white cs and then used sponge daubers and DOX inks, pretty much following the photo on the front of the die set.  I did add the little Tweet Cardinal (also Spellbinders) that I die cut and sponged and WOS'd, just because I thought he was a FUN addition!!


   My 2nd card also started with a Real Red card base and then I added an embossed background using a gold shimmery cardstock and a Spellbinders embossing folder called Tufted 3D that my sweet friend Michele let me borrow.  I gold foiled another sentiment from the Christmas Mailbox Greetings, and then added a mix of different leaf, snowflake, and Poinsettia die cuts from different sets to decorate up my mailbox.


Another 2 cards to add to my Christmas card stash...YAY!!  Although I wish I could say my Christmas card stash is pretty much finished, I am waaaaaay behind this year!!  How about you??  Almost done or barely started??  I guess we all need to get moving, right??!!  Good reason to play along with the Christmas Kickstart Challenge where there's LOTS of inspiration from Jo and her Guest Elf Gail, and also cards that are already in the gallery!  :0)


Thanks for stopping by today ... I love it when you do!


Wednesday, August 24, 2022

Krafty Chicks Challenge - ALL OCCASIONS

Hello friends.  It's week 4 of my Guest Designer spot here at the Krafty Chicks Challenge, and this week is called ALL OCCASIONS.


So this week is all about OCCASIONS, and it can be any occasion...birthday, anniversary, graduation, new baby, holiday, etc.  I know it's still technically Summer, but I thought I'd jump ahead a little bit and start working on some Halloween cards for the grands.  I mean Halloween is an occasion, right??!!  Take a look at what I came up with...


I used a couple new "In Colors" from SU! for my card...Orchid Oasis and Parakeet Party, and then Mango Melody for the orange piece.  A little hard to see, but I stamped my background with the haunted house image from MFT's Spooktacular Friends stamp set, and also used the cute little bunny all wrapped up like a mummy from the same set on my green tag.  (He was colored with Copics)  


My orange tag was embossed with a spider web embossing folder from SU! (retired), and I lightly ran my black ink pad over the raised part and also along the edges.  I wanted some sparkle on this card, so I used a 2 way glue pen to add glue along the lines of the web and then added some TH Distress Glitter...really sparkles BIG TIME in real life!!  My sentiment comes from a PTI set called Boo Black Cat and I finished the card by adding some black & white bakers twine to both of the tags.  Colorful and fun and I'm sure one of the grands will love it...along with some treats of course!!

We look forward to seeing what you add to the gallery this week with your OCCASION card, and if you need some inspiration, the DT has you covered right HERE!  Would like to thank Lori and the team for asking me to play along with them this month...it's been a blast and I had a great time!!  Thank you, THANK YOU!!

Thanks for stopping by today ... I love it when you do!


Monday, August 22, 2022

Color Hues #47 - Chocolate & Mint

Hello friends.  Playing along with the fun challenge over at Color Hues today where they're looking for the colors CHOCOLATE & MINT.


My first thought was chocolate chip mint ice cream, and I just had to pull out a new set from Lisa Hetrick/Gina K called Treat Yourself that I thought fit this challenge perfectly!  Here's what I came up with...


  Doesn't the cone wrap look just like a waffle cone??!  I thought it was perfect for this challenge with Charcoal Brown ink (Gina K) that I used my Aqua Painter on to spread the color around, and then fussy cut it out.  I stamped 2 of the outline lilies in the same brown ink onto a white panel and then used the solid stamp and Applemint ink to fill in the flowers.  I stamped a 3rd lily and fussy cut it out to add to my bouquet with a couple foam dots to add a little dimension.  (I also used the Bodacious Bloom stencil (Gina K) to add the design down the center of the card panel before I attached the cone and extra flower.)  


My sentiment also comes from the Treat Yourself stamp set and was die cut with a couple circle dies from Gina K's Master Layout #3 die set.  I added a couple Disco Ball Sequins (Gina K) to my card to finish it off.  So instead of a chocolate chip mint ice cream cone, my card is a chocolate chip mint flower cone, and while not too realistic, I love the whimsy of it!!

Lots of awesome cards using this color combo from the DT for inspiration, and you can check it all out and play along right HERE.  This challenge is open till the 28th @ 9:00AM
 

Thanks for stopping by today ... I love it when you do!


Wednesday, August 17, 2022

Krafty Chicks Challenge - CAS

Hello friends.  I'm back as Guest Designer for week 3 of the Krafty Chicks Challenge, and this week it's all about CAS (Clean & Simple) cards.

I actually have 2 cards to share with you today, because after I made the 1st card, I started doubting myself that it was CAS enough!  Oh brother!!  Anyway, here's the 1st card I made...


I used a stencil from The Ton called Precious Poppies and used shades of orange ink to color up these gorgeous flowers.  My sentiment is from a Gina K set called Heartfelt Hydrangeas.  I did a simple matting with black and layered both to a white card base.  Like I said earlier, after I finished this card I wondered if there was too much of the floral/leaves on the card to make it CAS, so I made another, although I really do love the way this card turned out!!  Here's card 2...


  This card uses PFS's Layered Bouquet stamp, stencil, & die set, and after stamping and stenciling it, I die cut it out, and then die cut 2 more blank images to layer beneath the stamped and stenciled layer to give some dimension.  I used a Stitched Diamond Coverplate Die (PFS) for my background layer, and then added a thank you sentiment from PFS's Perfect Sentiments that was also die cut and stacked 3 times for dimension.  Definitely a little more CAS than the 1st card, but I think they both still qualify!

Hope you'll all play along with us this week, and you only need to make ONE card...not 2!!  Check out the wonderful cards the DT came up with for inspiration, and then play along right HERE.

Thanks for stopping by today ... I love it when you do!


CAS Christmas August 2022 - Reminder - PINE

Hello friends.  Just a friendly reminder that there's still time to play along with us at the CAS Christmas Challenge where our hostess Trina would like to see PINE on our CAS Christmas cards.


I have used a few of my favorite stamps and dies from The Greetery to come up with this inspiration for you...


I started with a white card base and added the largest Crimped Circle Die cut also in white.  I attached my watering can from the Sprinkled with Kindness stamp and die set (also The Greetery) in shades of brown, and then started adding the pine branches from the BotaniCuts: Pine Bough dies from The Greetery.  The pine branches were all cut from white cardstock and then inked up with DOX inks.


The pinecone also is part of the BotaniCuts: Pine Bough die set and was cut from kraft cardstock and sponged with Soft Suede ink (SU!).  I finished with a sentiment in Cranberry ink (C&9th) from a PTI set called Christmas Blessings and a few Sparkling Champagne Metallic Pearls from PFS.

You have until the 24th to play along with this challenge, and if you need more inspiration, check out all the beautiful cards from my talented teammates right HERE.     


Thanks for stopping by today ... I love it when you do!


Monday, August 15, 2022

The Flower Challenge #71 - Circle/Circles

Hello friends.  Playing along over at The Flower Challenge where they are looking for a Circle/Circles on our flower cards.


I have a CAS card to share with you today using the Honeysuckle Stems stamp set from The Greetery that I didn't think I needed when it was first released, but then you know how it goes...you see all these BEAUTIFUL cards made with the set and you start saying "What was I thinking?!!  Of course I NEED that stamp set!!"  (Thanks enablers...you know who you are!!)  And here's what I came up with...


I started with a panel of white cs that I die cut with The Greetery's Crimped Rectangle Die, and then stamped the Honeysuckle image using mostly C & 9th inks.  Next I used The Greetery's Crimped Circle Dies to cut out the center of my stamped panel.


I also cut out 2 extra crimped circles to place behind the stamped image before inlaying it back into the die cut opening, lining up the images from the crimped circle and the crimped rectangle.  My hot foiled sentiment was done before layering all my circles together, and I used Spellbinders Anytime Glimmer Sentiments with gold foil.  I finished my card with a few gold (circle) metallic pearls.

You can check out all the BEAUTIFUL cards using flowers and CIRCLES from the DT right HERE and then play along.  This challenge closes on the 25th at 5:00PM.


Thanks for stopping by today ... I love it when you do!


Wednesday, August 10, 2022

Krafty Chicks Challenge - Christmas

Hello friends.  I'm back again for week 2 of guest designing for the Krafty Chicks Challenge, and this week is all about CHRISTMAS!!


Have you even started your Christmas cards for this year yet??  I make them all year round (can't help it, I just LOVE Christmas!!), so I'm almost ready for this year!  (Then comes the hard part...addressing them all and actually getting them out in the mail on time!!)  Anyway, I have a really cute and simple card to share with you today using a die from Gina K that came out last Christmas.  Take a look...


I used the Gina K Peace, Love, & Joy cover plate die and die cut it twice...once from Night of Navy cs and once from White cardstock.  I layered a piece of Real Red cs behind the blue, and then inlaid the letters from the white piece I had die cut...all except for the "O" in the word JOY.  I kept that space open so I could insert one of the penguins from Gina K's Playful Penguins stamp and die set.


I colored the cheerful little guy with my Copics and then slipped him in the opening for the "O".  I adhered both layers to a top folding white card base and added a piece of red & white bakers twine at the top.  Easy peasy and done!

Lots of great inspiration for you from the DT this week, so check it all out right HERE and then play along!  You'll be so glad you did come December!!  
   

Thanks for stopping by today ... I love it when you do!


Tuesday, August 9, 2022

CAS Mix Up Aug. 2022 and Double D Lighthouse Challenges

Hello friends.  Playing along with 2 favorite challenges today, and just gotta love it when you can combine both of them together!!  CAS Mix Up is looking for cards using the Emboss Resist technique, and the Double D Challenge is looking for Lighthouses.


Here's what I came up with...


Michigan where I live is surrounded by water, so plenty of lighthouses in my state!  I was born in Traverse City, close to the Old Mission Point Lighthouse, so figured it was a great time to dig out an older wooden stamp I have of this lighthouse. (Hardware Stampin')  I tried a new to me technique called Faux Batik which is also an emboss resist technique, and I love how it turned out!  I started by stamping my lighthouse in clear embossing powder, and then began ink blending 3 shades of blue ink onto the piece of heavy weight white cardstock.  (I think I was supposed to do this with the ink blending first and then embossing, but it still turned out!!)  I did some water splattering at this point too to add a little more interest.


At this point I started folding the cardstock at different angles from top to bottom with a bone folder, and then from side to side.  Next comes the fun with ink blending again over all the creased folds you made so they stand out, which gives you the Faux Batik look.  There is a video link on the CAS Mix Up site that shows how to do this, and also Loll explains beautifully in her post on how to do this technique also.  I die cut my image with a Gina K Master Layout #2 die, and then added a black layer before attaching to a white layer that I used a SU! embossing folder on (Old World Paper).  I added strips of foam tape behind the white embossed layer and added to a top folding white card base.  

LOTS of BEAUTIFUL examples of the Emboss Resist technique from the DT at the CAS Mix Up site, and also lots and lots of FABULOUS Lighthouses over at the Double D challenge, so check them both out and play along!  

Thanks for stopping by today ... I love it when you do!


Monday, August 8, 2022

Color Hues Challenge #46 - Special Tribute

Hello friends.  Today I am playing along with the Color Hues Challenge where they are paying special tribute to their teammate and friend Lindsey M-P who sadly passed away way too young from Ovarian Cancer 2 weeks ago.  Lindsey had already chosen the colors of BLUE & PURPLE for this challenge, so they decided to keep the colors in memory of her.


Before I show my card, I thought I'd share the reason why I made a Christmas card for this challenge.  Fellow Design Team member Tracey McNeely used to run a 25 Days of Christmas Tags challenge that I loved to play in each November, and Lindsey was one of the designers for this challenge that I was consistently inspired by!  I can't tell you how many tags I made that were inspired by Lindsey, and she ALWAYS left the sweetest comments!  She will definitely leave a big hole in the stamping world and be missed by so many!!

I decided the best way for me to pay tribute to Lindsey's sweet memory was to share a Christmas card, as it was definitely a holiday we both LOVED crafting for!


  I started by making my background using the new PFS Dainty Plaid stamp and stencil using BLUE & PURPLE inks (Gina K).  The stamp was embossed with white embossing powder and heat set, and then I used the stencils to add the color.


 My snowman and cat images are both from Gina K's Hygge Time stamp set and were colored with my Copics and then die cut with the coordinating dies.  I know a napping kitty is not too realistic next to a freezing cold snowman, but I thought it was a cute nod to Lindsey's love of cats!  Before I added my snowman and kitty, I added an iridescent snowflake from SU! (Wonderful Snowflakes), and then I finished my card with a Gina K pre-printed sentiment strip, a few Trinity Stamps Crystal Ball Dewdrop Baubles and a bit of glitter on the snowman and his pom-pom on his cap.

There is a LOT of inspiration to play along with this challenge right HERE, so check it out and play along.  This challenge is open till the 14th at 9:00AM.

Thanks for stopping by today ... I love it when you do!


Wednesday, August 3, 2022

Krafty Chicks Challenge - The Stamp Act

Hello friends.  I'm honored to be Guest Designing this month for the Krafty Chicks Challenge.  This is a weekly challenge, and week one is called The Stamp Act...simply meaning you must use a stamp or digi image on your card.


Since we're definitely in the depth of Summertime here in my "neck of the woods" (Michigan), I thought a Summer themed card would be appropriate, and what better than this cutie from MFT called Drink Up The Sunshine.  Take a look...


Isn't she ADORABLE?!!  I colored her with my Copics, and then die cut her out with the coordinating die, before attaching her to a wobbler...I hope she won't spill her drink with all that wobbling going on!!  My background was done with a stencil from PTI called Pool Water Stencils, and then the sentiment is from another MFT set called Sunny Days Ahead.  My stenciled layer is adhered to an Aqua Mist piece of cs die cut with The Greetery's Postal Frame Die, and then both layers are adhered to a white card base.  A little bit of WOS was added to the pool floaty, and then done.

Check out what the rest of the Design Team has made to inspire you right HERE, and then play along!


Thanks for stopping by today ... I love it when you do!


CAS Christmas August 2022 - PINE

Hello friends.  It's time for a new challenge at CAS Christmas, and our hostess Trina would like to see PINE (tree, branch, sprig??) on our CAS Christmas cards this month.


I used an older Penny Black cling stamp (red rubber) and came up with this...


I used my SU! markers and colored directly onto the Berry Speckled stamp, small areas at a time, huffed on the stamp to moisten up the ink on the stamp, and then pressed onto my cardstock.  Once I had the whole image colored, I spritzed lightly with water onto the stamp to release the rest of the ink still on the stamp, and then pressed into my cardstock again, which left me with more of a water colored look.


Next I trimmed my layer down a bit and then used Spellbinders Essential Dual Lines foiling plates to add the gold foiled framing around my image.


A little hard to tell in my photo, but I also gold foiled my sentiment which is from Yana's Christmas Sentiments (Spellbinders), and then die cut the sentiment shape 3 extra times to stack my sentiment on so it would stand out a bit on the card.

We have all kinds of beautiful inspiration for you from our talented DT and Special GD that you can check out right HERE, and then play along with us and get those Christmas cards started!  Remember to keep your cards CAS!!  This challenge is open till the 24th, and we can't wait to see YOU in the gallery!! 

Thanks for stopping by today ... I love it when you do!