Thursday, March 30, 2023

Seize The Birthday #258 - Things In A Garden

Hello friends.  I'm playing with the Seize The Birthday Challenge today and they are looking for Things In A Garden on your birthday cards.


I've been working on replenishing my birthday card stash (again!!) and had some fun with the PFS Magnolia Pattern stamp and stencils.  My card is a CASE of a card done by @createdbyjackie on Instagram that I just fell in love with and had to copy.  Here's mine...


After stamping the image in black, I used the stencils to just lightly add the blues, purples, & greens.  I think what I liked about Jackie's card so much was that she hardly added any color, whereas I tend to usually be a little more heavy handed with my ink blending.  I think the combination of the blues and purples in such soft amounts is beautiful!!


I added the 3 strips of cardstock in matching colors and then added my die cut sentiment (The Greetery - Everyday Labels) with foam tape behind for a bit of dimension.  I matted the stamped layer with a blue panel (Spring Rain - PTI) and attached to a white card base and then finished with a few light blue enamel dots.  I think a Magnolia tree would look wonderful in my garden...too bad it's still snowing here in my neck of the woods, and I don't think it would bloom too well here!  Sigh...

I have a twofer for you today, although it isn't a birthday card.  I used the same stamp/stencil design, but made this one into a CONGRATS card.  Take a look...


Same design but soft pinks and oranges this time.  My first thought with the sentiment was to use this one for a graduation card for a young lady (I hate doing graduation cards in school colors...they're never pretty!!), but I was thinking that this card would work well for a baby girl card, and maybe even a milestone birthday!  I'll leave the inside blank until I'm ready to use it.


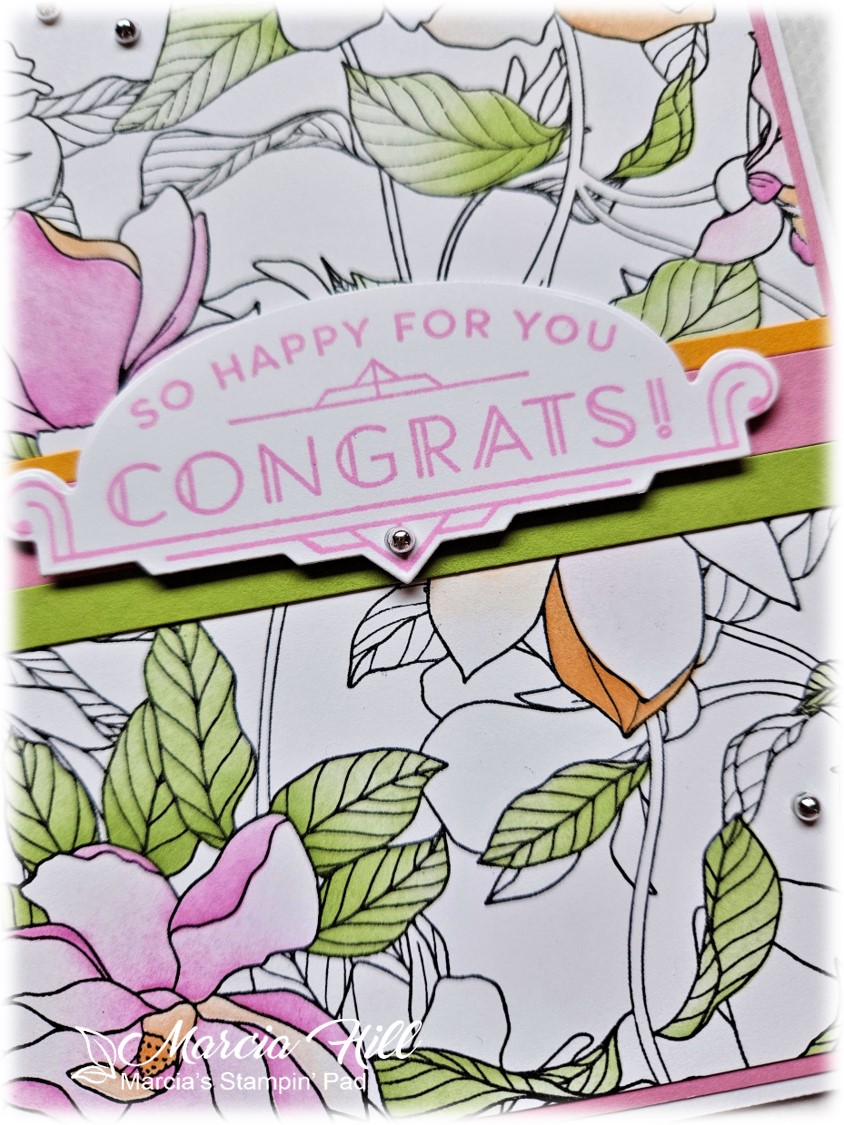
I just LOVE pink and orange together...one of my absolute favorite color combinations!  I finished off this card the same as the first one, but added some silver metallic pearls instead of enamel dots.

If you need to ramp up your birthday card stash, check out all the wonderful inspiration from the DT right HERE and then play along.  This challenge is open till April 4th @ 9:00AM.


Thanks for stopping by today ... I love it when you do!


Tuesday, March 28, 2023

Playing Cards with Friends

Hello friends.  FINALLY had another play date with my sweet friend Michele last week, and it was SO good to be together again after such a loooooooong Winter!  I think it was early November the last time we got together, and that is just too long to not see each other!  But we made up for it with LOTS of hugs, laughing, stamping, and of course lunch!!  

Michele had a BIG win with Pinkfresh Studio back in January and won their whole release that was filled with oodles and oodles of wonderful stamps, dies, and stencils, so we decided on the Blooming Peony stamp and stencil that was in the release to play together with.  I went a little bold with my colors and Michele went softer with hers, but we both loved how they turned out.  Here's mine...


This is all stenciling my friends, and I just LOVE how it turned out!  You start with a stencil that masks all the flowers and leaves so you can blend in your background color, and I just used leftover ink on my turquoise blending brush.  Then I used pinks and oranges (one of my favorite color combos!!!!!) for my flowers and shades of greens and turquoises for my leaves.  I used a Spellbinders Hemstitch Die to add the framing around my panel and then added to a white card base.


Took me a few tries before I FINALLY got a picture that showed the shimmer of the pink foiling I did for my sentiment (Spellbinders - Essential Glimmer Sentiments), but I'm glad I persevered so you could see it...adds such a nice touch to the card!  I finished with a few brushed gold butterflies from SU!.

My next two cards use the Detailed Leaf Stamp and coordinating stencils and die from Pinkfresh that Michele brought along...


I used more pinks and oranges to stencil in the leaves and then used the coordinating die to die cut it out.  I used Waffleflowers Woven Pattern Die (also Michele's) for my background...I love, LOVE this die!!


The sentiment is part of the stamp and die set, and I finished with a few glitter drops in Blush from PFS.


Using the Detailed Leaf Stamp again with blues and greens this time.  Instead of die cutting the image this time, I ran the panel through my Fern embossing folder (SU!) and then matted with a Teal layer before attaching to a white card base.  I used the same sentiment and wrapped some gold thread behind it to add a little shine.  I also finished with a few gold metallic pearls.


My last card uses the Wonderful In Every Way stamp and stencil set.  This set is sold out right now and I can see why...so simple but oh so beautiful!!  I stenciled with pinks and purples for the flowers and some lighter greens for the leaves.  I used the largest Slim Ornate Banner Die to die cut my image and then adhered to a white card base with foam strips behind the image for some dimension.  I also added some twine around the top before adhering to the card base.  The sentiment is also from the Wonderful In Every Way stamp set and was die cut before adding to my card.  Michele had brought me some Altenew Enamel Dots in pretty shades of green, and I added a few of those to finish off this card.

I know...looooong post, so thanks for sticking with me for so long!  I hope you enjoyed all my creations using all these wonderful Pinkfresh Studio goodies that Michele brought and shared with me, and I know Michele has lots of goodies to share with you too, so make sure you head over to her blog to see what she came up with right HERE.  She will knock your socks off as usual with her fabulous talent!  Thank you, thank you, THANK YOU Michele!!  I had SO much fun last week and can't wait to do it again...you're the best!!

Thanks for stopping by today ... I love it when you do!


Monday, March 27, 2023

Fun With THE TON

Hello friends.  Had fun playing with a new stencil from The Ton called Darling Dahlia and a new die too from SSS yesterday, and thought you might like to see what I've been up to.  I have 3 cards to share with you  today...one Dahlia I cut in half (the stencil is a 6 x 6 size) so I could make 2 cards, and the other card I'm going to show you first uses the color combo I shared on the current Color Hues Challenge (Blue & Turquoise).


I just love all the layers on this Dahlia and it only uses 3 stencils!  I started with a light turquoise for the 1st stencil, blue for the 2nd stencil, and then a darker turquoise for the 3rd stencil.  (Inks are all PFS.)  I die cut my stenciled panel with the Nordic Frame Dies from The Greetery and then layered it over a piece turquoise cs and attached both to a white card base.  The sentiment is from Memory Box's Just A Note Posh Script dies, and then I finished with a few glitter gem stones from PFS.


This card uses one half of the stenciled Dahlia that I did using 3 shades of pinks and a bit of red.  After cutting the flower in half I fussy cut both pieces.  For this card I SSS's Detail Petal Plate to cut all the tiny holes in the white layer that I added the Dahlia half to, and then adhered that to a black layer and a white card base.  The leaves are a separate stencil from The ton and I fussy cut those too after stenciling them.  Here's a close up so you can see all the detail that cover plate die adds...


I did add my die cut Happy B To You (SSS) before I used the cover plate die, so it has all the pin-point detail too.  I finished with a few crystal gems from PFS and really like the way this one turned out!


My last card uses the other half of the Darling Dahlia and it was made very similar to my 2nd card...I just changed out the white background using a new Spellbinders embossing folder called Stylized Calla Lily and my sentiment which is another Memory Box one...Thank You Posh Script.  The clear gems are once again PFS.

So now you know how I spent my Sunday...stenciling and die cutting away!  

I am going to add my cards to a new to me challenge called the Triple B Challenge...Birds, Blooms, & Butterflies, and also to Darnell's NBUS Challenge since I've never used the stencils, the Happy B die, or the Spellbinders embossing folder before.


Thanks for stopping by today ... I love it when you do!


Friday, March 24, 2023

Peace On Earth Challenge #36

Hello friends.  Still trying to keep up with my Christmas card stash and playing along with the Peace On Earth Challenge to keep me on track!


I was drawn to the bottom left photo with the bear as it reminded me of one of my favorite MFT stamp sets...Polar Bear Pals.  Last Fall at a play date with my sweet friend Michele, I had die cut a few of her Fa - La - La letters from The Stamp Market, but hadn't used them yet, and I think they paired up quite nicely with a PFS stencil (Kaleidoscope) to come up with this card...


I had stenciled a white piece of cs with red and green and then die cut the Fa - La - La letters from it, and then also die cut again using just red cs.  I removed the red letters and ran the negative piece through my big shot with a SU! ef called Cane Weave.  I inlaid the stenciled Fa - La - La letters into the embossed red negative piece and attached to a white card base.


I stamped, colored with my Copics, and die cut the 2 bears and then attached to my card with foam tape for a bit of dimension.  A bit of green & white bakers twine at the top finished off this card.


My twofer was made with all the negative pieces from the first card and then instead of adding more Polar Bears, I added a sweet little "paper" mouse from CCC's Anita Jeram called Best Gift Shrew.  I don't know if a shrew is different than a mouse, but he sure looks like a mouse to me!  And as long as he's paper, he's cute and belongs on a card!!

The DT has lots of wonderful inspiration for you right HERE if you're looking to keep up with your Christmas cards this year!  This challenge is open till Thursday, March 30th @ 8:00PM.


Thanks for stopping by today ... I love it when you do!


Tuesday, March 21, 2023

Double D Challenge - Easter

Hello friends.  Playing along with the Double D Challenge today and it's all about EASTER!


I have a twofer for you today...one a cute bunny card, but first one that says what Easter is really all about.


I totally owe the inspiration to Dana Kirby for her card (HERE) and reminding me about the wonderful tulip dies from The Greetery (BotaniCuts: Tulips and also the It's a Wrap: Posy Pocket die.)  I feel like I die cut a million tulips for this card, but really just 2 of the medium size ones and 7 of the smallest.  I cut them from Real Red (SU!) cardstock and sponged each piece with Cherry Cobbler (SU!) ink.  I think my fingers are permanently stanined red!!  Haha!!  I used Old Olive ink and cardstock for the leaves.  


My white background was die cut with a PFS Stitched Diamonds coverplate die, and then adhered to a piece of Old Olive cardstock and a white card base.  My dsp for the posy wrap is from PTI's Bitty Big Pattern Pack in Kraft and my sentiment which explains the whole meaning of Easter to me is also from The Greetery (Empty Grave) and was stamped in black, heat embossed in clear, and then die cut with the coordinating die and foam adhesive added to the back for dimension.  There were a LOT of pieces to this card, but I absolutely LOVE the way it turned out!


And now for a little fun and a completely different direction, how about a little Bunny Hop?!  I started with Concord & 9th's Markered Turnabout Stamp for my background (ask me how many color combinations I made while I had it positioned on my MISTI?????  Yes, it is a little addicting!!), and then started adding different elements.  The fence is a die from PTI (Picket Fence Die) and then added two of the bunnies from Tim Holtz's Bunny Hop dies.  I love how they're both climbing the fence!  (Can bunnies climb in real life??)  I added a tiny pompom to the bunnies bottom that is facing away from us...makes me smile!  


  The grass at the bottom was die cut from some sparkly green paper with a Gina Marie Designs die, and the tiny flowers are from an older Spellbinders die set...I also added some sparkly clear Stickles to the centers of the flowers.  My sentiment comes from PTI's Just Sentiments: Spring Blessings and the little butterfly die cut is also from a Gina Marie Designs die set.  I finished with a piece of sparkly turquoise thin ribbon that I think is from SU!.

There is LOTS of absolutely BEAUTIFUL inspiration from the DT over at the Double D and you can see it all and play along right HERE.  This challenge is open till Sunday, April 2nd @ 8PM.


Thanks for stopping by today ... I love it when you do!


Thursday, March 16, 2023

Color Hues #59 - BLUE & TURQUOISE

Hello friends.  I'm thrilled to be hosting the new Color Hues Challenge for the next two weeks, and I would like to see BLUE & TURQUOISE on your cards.


Why these colors??  Think warm breezes, sunshine, the tropics...that's what I'm thinking this time of year when Winter is still hanging on here in Michigan!  Seriously though, go wherever the colors take you, and we'll be thrilled to see you in the gallery!  Here's what the colors led me to...


That little crab is me in my pale white skin, but he's hoping a few days poolside will fix that!  I started by stenciling my background using PTI's POOL WATER stencils and Blue Raspberry and Turquoise Sea inks from Gina K.  I stamped my umbrella on white card and then again on Turquoise Sea and Pacific Point cardstocks (Gina K & SU!), and then fussy cut and paper pieced to the white stamped umbrella.  The umbrella and the crab are both from MFT's Just Beclaws stamp and die set.


   The Adirondack chair (Gina Marie Designs) was also die cut from Turquoise Sea card and then attached to my Crimped Circle die cut (The Greetery) along with the pasty white crab, the umbrella, and my sentiment that I think is just perfect for this card!  (Catherine Pooler - Vitamin Sea Stamps)  I finished with a few matching enamel dots and google eyes that have blue centers (leftover from a Paper Pumpkin (SU!) kit).  

We can't wait to see YOU in the gallery using these two colors!!    Make sure you check out all the FABULOUS inspiration from the rest of our DT...you can check it all out right HERE.  This challenge is open till the 28th @ 9:00AM.

Thanks for stopping by today ... I love it when you do!


Saturday, March 11, 2023

Peace On Earth Challenge #35

Hello friends.  Trying to keep up with making a Christmas card every week or two, and the Peace On Earth Challenge is helping me stay on track!


I was inspired by the photo on the top left with all the trees and decided this was the perfect time to bring out my Concord & 9th Tiny Trees Turnabout stamp and dies.  I have quite a few of the turnabout stamps, but hadn't used any in quite some time and had to dig out the instructions on how to set up my MISTI with the jig and template, but it all came back rather quickly once I started!  Once I finished the card it sat on my desk for a few days as I wasn't sure I liked it.  I am mostly a CAS stamper, and this card is WAAAAAYYYY busy, but it's grown on me and I kinda like all the small details.  Take a look and let me know what you think...


I stamped the background with the turnabout stamp using Pinkfresh Studio green inks in 4 different shades, and then die cut it using The Greetery's Crimped Rectangle Dies.  I matted it to a piece of green cs (Gina K) and then adhered both panels to a top folding white card base.  Next I added an offset Crimped Circle Die cut (The Greetery) in white to the background and added 5 of the die cut trees that come with the stamp set and added gold embossed ornaments to the top right and bottom left trees.  


 I also embossed in gold my sentiment strip and wish it showed up as gold in my photos instead of black...grrrrrrrrr!  I added some gold thread underneath my sentiment for a bit more shine and that shows up pretty well in my photos, so just imagine that the sentiment matches the shine of the thread!!  It definitely is a busy card, but it really does grow on you and I had fun making it, so I guess that's all that matters!  :0)

There's lots of wonderful inspiration from the DT that you can check out right HERE if you'd like to play along.  This challenge is open till Thursday, March 16th @ 8PM.


Thanks for stopping by today ... I love it when you do!


Friday, March 10, 2023

The Flower Challenge #78

Hello friends.  Playing along with The Flower Challenge today and this month they are looking for Die Cuts and/or Stencils.


In my head it's SPRING, so I pulled out my beloved BotaniCuts: Crocus dies from The Greetery and came up with this card...


I die cut all the pieces from white and then used my sponge daubers and Oxide Inks to color them up.  I know Crocus's don't come in pink, but I just wanted a touch of a 3rd color to add into my little cluster.  


I wanted to make a background for my cluster, but very soft so as not to take away from my pretty crocus's.  I used vellum and stenciled on it using Gina K's Lush Leaves Stencil with some green ink that was left on my blending brush.  I attached the vellum to my card base and then added another layer that I die cut the circle opening from using Penny Black's Stitched Circle Dies.  I did add foam tape behind this layer to add some depth and dimension for my flowers.


My "Spring" sentiment also comes from The Greetery and was die cut 3 times and stacked together for a bit more dimension.  I thought about inking the die cut sentiment, but in the end decided to leave it plain white.  The "BLESSINGS" was heat embossed in white on a strip of black cardstock and adhered below.  I finished with a few silver metallic dots from SU!.

You can check out all the fabulous inspiration HERE and then play along.  This challenge is open till the 25th @ 5:00PM.


Thanks for stopping by today ... I love it when you do!


Wednesday, March 8, 2023

Just Us Girls #669 - Color Week

Hello friends.  Playing along with the Just Us Girls Challenge where it's Color Week and I'm absolutely loving the colors!!


It's such a FUN color combination, so I made a FUN little card using the same Honey Bee Heart Hugs die set that I used earlier this week, and just changed up the critter to a sweet little fox.  Take a look...


I made a plaid background using PFS's Simple Plaid stencil and Honey Mustard & Turquoise Sea inks (Gina K).  I matted it to a piece of black and then adhered to a white card base.  That sweet little fox was die cut using matching cardstock from Gina K and popped up on dimensionals and adhered to a white stitched circle die cut.


My sentiment is also from Honey Bee (Bitty Buzzwords stamp and coordinating dies).  A pretty simple card that I thought turned out rather cute using the challenge colors!

You can check out all the inspiration from the DT and their Special GD (my sweet friend Michele) right HERE.  This challenge is open till March 9 @ 9:00PM.


Thanks for stopping by today ... I love it when you do!


Monday, March 6, 2023

Double D Everything Is Coming Up Green Challenge

Hello friends.  Lots of GREEN out there in blogland lately and I'm playing along with the Double D Challenge where Everything Is Coming Up GREEN! 


Our youngest and middle daughters both have birthdays in March, and both love the color green, so I have another birthday card to share today using a couple new Honey Bee items.  The stencil set that I used for my background is really a Valentines stencil (Hearts In Bloom), but I stenciled it all in shades of green and I think it worked out beautifully for a March birthday.  Take a look...


Besides the new stencil set, I used a new die set from Honey Bee called Heart Hugs and I just couldn't resist adding this little hedgie to my card!!  He's holding a heart that I edged in Versamark and heat set with gold embossing powder.  I also added a little green sprig from Spellbinders Be Bold Blooms.


My sentiment comes from Gina K's Birthday Trio Die set and I used vellum for the background layer, and then ink blended the "HAPPY" with green ink and added the "Birthday" in black to add a POP against all the green.  A few glitter gems (PFS) finished off this card.

Lots of GREEN inspiration going on over at the Double D challenge, and you can find it right HERE to check it out and play along.  This challenge is open till March 12th @ 8:00PM.
 

Thanks for stopping by today ... I love it when you do!