Monday, July 25, 2022

Playing with Purple, Blue & Green

Hello friends.  I'm playing along with a couple challenges today that are color challenges using PURPLE, BLUE & GREEN.  Both the Double D Challenge and the Seize The Birthday Challenge are looking for these colors on our cards.


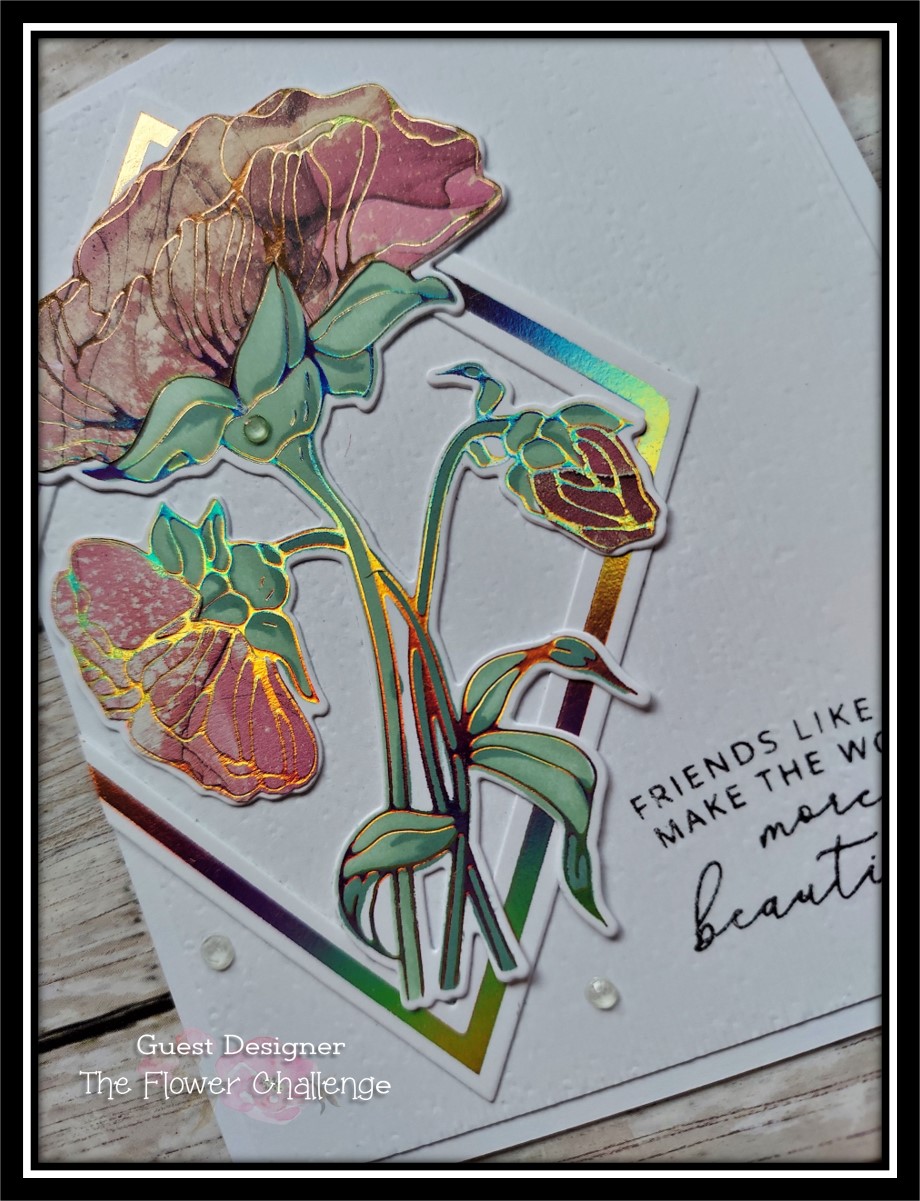
It's such a pretty color combination, that I have 2 cards to share with you today.  My first card uses a new die set from Reverse Confetti called simply Flower Builder.  Take a look:


I started by ink blending my background on a white piece of cs using Gina K inks in the 3 colors, and then ran the piece through my Altenew Waffled Diamonds embossing folder before attaching to a white card base.


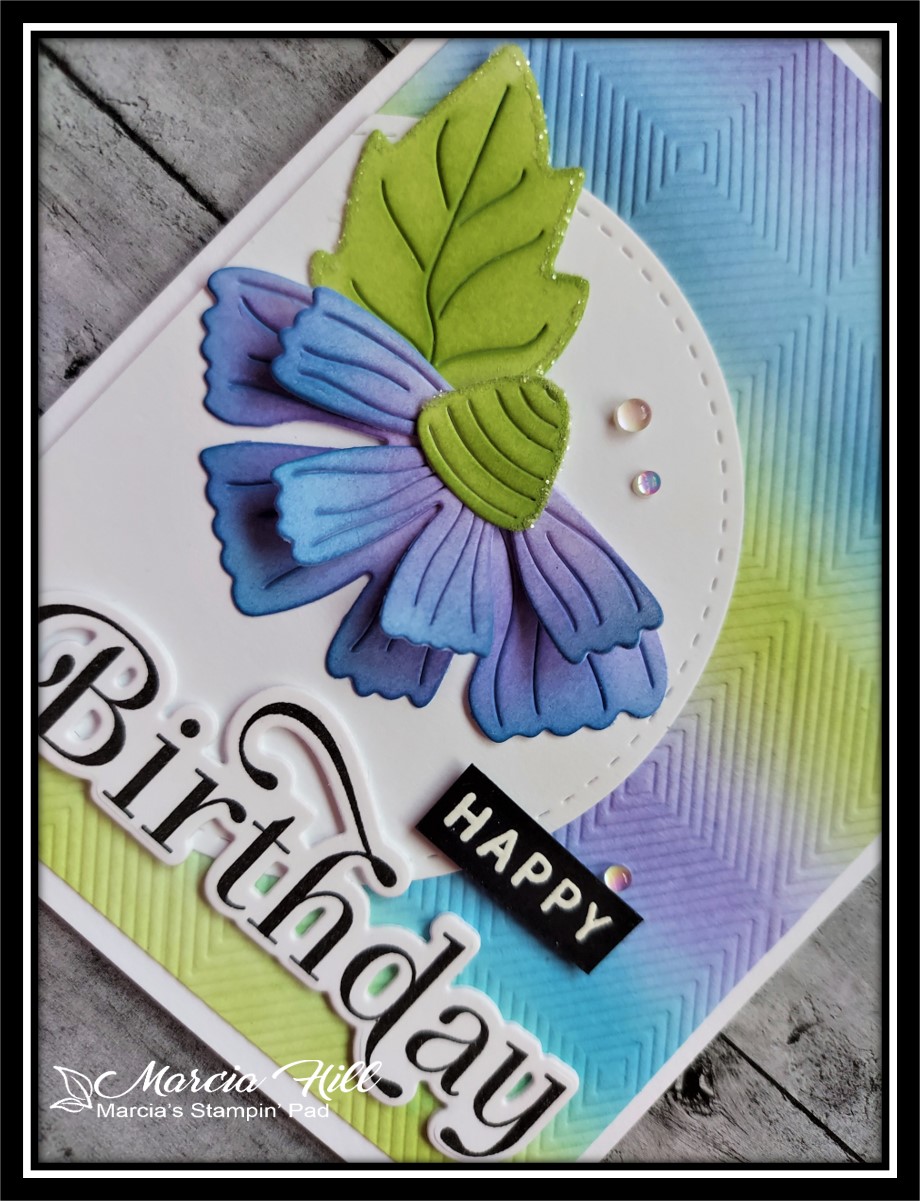
Next I die cut my flower and leaf from more white cs and then ink blended the flower with the purple and then blue ink, and obviously green for the leaf and flower center.  I also added a tiny bit of glitter to the edges of the leaf and flower center, and then adhered to a white die cut circle, so they wouldn't disappear against the same colored background.  My sentiment was stamped and die cut using The Greetery's Birthday Blooms, and I finished with a few clear gems from Trinity Stamps.  

My 2nd card is a very simple one using a Gina K style where I ink blended the background and then stamped a silhouette.  Take a look:


  This is such an easy style card to make and always turns out beautiful!  Great technique for when you need a card fast!  I ink blended the background using Jelly Bean Green, Blue Raspberry, & Wild Wisteria inks (Gina K) and then stamped my silhouette image from Gina's Wild Blossoms stamp set.  I masked off my edges with skinny washi tape before I started the ink blending, and then when finished, matted this layer to a black piece of cs and a white card base.  My "Thinking of You" sentiment is a pre-printed sentiment strip from Gina K and has a piece of foam tape behind it for a bit of added dimension.  I finished this card with a few Disco Ball sequins (also Gina K).  And although you can't see it, before I adhered my stamped layer to the black layer, I sprayed some Sheer Sparkle Shimmer Spritz to it for a very subtle sparkle to the card.

You can check out all the beautiful inspiration from both teams right HERE (Double D Challenge) and also HERE (Seize the Birthday Challenge) to play along. 

Thanks for stopping by today ... I love it when you do!


Friday, July 22, 2022

Color Hues #45 - PEACH & GRAY

Hello friends.  Playing along with the Color Hues Challenge today, where they are looking for PEACH & GRAY on our cards.


When I saw the colors for this challenge, I immediately thought of actual peaches (which are just hitting the fruit stands here in Michigan) and decided to go in that direction for my card.  Here's what I came up with...


I started my card with MB's Pinpoint Leaf Plate for my background, and then added a strip of stenciled plaid using PFS's Diamond Plaid Stencil and SU!'s Smokey Slate ink down the middle of my card.  I also layered a piece of Smokey Slate cs behind the plaid that was just a little bit wider than the plaid piece.  


I stamped and die cut my peaches using Pale Papaya and Grapefruit Grove inks (SU!) and the leaves in Smokey Gray ink.  I stamped my sentiment in Smokey Slate ink on the center peach, and then added the leaves that I also added Rock Candy Glitter (TH) to, to add a bit of sparkle to my card.  I also pop dotted my leaves to add a bit of dimension, and then finished with a few PFS Clear Drops: Iridescent, and a piece of gray & white baker's twine.

Check out all the fabulous inspiration from the DT and then play along right HERE.  This challenge is open till the 28th at 9:00AM.  


Thanks for stopping by today ... I love it when you do!


Wednesday, July 20, 2022

Christmas Kickstart #64 - SHOW US YOUR SNOWFOLK

Hello friends.  Playing along with the Christmas Kickstart Challenge where they want us to SHOW YOUR SNOWFOLK.


SNOWFOLK
immediately made me think of a SSS stamp set I received for my birthday this past Winter called Warmest Wishes and has the most ADORABLE snowmen in it!  And have you seen all the ROCKER cards out in blogland lately??!!  I had never heard of a rocker card before, but after seeing Lisa's card, and then Loll's card, I just HAD to try one out for myself!  I combined the snowfolk and rocker card ideas and came up with this...


The base of the card is just a die cut circle (the largest circle from the Lil Inker set) that is scored in the middle and then folded in half.  When you set it up on the curved part, it rocks!  I used an older die cut tree line and adhered it to the back of the circle with score tape.  (This was a die that I never kept the original packaging, so I'm not sure any more who the maker is...maybe Gina Marie Designs??)


  I die cut another smaller circle in red cs, cut it in half, and then embossed my sentiment from PTI's Stylish Sentiments: Holiday in white.  After adhering it to my white card base, I added the snow couple from the Warmest Wishes (SSS) stamp set.  I colored them with my Copics and then fussy cut them out, added some glitter, and then adhered them to my base.  I originally put them to the left of the card base, but then the card didn't stand up straight...grrrr!!  So I carefully removed them and re-attached them to the center of the card...rocks perfectly now!


 This style of card was really so easy to make, and I will definitely be making more!!  Not sure what size envelope this is going to fit into, but I'll figure that out later.  It just may get hand delivered!  :0)

This challenge is open till the end of the month, so still plenty of time to play along!  You can check out Jo's card and her special elf Helen's SNOWFOLK card for inspiration and info on how to play along right HERE.
 
Thanks for stopping by today ... I love it when you do!


Sunday, July 17, 2022

CAS Christmas July 2022 Reminder Post - SANTA

Hello friends.  Just a friendly reminder that there's still time to play along with us at the CAS Christmas Challenge where our hostess Barb would like to see a SANTA on your card.


I have a very simple card to share with you using another older wooden stamp from Paper Inspirations called Telling Santa.  Take a look...


Doesn't that image just make you feel all warm inside?!!  I stamped the image in Basic Gray ink (SU!) and then layered it to a Basic Gray panel and a Matte Silver cs layer (Gina K).  


I embossed the front of my card base with a FSJ Evergreen ef, and then added a sparkling white ribbon (SU!) before attaching my stamped image, which is raised up on foam strips.  I finished by simply adding 3 red gemstones to add just a tiny pop of color to my card.  I left off a sentiment on the front of my card as I felt the image was busy enough as is, and I don't think anyone will mistake it for anything other than a Christmas card!  :0)

There's still a week left to play along with us, so check out all the fabulous inspiration from our DT and Special GD, and then play along with us right HERE.  This challenge is open till the 24th


Thanks for stopping by today ... I love it when you do!


Wednesday, July 13, 2022

The Four Seasons Challenge - SUMMER

Hello friends.  Playing along with Double D's The Four Seasons Challenge where it's SUMMER/JULY ANYTHING GOES today.


I had some new goodies from The Greetery that definitely said SUMMER to me and this is what I came up with...


Lots of layers on this sweet little card, starting with the background that I die cut using the Honeycomb Corners Die, and then blended Mustard Seed Distress Ink all over it, going heavier in the two corners over the die cut area.  I did a little ink splattering and then adhered to my white card base.


Then came the FUN part and layering on all the different elements, from the Honey Jar stamp & die set, the Crimped Circle die cut behind the honey jar, the BotaniCuts: Sunflower, the bees, and of course the FUN sentiment from the Buzz Worthy Sentiments stamp & die set.  The jar topper was stenciled using a plaid stencil (also from The Greetery), and I learned something new and made the honey that is on the stir stick using Glossy Accents and re-inker...it really does look like the real stuff in real life!!  :0)   I did add a bit of glitter to the veins on my leaves and then finished off with a few Trinity Stamps Crystal Ball Dewdrop Baubles.

Hope you're all having a GREAT Summer, and if it gets too hot like it's been here in Michigan, then have some fun in your craft room making a Summer card to brighten up someone's day!  Check out all the FABULOUS inspiration from the DT, and then play along with this challenge right HERE.  This challenge is open till the 25th of this month.    

Thanks for stopping by today ... I love it when you do!


Monday, July 11, 2022

CAS Mix Up July 2022 - Things with Wings

Hello friends.  I'm playing along with the CAS Mix Up Challenge today and they are looking for WATER COLORING and Things with Wings.


I had just received The Greetery's Jumbo Curiosity Dragonfly die and this challenge seemed like the perfect time to try it out!  The die comes with a stencil too, but since the main element of this challenge needs to be water coloring, I didn't use the stencil.  I used Lindy's Magicals for my water coloring and came up with this...


I used Tibetan Poppy Teal and Ponderosa Pines Olive Magicals (from the Autumn Leaves set) and sprinkled both colors on my cardstock and then spritzed lightly with water.  Once it was dry I used the Dragonfly dies to cut him out.


I tried so hard to capture the shimmer you get from using Lindy's Magicals, but my camera just wasn't having any part of it...sorry!!  On my card base I ink blended a bit of turquoise ink leftover on my blending brush before adding a top layer that I had used MFT's Peek-A-Boo Rectangle die on and then SU!'s Timeworn Type 3D embossing folder.  I added a few green crystal gems (PFS) to the body of my Dragonfly before gluing him down to the center of the rectangle, leaving the two bottom wings curled up a bit for some dimension.


I didn't add a sentiment as I really liked the CAS look with nothing else added.  I'm thinking this will be a good "Just A Note" card.  :0)

The DT has some absolutely BEAUTIFUL cards to inspire you with, so check it out right HERE and then play along!  This challenge is open till the 24th.

Thanks for stopping by today ... I love it when you do!


Wednesday, July 6, 2022

Color Hues #44 - Playing Cards With Friends

Hello friends.  There's a FUN challenge going on right now at Color Hues...my sweet friend Michele, who asks a different friend each month to play along with her, has asked the whole team at Color Hues to play along with her using RED & BLUE and to include STARS and/or STRIPES.


And here's what I came up with...


I started by using The Greetery's Pinwheel Party Stencils and SU!'s Sweet Sorbet and Starry Sky inks and blended down the left side of a piece of white cardstock.  Next I used my rubber mat and an older set of Gina Marie Designs STAR dies and embossed the stars onto the same piece of stenciled cardstock.  I love the look of the pinwheels and stars together!!


Of course I had to add a bit of CUTE factor to this card, and colored (Copics) and die cut this sweet little Anita Jeram mouse Be Creative with a bit of foam tape for dimension to the front of my card.


To finish I added my die cut sentiment from The Greetery's Birthday Blooms stamp and die set.  Turned out to be a pretty simple card, but definitely says CELEBRATION to me!  Think this one will go to my brother in law at the end of the month.

Lots of FABULOUS inspiration from Michele and the DT, and you can find it all right HERE!  This challenge is open till the 14th


Thanks for stopping by today ... I love it when you do!


Monday, July 4, 2022

The Flower Challenge #70 - CAS

Hello friends.  I am honored to be guest designing with the talented ladies over at The Flower Challenge today.


This month the challenge is all about CAS (Clean and Simple), which just happens to be my favorite style!  Just remember that CAS means LOTS of white space and simple designs.
  

Last Summer I was the lucky winner of one of Pinkfresh Studio's grand prizes, where I won the whole release for the month of July!  Included was a stamp, stencil, die, & hot foil plate for the Thankful for Friends set, and I used it for my CAS card.  Take a look:


I started with a white card base and another layer of white that I embossed with SU!'s Subtle embossing folder (sadly retired).


Next I foiled the flower image on a piece of Hammermill cardstock with Spellbinders Aura foil, then stenciled the leaves with a couple Gina K green inks, and then die cut the image out.


I used a piece of DSP from the Craft Consortium (Ink Drops Dusk) that my sweet friend Loll gifted me, and foiled the image again in the same Aura foil, and then proceeded to fussy cut the 2 flowers and 1 bud and paper pieced them to the first foiled piece I had done.  I also foiled one of the Nested Diamonds Hot Foil Plates (the largest one) and glued it off center on the left side of my card base, before gluing down the flowers.  I finished by simply stamping my sentiment (that comes with the stamp set) in black and adding a few PTI Rainstones.

We look forward to seeing what YOU create for this CAS challenge, so check out all the FABULOUS inspiration from the talented DT, and then play along right HERE.  This challenge is open till the 25th at 5:00PM.  A BIG THANK YOU to all the ladies at The Flower Challenge for letting me play along with you this month...I am so tickled and honored to be joining you!!

Thanks for stopping by today ... I love it when you do!


Sunday, July 3, 2022

CAS Christmas July 2022 - SANTA

Hello friends.  It's time for a new challenge over at CAS Christmas, and our hostess Barb would like to see SANTA on our CAS Christmas cards. 


I had fun inking and coloring up an old wooden stamp from Rubber Stampede called Santa Collage, and came up with this card...


I stamped my image in black, and then used a B34 Copic to color Santa's eyes (a little hard to see in my photo, but they really are BLUE), a gold pen to outline Santa's glasses, and then lightly added a bit of pink chalk with a q-tip to Santa's cheeks, nose, & mouth.  I also used a WOS pen to make the snowflakes in his beard sparkle.


 I made a frame by die cutting a rectangle from the center of my 4" x 5 1/4" panel, and then embossed it using a SU! ef called Winter Snow.  I used foam strips on the back of the embossed panel for a bit of dimension, and then added a pre-printed sentiment strip from Gina K.

Let us help you get a head start on those Christmas cards by pulling out your SANTA stamps and joining the DT and our special GD over at the CAS Christmas Challenge...this challenge is open till the 24th.

Thanks for stopping by today ... I love it when you do!