Monday, May 31, 2021

Pop Up Bird Houses

Hello friends.  No challenges today...just finally getting around to playing with a die set that I bought eons ago after debating whether I would really use it, and then of course bought it and there it sat!  Drives me nuts that I do that...HAVE to have it, and then don't use it!  Sometimes I wonder if I like the shopping more than I do the creating??  Nah...just a bit lazy, but I do eventually get around to using everything!!

So anyway, today I have two pop up easel cards for you using Poppystamps Bird House Pop Up Easel Set, and let me tell you, once I started making these, I wanted to make even more, and questioned why I had waited SOOOOO long?!!  So take a look:


The die set is made to be used as a Christmas card, but I watched Jennifer McGuire do a video (HERE) and she showed different ways to make it a non-Christmas card too, so that's what I did.  A Springtime one and a Christmas one.


Let's start with the Christmas one.  The dies start with a base die that I cut with white and this piece has the folds scored into it so that it will work as an easel card.  I added a kraft layer next and then a red layer.  The red layer has horizontal lines already scored into it, but I also used a MB Pinpoint Snowflake Plate die to add a bit more design to the front of the bird house.  I sponged all the edges with Soft Suede ink to give a bit of a vintage look, and then added the Cardinal and branches.  I also added a few tiny die cut snowflakes from IO.  The sentiment is from an older PTI Christmas sentiments set.  I also added a bit of Distress Glitter to the snowflakes and branches.  Super easy to assemble and I love the way it turned out!!


Here's my Springtime birdhouse, and I basically did everything the same, except for stenciling on the lower half of the birdhouse with Gina K's Funky Flourish Stencil and then added a miniature grapevine wreath die cut that my sweet friend Birgit gifted me from Creative Expressions.  It was like the wreath was made specifically for this bird house...love it when that happens!!  The tiny leaves and flowers are from SU!'s Sweet As A Peach die set, and the sentiment is a freebie from a Taylored Expressions order.


I was trying to take a picture of how the card looks popped up, but I don't do so well with dimensional photography!  Hopefully you can sort of see what it looks like propped up as an easel card!  Oh, and I used the same bird die that comes with the set for my Springtime card but just cut off the top part of the cardinals head so it didn't look like a blue Cardinal...hope that makes sense?!!  So there you have it...a Christmas AND a Springtime card both using the same die set, and I'm already thinking about a Fall card too using this set!  Stay tuned...

I will be adding this card to Darnell's NBUS  as I think it definitely qualifies considering how loooooong it sat in my craft room without being used!


                                        Thanks for stopping by today ... I love it when you do!


Tuesday, May 25, 2021

The Flower Challenge #56 - Use Your Favorite Flower

Hello friends.  I'm playing along with The Flower Challenge today where they want us to use our FAVORITE flower.


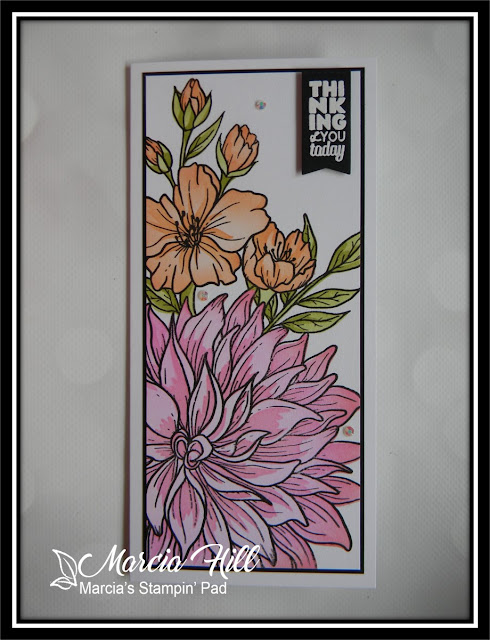
How do you pick a favorite flower?!!  Isn't that a bit like asking someone who their favorite child is?!!  It's just NOT possible...I LOVE all flowers!  Tulips, Daffodils, Roses, Daisies, Sunflowers, Peonies, Lilacs, Lily of the Valley, Iris's, and many, many more!!  And in ALL colors!!  But choose I must, so I'm using a stamp/stencil set from Pinkfresh Studios called Miss Your Smile that look like Peonies to me...


The bottom flower especially looks like a Peony to me, but not so sure about the top flowers/buds.  I know there really aren't peachy colored Peonies either, but I love pink and orange together, so artistic license and all that good stuff!!  So I stenciled first, using Gina K inks and my blender brushes, and then went over the stenciled flowers with the outline stamp in versafine black onyx ink.  


I layered my stenciled and stamped layer with a piece of black cs and then attached both to a white card base.  I finished with a little banner tag embossed in white on black and used some foam tape behind it for dimension. (The Greetery's Sentiment Suite: Thinking of You)  I also added a few Pinkfresh Studio gems for a little bling.  

You can check out all the FABULOUS cards from the DT HERE.    

Thanks for stopping by today ... I love it when you do!


Wednesday, May 19, 2021

Color Hues #18 - PURPLE & TEAL

Hello friends.  In case you haven't noticed, I LOVE playing with color challenges, and especially the Color Hues Challenge where this time around they would like to see purple & teal on our cards.


I had just received a new stamp, die, & stencil bundle from Pinkfresh Studios called Butterflies that I had to try out with this color combination, and here's what I came up with:


I started by inking up the outline stamp, and then matched up the stencils (there are 5 of them to create this butterfly!) and ink blended using Lavender and Aquamarine (that looks like Teal to me!) inks from Pinkfresh Studios.  After I die cut the butterfly, I used my WOS to add lots of sparkle to the butterfly's wings.


You can see the sparkle on the upper left wing of the butterfly, but trust me...the sparkle is all over the whole butterfly!  I attached the butterfly to a piece of white cardstock that I used my sweet friend Michele's Lil Inker Woodgrain Cover Plate Die on to provide some white on white design, and also added a thin strip of black cardstock, before attaching both to a top folding white card base.  I finished with a few Pinkfresh Studio gems and a white embossed sentiment (The Greetery) on a black strip. 

Lots of absolutely beautiful inspiration from the whole DT over at Color Hues that you can check out right HERE if you'd like to play along.  This challenge is open till May 29th at 9:00AM.

Thanks for stopping by today ... I love it when you do!


Monday, May 17, 2021

Christmas Kickstart #50 - Santa and Friends

Hello friends.  I'm building up my Christmas card stash and playing along with Jo and her guest elf Bonnie over at the Christmas Kickstart Challenge where this month they are looking for SANTA & FRIENDS.


I feel like I'm cheating a little bit by using the same stamp set that Bonnie used, but I am using a different image from that set, so hopefully it still counts!!


There are SO many great images in MFT's Christmas sELFies stamp set, and I chose the one with Santa and Comet...or is it Donner, or maybe Blitzen??  I just know it's NOT Rudolph!!  Haha!!  I colored up the image with my Copics, and then used the die that looks like a Polaroid Picture to die cut my image.  I stamped my sentiment at the bottom and then layered it onto a piece of black cardstock, and layered that onto a piece of white cardstock that I embossed using an older Cuttlebug EF, before finally adhering it all to a top folding white note card.


 This challenge is open till the end of the month, so it's a great way to get ahead on making those Christmas cards this year!  You can check out the inspiration and play along right HERE.

Thanks for stopping by today ... I love it when you do!


Saturday, May 15, 2021

CAS Christmas Reminder - Foliage And Berries

Hello friends.  Just a friendly reminder that there's still time to play along with us this month at CAS Christmas, and that this month we're looking for cards with FOLIAGE & BERRIES.


I used the same set (different image) that I used on my first post from The Greetery called Budding Beauties Winter for my reminder card...this time I used the Pine Sprig with Berries.  Take a look:


I stamped and die cut the image and added it to a red frame (PTI's Pierced Feature Frames) and also added an embossed panel behind the frame using SU!'s Winter Snow embossing folder.  My sentiment is from Gina K's Holiday Tapestry stamp set and was die cut using Gina K's Master Layouts 3 dies.


To finish I added a bit of WOS to the pine branches and a couple of clear gemstones to the sentiment area and one on the frame.  Easy peasy and I might just make a few more while I still have everything out!

Make sure you check out all the inspiration we have for you from our talented DT and Special GD Robyn right HERE, and then play along with us to get going on those Christmas cards!!  This challenge is open till the 24th.

Thanks for stopping by today ... I love it when you do!


Wednesday, May 12, 2021

CAS Mix Up May 2021 - Rainbow Ink Blending w/ Stencils

Hello friends.  I'm playing along with the gals over at CAS Mix Up where they are looking for Rainbow Ink Blending w/ Stencils.


I love stencils and I love rainbow ink colors, so this sounded like a great challenge to me!  I was a little concerned though about how to keep my card CAS with all the rainbow color AND a stencil.  Once I got started playing though, I couldn't stop, so I have 3 cards to share with you today.  Here's what my panels looked like after stenciling and before I cut them up for my cards...


Aren't all the colors so pretty all together?!  I used 3 different Gina K stencils and all Gina K inks for all 3 of my cards.


This first card ended up being my favorite, using the Fizzy Stencil and SSS's Butterfly Drift Die.  The sentiment was a freebie from a Taylored Expressions order.


My 2nd card uses the Festive Stencil and a PB die called Bashful that I die cut 3 times and glued together for some extra dimension.  


My last card isn't as CAS as the other two, but I still like how it turned out!  This one uses the Harvest Flourish Stencil and I used a Pinkfresh Studios Diagonal Stitched Circles Die to cut out the larger circle in plain white and the stenciled piece on the smaller circle.  Next I added SSS's Birthday Circle Die cut out in Turquoise Sea cardstock over the stenciled layer, and then added the die cut cupcake to the center.  For the frosting I ink blended lightly some pink before adding some Distress Glitter over the top of that.  The cupcake was pop dotted so it wasn't sitting flat on my stenciled piece.  At this point a plain white card base seemed to plain, so I added a layer that I embossed using an old Cuttlebug EF.  It is a little busy, but I still like it!!

Lots of BEAUTIFUL examples of Rainbow Ink Blending through stencils from the DT, so check it out HERE and then play along.  This challenge is open till the 24th.  

Thanks for stopping by today ... I love it when you do!


Monday, May 10, 2021

Twofer Challenge #38 - Cake/Cupcake

Hello friends.  It's that time of month again (no, not THAT time of month!!) for a new Twofer Challenge and this month the prompt is CAKE/CUPCAKE.


I chose to use a cupcake and used Elizabeth Craft Dies Small Cupcake Dies to come up with these two cards...


I made a slimline Birthday card and a regular size encouragement card using the cupcake dies.  Let's take a closer look at each individual card...


I really do like the slimline craze that is going on except for...yep, the photographing part!!  My card is a 3 1/2 x 8 1/2 size and I used a couple Pinkfresh Studio dies (Slim Stitched Rectangles) for my Aqua Mist layer and the white layer that I added my cupcakes to.  The cupcake liners were die cut from PTI's Bitty Big DSP in Aqua Mist, Pure Poppy, & Sweet Blush and the frosting layers were die cut from cream cardstock and sponged with Walnut Stain Distress Ink.  The sprinkles and the sentiment are both from SU!'s Sweet Ice Cream set.  I finished with some glitter to the red hearts and some Glossy Accents to the cherry on the middle cupcake.  


Can you spot the cupcake on my encouragement card?  I used the cupcake liner die on a piece of kraft cardstock that I had stamped the woodgrain on to use as a washtub for my little hamster (he's a 3rd cousin to Hammy's Dad's Mom 7 times removed...got it??) and the umbrella is the frosting die turned upside down using more of the Pure Poppy Bitty Big DSP from PTI.  I die cut the handle and little tip at the top of the umbrella using an actual umbrella die from Impression Obsession with matte silver cardstock.  The background is a scrap of smooshed water color that I thought looked like a rainy day and I also added a tiny raindrop gem that I've had forever in my stash.  The sentiment is from MFT's Rain or Shine and the hamster is from Colorado Craft Company's Birthday Wishing set.


  So there you have it...a normal cupcake card and a not so normal cupcake/washtub/umbrella card!  It's amazing what you can come up with when you let the old imagination lose!!  We can't wait to see what YOU come up with using a CAKE/CUPCAKE stamp, stencil, or die to come up with TWO DIFFERENT designs for TWO DIFFERENT occasions this month!  Make sure you check out all the FABULOUS inspiration from the DT and our Special GD's right HERE and then play along with us!  This challenge is open till the 24th.

SPECIAL NOTE** And if you'd like to join in a fun recipe exchange, feel free to add your favorite cake or cupcake recipe to your post when you play!

My favorite and EASY cake recipe is a Cherry Dump Cake...

2 cans Cherry Pie Filling
1/2 tsp. Almond extract (optional)
1 Box Yellow or White Cake Mix
3/4 cup melted butter (NOT margarine)
Chopped nuts and/or coconut if desired

Grease 9 x 13 pan and preheat oven to 350.  Spread the 2 cans of Cherry Pie Filling evenly over the bottom of your greased 9 x 13 pan.  (you can add the Almond extract here if you'd like)  Traditional Dump Cakes have you "dump" the dry cake mix over the pie filling at this point, but I like to use an extra bowl and mix the cake mix and melted butter with a fork till it's kind of crumbly and then add over top of the pie filling.  You can add the chopped nuts (pecans or walnuts both work great!) and/or coconut to the crumbly cake mix before you spread it over the pie filling, or add it to the top of the cake mixture at this point.  If you do add the cake mix dry over the pie filling, try to add the melted butter as evenly as possible over the dry cake mix, or you will end up with dry areas of cake mix after the cake has baked.  Bake at 350 for 50-60 minutes or until golden brown and bubbly.  Serve warm with vanilla ice cream or cool whip and enjoy!  (tastes great the next day too if you just nuke it in the microwave)   

Thanks for stopping by today ... I love it when you do!


Tuesday, May 4, 2021

Color Hues Challenge #17 - RED & ORANGE

Hello friends.  I'm playing along with the gals over at the Color Hues Challenge where they are looking for RED & ORANGE this time around.


I have to admit I wasn't too sure about this color combination at first, but have to tell you that now I absolutely LOVE it!!  Here's what I came up with:


I started by stenciling my background using Pinkfresh Studio's Mirrored Triangles stencil and used Gina K's Tangerine Twist ink first, then flipped the stencil over to the back and stenciled again using Gina K's Red Hot ink.  I used the same two inks to stamp the flowers from Ink To Paper's Prominent Petals stamp set, then die cut them out and pop dotted them to my background.  I die cut the stems and leaves from black to make them pop a bit more since the rest of the card is already pretty busy.  The stamped "Hello" is from Gina K's latest bundle called A Little Hello, and I finished with just a couple Disco Ball sequins (also Gina K).

Make sure you check out all the BEAUTIFUL cards from the talented DT, and then play along with this FUN challenge right HERE.  This challenge is open till May 14 (9:00AM EST).

Thanks for stopping by today ... I love it when you do!


Monday, May 3, 2021

CAS Christmas May 2021 - Foliage and Berries

Hello friends.  It's time for a new challenge at CAS Christmas and our hostess Christine would like to see FOLIAGE AND BERRIES on your Christmas cards this month.


I used a set from The Greetery called Budding Beauties Winter that I had bought back in 2019 and then never used...shame on me!  Take a look at what I came up with...


I used the Holly image and stamped and die cut it 3 times, and then also stamped the watering can that is also from The Greetery (Sprinkled With kindness), die cut it, and then added the holly branches to the can.  


I added dimensionals behind the watering can and adhered to a panel that I embossed first with SU!'s Subtle embossing folder.  The embossed panel and the black panel were both die cut with Gina K's Master Layouts 2 dies.  After attaching all the layers to a top folding white card base, I finished my card simply with a little red heart tag from PTI's Tiny Tags set (the "very merry" is also from the Tiny Tags set).

Can't believe I waited SOOOOO LOOOOONG to use this stamp set, but better late than never, right Darnell?!!  (Yes, I'll be adding this card over at Darnell's NBUS Challenge too!)  

We're looking forward to seeing our gallery filled with all your greens and berries (and remember that berries don't always necessarily need to be red!!) this month!  Check out all the BEAUTIFUL inspiration we have for you from the DT and our Special GD Robyn this month right HERE, and then play along with us to get a head start on those Christmas cards!  This challenge is open till the 24th.

Thanks for stopping by today ... I love it when you do!