Saturday, December 31, 2022

Last Card of 2022

Hello friends.  Just wanted to share a quick card today that really made me feel like an artist after being gifted a couple Penny Black stamps and dies from my sweet friend Sue for Christmas.  This card is almost a complete CASE of Jill Foster's card (see video HERE) with the exception of ink colors, sentiment, and the PTI cardinals I used.  Take a look...


 Jill
does amazing videos that are so easy to follow, and I just kept pausing the video as I worked right alongside her, using some of my SU! markers and Gina K ink cubes directly to the stamp. (40-880 panorama)  


   I used the same stitched circles (51-551) dies as Jill too as I just LOVE how it finishes off this card!  My sentiment comes from the butterfly garden (30-558) stamp set and my 2 little die cut cardinals are from PTI's In the Meadow die set.

I am adding this card to the Penny Black Saturday Challenge where it's anything goes with the option of Christmas this month.  


Thanks for stopping by today ... I love it when you do!


Thursday, December 29, 2022

Double Stamped Vellum

Hello friends.  Been having fun this week just playing with NBUS and trying techniques that I've just never gotten around to...like the Double Stamped Vellum technique that Bonnie and Loll have been showing on their blogs recently.  Chrissie Stokes has a wonderful video HERE that shows how fun and easy this technique is!  My first attempt is very simple, but I'm happy with how it turned out.  I will definitely be trying it again and using more color!  For today though, here is take one...


I started by embossing in white on my heavy weight vellum (PTI) an image from The Greetery called Lovely Silhouettes.  Next you simply turn the vellum over and stamp either the same image or a different one (I used 2 more images from the same Lovely Silhouettes stamp set).  I used Jelly Bean Green (Gina K) ink to randomly stamp on the backside of my vellum.


Next I created a frame using PTI's Pierced Feature Frame Dies and adhered my vellum to the backside of the frame.  On my card base I taped off all 4 edges with some skinny washi tape and then used an old SU! background stamp called En Francais and Smokey Slate ink (SU!) to stamp directly onto the card base to add a bit of interest to my background.  


To finish my card I used a sentiment strip from Gina K and also a few Disco Ball Sequins (also Gina K).  I think this technique makes such a classy CAS card and will definitely be making more, and like I said earlier, using a bit more color.  Such an easy and fun technique...thanks Bonnie and Loll for getting me started!!  :0)

Thanks for stopping by today ... I love it when you do!


Saturday, December 24, 2022

REJOICE...A Savior Is Born!

REJOICE...A Savior Is Born!


Merry CHRISTmas!!


Thanks for stopping by today ... I love it when you do!


Thursday, December 22, 2022

Thank You with The Greetery

Hello friends.  Are you ready for Christmas??  Cards mailed?  Shopping done??  Gifts wrapped?  Baking done?  We had our family Christmas this past Sunday, so this has been a wonderful week of taking it easy for me, and also FINALLY getting to play with some new Greetery products.  It was killing me to see others play with all these new products from The Greetery's last release and not having the time to play until now!  But I made up for it with two cards and a tag, so let me show you what I've been working on!


One of the 1st things I noticed everyone using with this latest Greetery release was the 
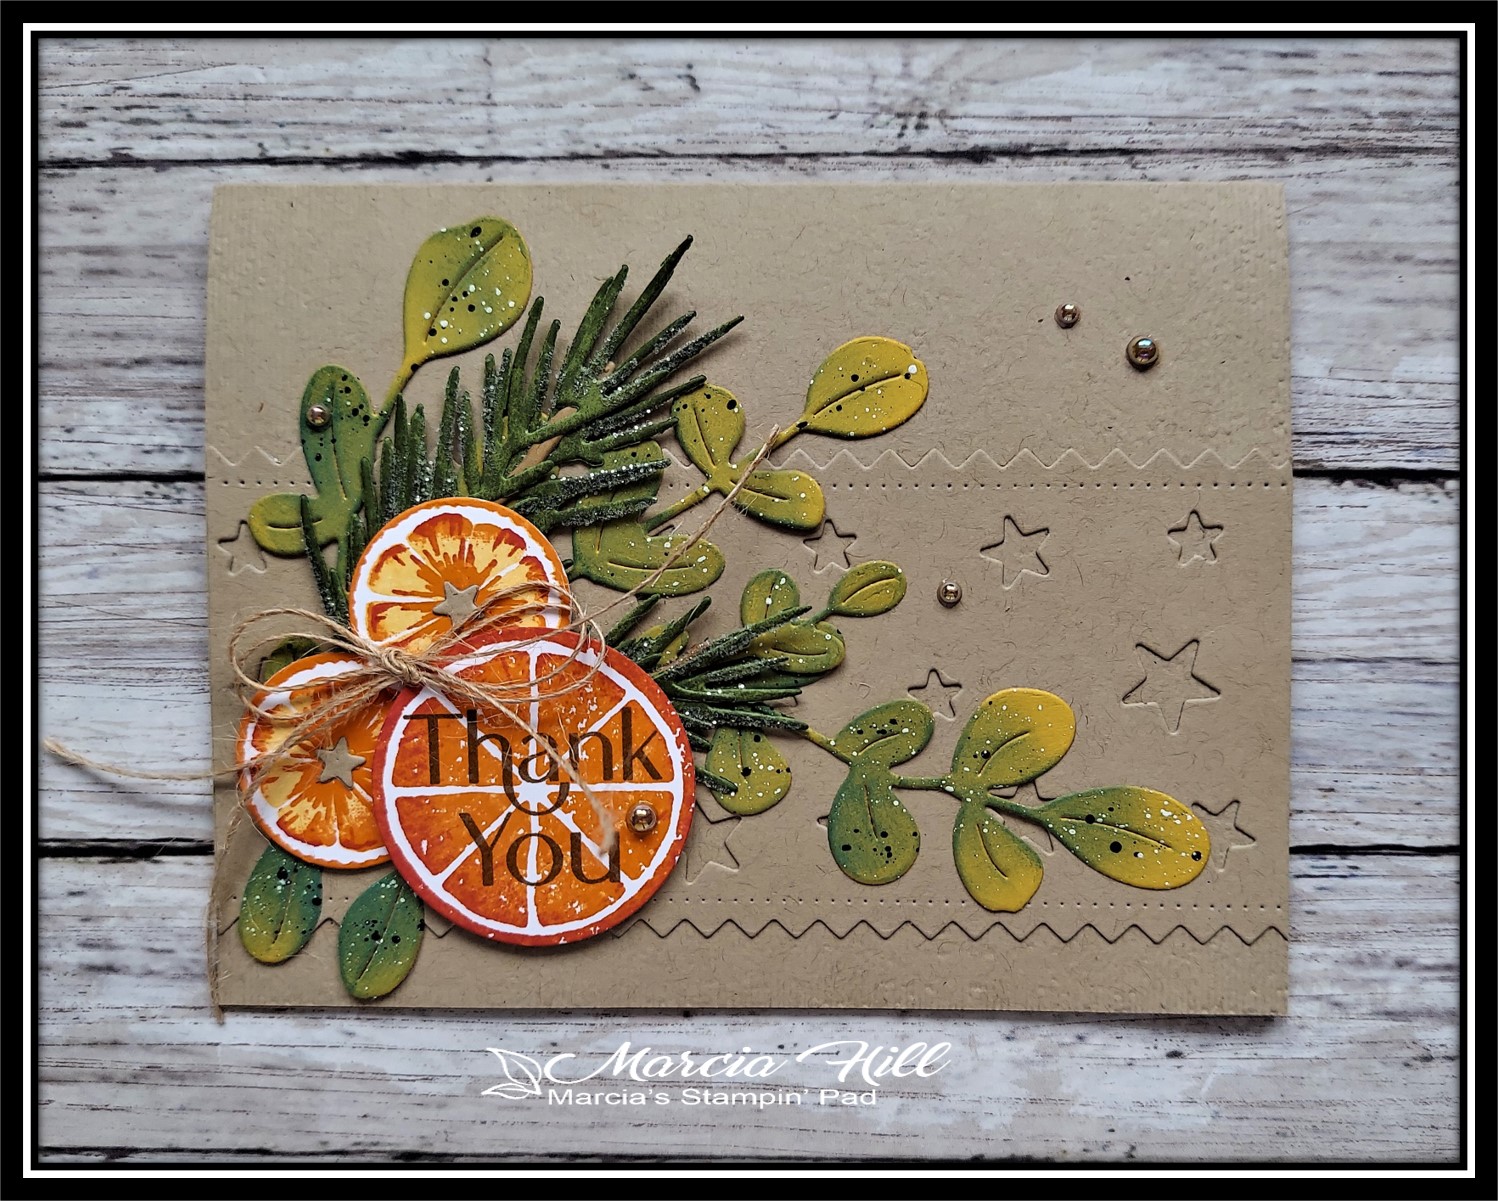
Dried Citrus Slices Dies, which I did not think I needed.  Boy was I wrong!!!  Everything I've seen has been SO beautiful using these orange slices, and I was just totally kicking myself for not getting them!  So I had to move onto plan B and compromise...The Greetery's Lemon Blossom set had a smaller fruit slice in it (think tangerine size instead of an orange size) that worked beautifully once I changed the colors, and I also found a larger fruit slice stamp in an older SU! set called Lemon Zest.  Between the two, I made them work!  

My sweet friend Michele gifted me the Ribbon Maker Pinked Stars Die and that's what I used for my background on both of my Thank You cards...LOVE this die!!  Besides my orange slices, I also added the Big Branches Ruscus Die, the Big Branches Eucalyptus Die, and the Big Branches Baby's Breath Die, all of which I added a bit of inking to and some splattering also.  Didn't want all those small stars that were left over from the Ribbon Maker Pinked Stars Die go to waste, so I added a few of them onto the sides of my card base.  I finished with a bit of twine and a few Sparkling Champagne Metallic Pearls from PFS.


I stuck with the same color family for my 2nd card but changed up the card base to kraft instead of white like the 1st card.  


I did add the BotaniCuts Pine Bough to this card along with the Big Branches Eucalyptus Die, and of course the fruit slices.


It's hard to see in my photos but I textured my card base using a retired SU! embossing folder called Subtle...still one of my all-time favorite embossing folders!!  The Thank You that I stamped on the large orange slices from both cards comes from The Greetery's Tagged Elegance stamp set.  Some more twine and the Sparkling Champagne Metallic Pearls (PFS) once again finished off this 2nd card.


Because I had leftover bits and pieces, I decided to make a tag and I'm pretty tickled with how this came out too!  I stamped the background of my tag with The Greetery's Pine & Berry Background Stamp and Crumb Cake ink, and then added a small piece of the Ribbon Maker Petite Scallops Die cut out in kraft cs.  I decorated it with another pine branch and Ruscus die cut, and finished with more twine and the Sparkling Champagne Metallic Pearls once again.


Here they are all 3 together, and I think you can tell I had FUN putting all 3 of these cards and tag together!  Now what shall I play with today since we have a blizzard barreling down upon us and I won't be going anywhere for the next 3 or 4 days??  No shortage of things to play with over here, so as long as we don't lose power, I'll just be right here in my happy place!  (Praying all of you in this Winter storms path stay safe!!!!!)

Since most of the products I used today are NBUS, I'm going to add these over at Darnell's NBUS Challenge.


Thanks for stopping by today ... I love it when you do!


Tuesday, December 13, 2022

Double D Challenge - CHRISTMAS STOCKINGS

Hello friends.  My cards are made and mailed out but couldn't resist playing along with the Double D Challenge where they are looking for CHRISTMAS STOCKINGS.


I used an older Avery Elle set called Stockings and came up with this card...


I started by stenciling my background with Gina K's Brick Wall stencil and then matted it to a piece of Basic Gray cs (SU!) and a side folding white card base.


Next I stamped and colored up my stockings with a few red, green, & gray Copic markers, and then fussy cut them out.  I attached them to a wood panel from PTI's Christmastime stamp and die set that made me think of a fireplace mantle.  The die cut NOEL is from the same set.


The trees and rocking horse are also a part of the Christmastime stamp and die set and helped to finish creating my little Christmas fireplace scene.  I also added glitter to the trees (which unfortunately you cannot see...NO sunshine here in Michigan for over a week now...grrrrrrrr!  Makes photographing difficult!!) and a couple sparkling gems to the bells on two of the stockings.  Pretty simple card but I like the way it turned out.  

There are lots of FUN and BEAUTIFUL stocking cards for inspiration from the talented DT HERE, so check it out and play along if you still need to finish up those last minute cards!  This challenge is open till the 18th.

Thanks for stopping by today ... I love it when you do!


Wednesday, December 7, 2022

The Flower Challenge #75 - CHRISTMAS

Hello friends.  I'm playing along with The Flower Challenge today and they are looking for CHRISTMAS flower cards.


I had won a gift card from Altenew quite a few months ago and ordered some of their 3D embossing folders, including their Perfect Poinsettias 3D embossing folder which I had not used yet, so this seemed like the perfect opportunity to get it out and play!  


This is one of those cards that's so much prettier in real life with the color, shine, and foiling!  I've been pretty hooked on the technique that Jennifer McGuire showed awhile back with ink blending in a masked off area and then brushing perfect pearls over the blended area before running the whole piece through an embossing folder.  I used 3 shades of red distress inks for my blending (Lumberjack Plaid, Fired Brick, & Aged Mahogany).


After adhering my embossed panel to a top folding white note card, I added my silver foiled sentiment from PFS's Perfect Sentiments: Holiday along with a few silver metallic pearls (also PFS) and a piece of black & white baker's twine at the top.  Such an easy technique that really packs a punch in real life!!

I will also be adding this card to Darnell's NBUS Challenge as I've had this embossing folder for months and this is the first time using it!  


Make sure you check out all the absolutely BEAUTIFUL Christmas flower cards from the DT and their special GD Darnell and then play along right HERE.  This challenge is only open till the 15th this month.

Thanks for stopping by today ... I love it when you do!


Friday, December 2, 2022

Color Hues #54 - NAVY & CREAM

Hello friends.  Playing along with the current Color Hues Challenge, where this month (YES, we get the whole month to play this time!) they are looking for NAVY and CREAM on our cards.


This was a perfect color combination for a new stamp set I had gotten from SU! called PEACE TO YOU.  I actually have 3 very simple cards for you today, because I had all the supplies out and now, I think I'm finished with this year's Christmas cards...YAY!!  Do I have them all addressed and ready to mail out??  Nope...haven't even started!  But that's for another day.  Let's look at what I came up with using this color combination...


I love this image!!  It's graphic but still so pretty!!  I used SU!'s Starry Sky ink on Gina K's Ivory cardstock and stamped my sentiment on a small piece of torn Ivory cardstock with a bit of glitter for some sparkle.


I also added Spellbinders Essential Duo Lines Glimmer Rectangles foil plates to add the border in gold foil.  CAS and I love how it turned out!


Another very CAS version of the 1st card but used Gina K's Swiss Dot embossing folder for one of the background layers, and a different sentiment from the stamp set.


My last card uses the 2nd image included in the stamp set, and I matted it in some gold mirror cardstock and then added it to a background embossed with Spellbinders Tufted ef (thanks Michele!!).  My sentiment didn't stamp too well over the raised background, but hopefully whoever receives this one won't mind!

Make sure you check out all the FABULOUS cards from the DT and their special GD for inspiration, and then play along...you've got the whole month to play.  Check it all out right HERE.

Thanks for stopping by today ... I love it when you do!