Monday, September 26, 2022

Double D Challenge - Things that FALL

Hello friends.  Playing along with the Double D Challenge where they are looking for Things that FALL.


It was easy for me to decide which way to go with my card from this mood board as I had just received from The Greetery's recent release the BotaniCuts: Apple dies, and came up with this...


I die cut all my apples first from white cardstock, and then used my sponge daubers and DOX inks to color them up.  I thought they turned out looking like the Fuji apples my hubby loves so much!  I made my crate from the Shiplap Builder Dies (The Greetery) and some gray and brown inks to give the weathered look.  


I used the Windowpane Plaid Background stamp (also The Greetery) with kraft ink on white for my background panel, and then used the Frosted Frames die (The Greetery) with Kraft and Real Red cardstock and adhered it over the plaid background.  Both were mounted to a top folding card base (Kraft) and then I added my apples and crate to the card front.  I also added a piece of twine to look like a carrying handle to the center of the crate and then attached a Tiny Tag (PTI) with a greeting from the Sentiment Suite: Thinking of You stamp set from The Greetery.  A simple red enamel dot (SU!) above the sentiment finished off this FALL looking card.  

You can check out all the FABULOUS inspiration from the talented DT right HERE and then play along.  This challenge is open till Sunday, Oct. 2 @ 8:00PM

Thanks for stopping by today ... I love it when you do!


Thursday, September 22, 2022

Color Hues #49 - YELLOW & BROWN

Hello friends.  Playing along with the current Color Hues Challenge where they are looking for cards with YELLOW & BROWN.


I had 2 ideas for this color combination, and couldn't decide which one I liked better, so you get a twofer today!  Here's my first card...


I am still in LOVE with this stencil from The Ton called Precious Poppies Layering Stencils, and think it turned out beautiful in shades of yellow and brown!


There is actually a 3rd poppy on this stencil, but I chose to only ink up the bottom and middle one so it would fit better on my A2 size card.  After I finished ink blending, I ran this layer through with SU!'s Tome Worn embossing folder and then matted it with a piece of Early Espresso cs and a white card base.  My little tag is an oldie from PTI's Stemmed Statements and I finished with a bit of twine and a few Sparkling Champagne Metallic Pearls from PFS.

My 2nd card uses another favorite stencil...TCW's Mini Joyful Sunflower.  (You might want to go get your sunglasses before you take a look at this one!)


After blending with my yellow and brown inks, I got my glass bead gel out and spread a thin layer over the stencil and then lifted it off to clean before it hardened.  The hardest part of using glass bead gel is the waiting for it to dry...usually a good 12 - 24 hours!  That's hard for someone like me who's very impatient!!  


I ended up cutting off quite a bit of this panel (started with an A2 size panel) so that I could layer it with a piece of Early Espresso cs and still have a nice wide white border from the card base.  I embossed in white on the bottom of the Early Espresso panel my sentiment that comes from The Greetery's Sentiment Suite: Birthday, and that finished off my CAS birthday card.  

I'm leaning more towards my 1st card as the favorite, but all that SHINE on the 2nd card still calls out to me!  What do YOU think??  Lots of BEAUTIFUL inspiration from the DT using these 2 colors, so check it all out right HERE and then play along.  This challenge is open till the 28th @ 9:00AM.


Thanks for stopping by today ... I love it when you do!


Tuesday, September 20, 2022

The Flower Challenge #72 - Add Sparkle

Hello friends.  I am playing along with The Flower Challenge where they would like us to add SPARKLE to our flower cards, and I definitely have sparkle on my card AND everywhere on my desk!  A little sparkle goes a looooong way!!  Haha


I used a couple older die sets from The Greetery to come up with my sparkly card...


I started with a piece of Misty Moonlight cs (SU!) and embossed it with SSS's Vine Canopy embossing folder.  To make the design show up a bit bolder, I used my brayer and white pigment ink and rolled it over the embossed layer very lightly so as only to make the raised parts highlighted with the white ink.


Next I began working on my sunflowers (The Greetery - BotaniCuts: Sunflower) and die cutting them from white cardstock and then blending color on with my blending brushes.  Once I had the amount of color I wanted on each layer, I glued them together and then added TH Distress Glitter.


 I used The Greetery's Market Basket Dies cut from matte silver cs (Gina K) to place my sunflowers in, and also added a liner to the basket using some really OLD tissue paper that has a slight wax sheen to it to supposedly help your dies release easier...it never really worked for me, but I kept the roll anyway and it has come in handy for different things a couple different times!


My little "oh Happy Day" sentiment comes from a little add on set for the basket dies from The Greetery.  With all this SPARKLE, this card will surely give someone a Happy Day!

There is all kinds of inspiration from the DT and their special GD, and you can check it all out right HERE and then play along.  This challenge is open till the 25th.


Thanks for stopping by today ... I love it when you do!


Saturday, September 17, 2022

CAS Christmas September 2022 Reminder - Sparkle and/or Shine

Hello friends.  Just a friendly reminder that there's still time to play along with us at the CAS Christmas Challenge, where this month our hostess Hideko is looking for CAS Christmas cards with SPARKLE and/or SHINE.


The past year or so I have fallen in LOVE with the foiling techniques, and the fabulous SHINE it gives to a card!  It is so different than the shine you get from embossing with gold or silver, and unless you really see it in person, photographs don't really do it justice!  With that being said, I still made a card with foiling, and you're just going to have to trust me that the SHINE factor on this card is incredible!!  Take a look...


 I used a Spellbinders hot foil plate called Holidays Floral Background and Aura Foil on black cardstock, and the colors this foil gives when the light hits it is SO pretty!  In very little light it looks silver, but when you turn it just right, or the sunlight hits it, it goes into this multi-colored image that's like looking at colored lights on a Christmas tree at nighttime. I matted my foiled image with white and then adhered to a black card base (4 3/4 x 4 3/4).  Really a very easy card to create and I love the dramatic look of it!

Make sure you check out all the beautiful inspiration from my talented teammates, and then play along and get going on those Christmas cards!  Just remember to keep it CAS and also to add some SPARKLE and/or SHINE to your card.  We look forward to seeing YOU in our gallery!!  You can play along right HERE.  This challenge is open till the 24th.

Thanks for stopping by today ... I love it when you do!


Tuesday, September 13, 2022

Peace On Earth Challenge #23 - Anything Goes

Hello friends.  It feels like just the past couple days we've turned a corner and now so many posts are Christmas related...so I'm jumping on the bandwagon since my card stash is seriously LOW this year, and playing along with the Peace On Earth Challenge.  


This is an Anything Goes challenge, but of course the HOLLY jumped right out at me!  Here's what I came up with...


I stamped my sentiment first, which is from Penny Black's rejoice with joy stamp set, and then started stamping and masking my holly leaves, pine branches, and berries using an oldie (but a goodie and still FAVORITE stamp set) from PTI called SPRUCE & SPRIGS.


I used a variety of green inks and a couple of red inks and the rock n roll technique to blend some of the colors together.  I finished by adding my stamped panel to a top folding white card base and added a few Disco Ball sequins (Gina K) for a bit of shine.

Lots of beautiful inspiration for you from the DT, so check it out and play along right HERE.  This challenge is open till the 15th.

Thanks for stopping by today ... I love it when you do!


Friday, September 9, 2022

Color Hues #48 and Seize the Birthday #246

Hello friends.  It's BIRTHDAY time over at the Color Hues Challenge where they are celebrating their 2nd birthday, and to make their celebration even bigger, they've invited their sister challenge to join in on the fun to over at Seize the Birthday Challenge!  Sounds like a party to me and the colors are Navy & Lime Green.


I had a brand new Pure Innocence stamp set (Apple of My Eye) from MFT that I made work with the colors and came up with this birthday card...


Isn't she a cutie picking her Granny Smith apples?!!  I stamped her in versafine black onyx ink and heat embossed with clear so I could use my Copics without any smearing.  After die cutting her with the coordinating die I adhered her to a card base of Parakeet Party (SU!) that I added a die cut layer of Starry Sky (SU!) using a cover plate die from PTI called Lotty Dotty.


 I did add a small rectangle of white card so my sweet little apple picking girl didn't get lost among all the navy and lime green dots.  I did put foam tape behind her for a little separation too, and then added my birthday banner that I stamped on a die cut strip of Parakeet Party cs.  I finished with a couple clear gems from Trinity Stamps.

You can check out all the fabulous inspiration from the DT's at Color Hues HERE and Seize the Birthday HERE and then play along.  This challenge is open till the 13th.  And a very HAPPY, HAPPY 2ND BIRTHDAY to all of you at the COLOR HUES CHALLENGE!!!


Thanks for stopping by today ... I love it when you do!


Wednesday, September 7, 2022

The Four Seasons Challenge - September 2022

Hello friends.  Playing along with the Four Seasons Challenge, where for the month of September, it's Anything Goes - FALL!


Don't you just LOVE Fall and all the beautiful colors and warmth of the season?!  Fall is definitely my favorite season here in Michigan...I think it showcases God's artistry so beautifully!!  I recently had a play day with my sweet friend Michele, and she let me borrow some of her stamps, stencils, and foil plate from the recent Papertrey Ink release and I came up with a "twofer" from one foiled and stenciled piece of A2 cardstock.  (WARNING...I used very untraditional colors!!)  Let's take a look at the first one...


  I know, I know...not very realistic Autumn colors, but I just couldn't help myself!!  I started by foiling the Fallen Leaves: Hot Foil Plate (PTI) on a piece of Hammermill cs with a piece of Aqua Spellbinders foil and then used the coordinating PTI stencil (Fallen Leaves) with my blending brushes and Gina K inks in purples, aquas, magentas & reds.  (Most of the ink came from what was already on my ink blending brushes and not a lot of new ink.)  At this point I cut off a 1 1/4" strip to use on my 2nd card.  


Here's a closer up photo and if you look towards the top you can see some of the aqua foiling a bit better.  I attached my foiled piece to a top folding white card base, and then added a skinny strip of black cs to ground the foiled piece.  I finished with the die cut "Fall" (Larger than Life: Fall - PTI) that I mounted with foam tape for dimension and a coordinating sentiment from PTI's Larger than Life: Fall Sentiments that I die cut with a couple circle dies.  A few light aqua pearls were also added.


My 2nd card uses that 1 1/4" strip that I had cut off from the 1st card and I attached it to a card base that I had embossed using a FSJ Falling Leaves embossing folder


Once again you can just see the aqua foiling towards the top of the card...trust me that in real life these cards are SO pretty with that aqua SHINE!!  I finished this card the same as the first one except the Fall die cut was inked up in black, and used a different die (SU!) for the coordinating sentiment.  A few silver metallic pearls were added to this one.


 Here they are both together.  Do you have a favorite??  I like them both equally as well and sure had a FUN time making these!  Thanks so much Michele for letting me borrow these goodies!!

I would also like to add these "twofers" to Darnell's NBUS Challenge since these are "new to me" products and never been used before (by me!).


There is LOTS of beautiful inspiration over at the Four Seasons Challenge if you'd like to play along...this challenge is open till 25th.  This is also the Four Seasons first anniversary, so I'm happy to play along and help them celebrate this milestone!!  CONGRATS Four Seasons!!


Thanks for stopping by today ... I love it when you do!


Monday, September 5, 2022

Playing Cards with Michele

Hello friends.  My sweet friend Michele and I got together again to play cards a couple weeks ago...and talk and laugh and laugh and have lunch (I made the lunch and Michele provided the yummy dessert!!), and even more laughing and talking, and yes, even some crafting!  We discovered that we each had just purchased PFS's Grow Wild Stencils and decided to share what we each had made using them.  Let's get started!


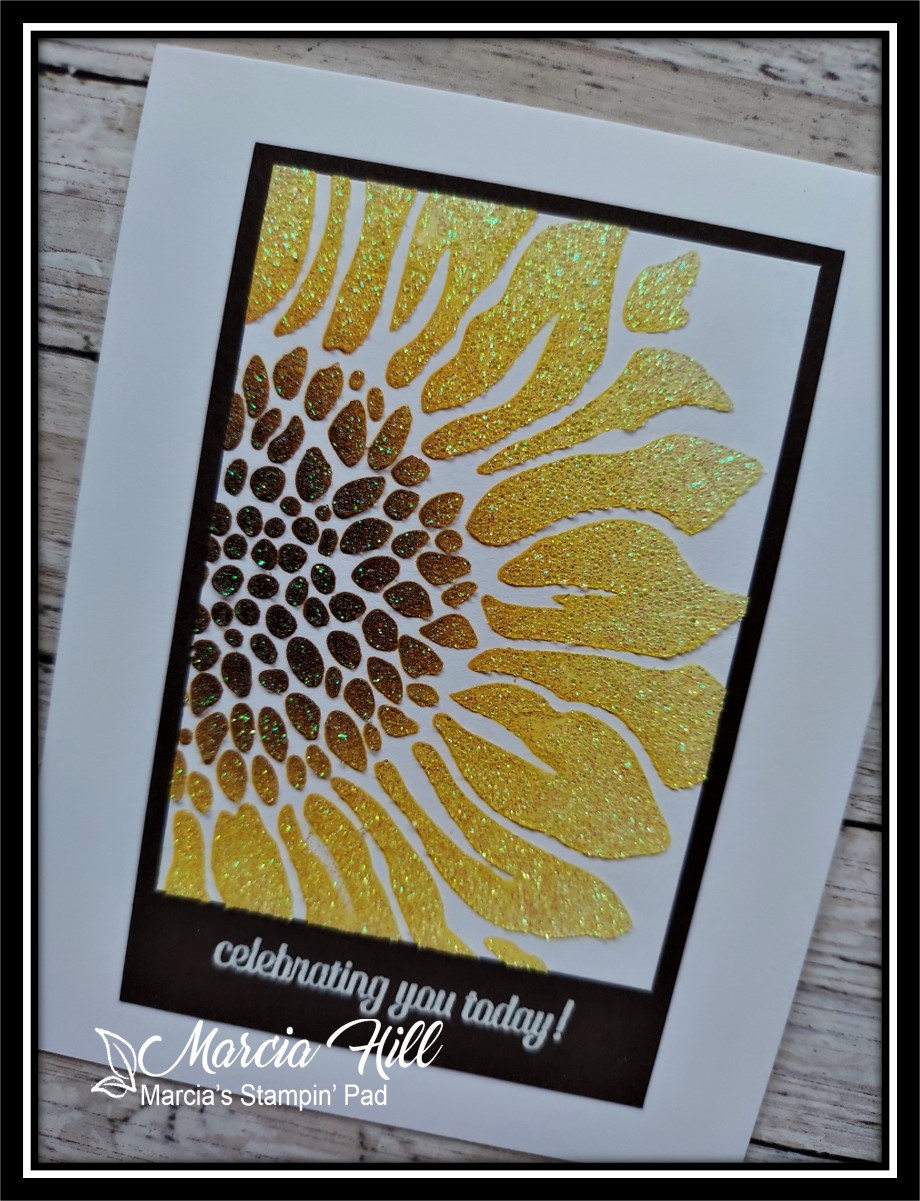
I love PFS stencils because of the ease of use in lining everything up, and this stencil set lined up so beautifully I didn't even mind that I hadn't purchased the coordinating stamp set and die!  I used 3 shades of yellow inks (Lemon Whip, Sunshine, & Sweet Mustard - all PFS) to stencil the flower layers with some leftover orange on my blending brush for the flower centers.  The leaves were done with Light & Medium Spruce inks (Gina K).  


I used an older MFT hello die (I think it was a freebie with an order) to die cut the word towards the bottom of my card panel, and then die cut the word again twice more from just plain white cardstock to stack beneath the stenciled cut before replacing back into the stamped layer.  I added a few gold metallic pearls (PFS) to finish off this simple card.


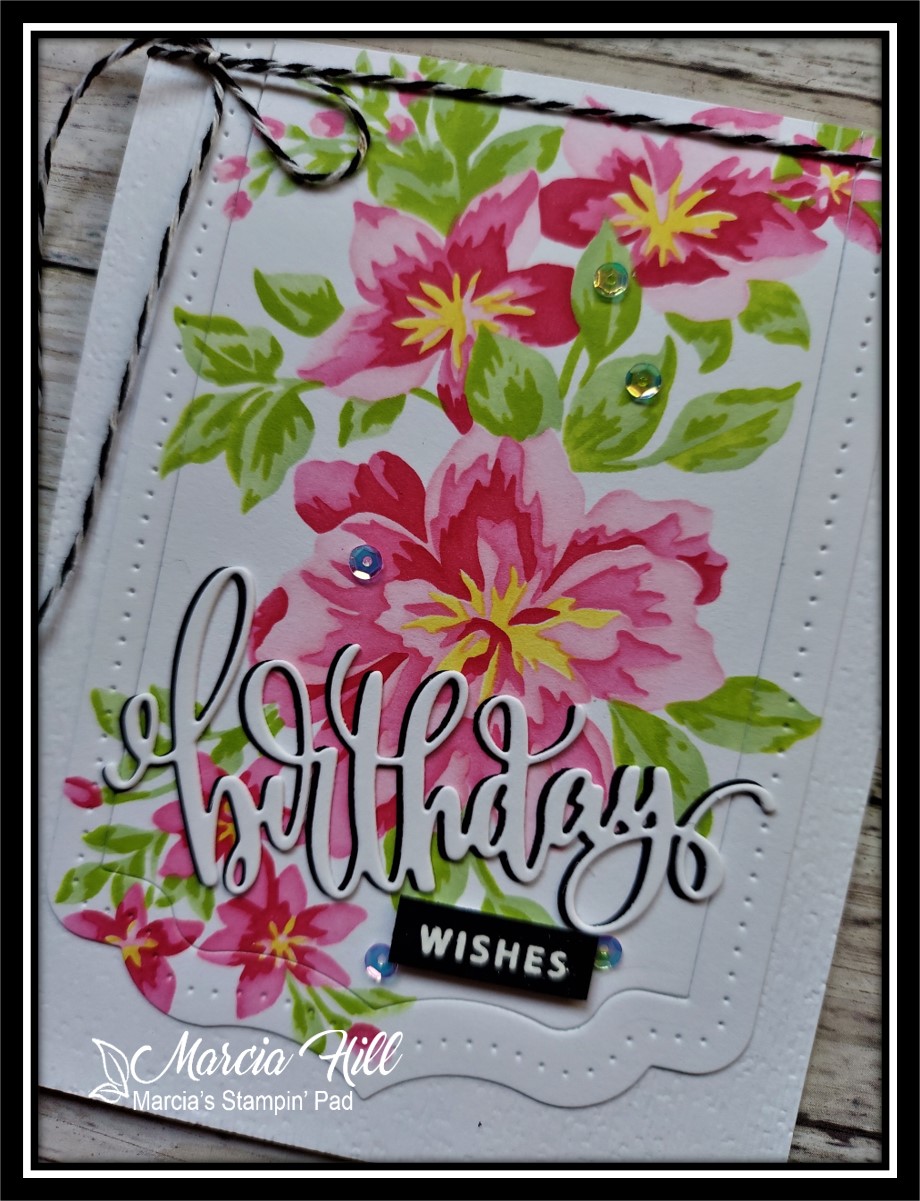
 My 2nd card is my favorite I think.  I used shades of pink this time (Ballet Slipper, Sparkling Rose, & Bubble Gum - PFS) with yellow for the flower centers, and Jelly Bean Green & Fresh Asparagus inks for the leaves (Gina K).  Next I used PFS Slim Ornate Banner Dies to die cut the decorative edges of my stenciled panel and then placed on a white card base that I had embossed with SU!'s Subtle embossing folder.  


  My birthday die was cut twice...once from white and once from black and then I offset them a bit so they would show up better on my stenciled part of the card.  I added a few Disco Ball Sequins (Gina K) and some black & white baker's twine to finish off this card.


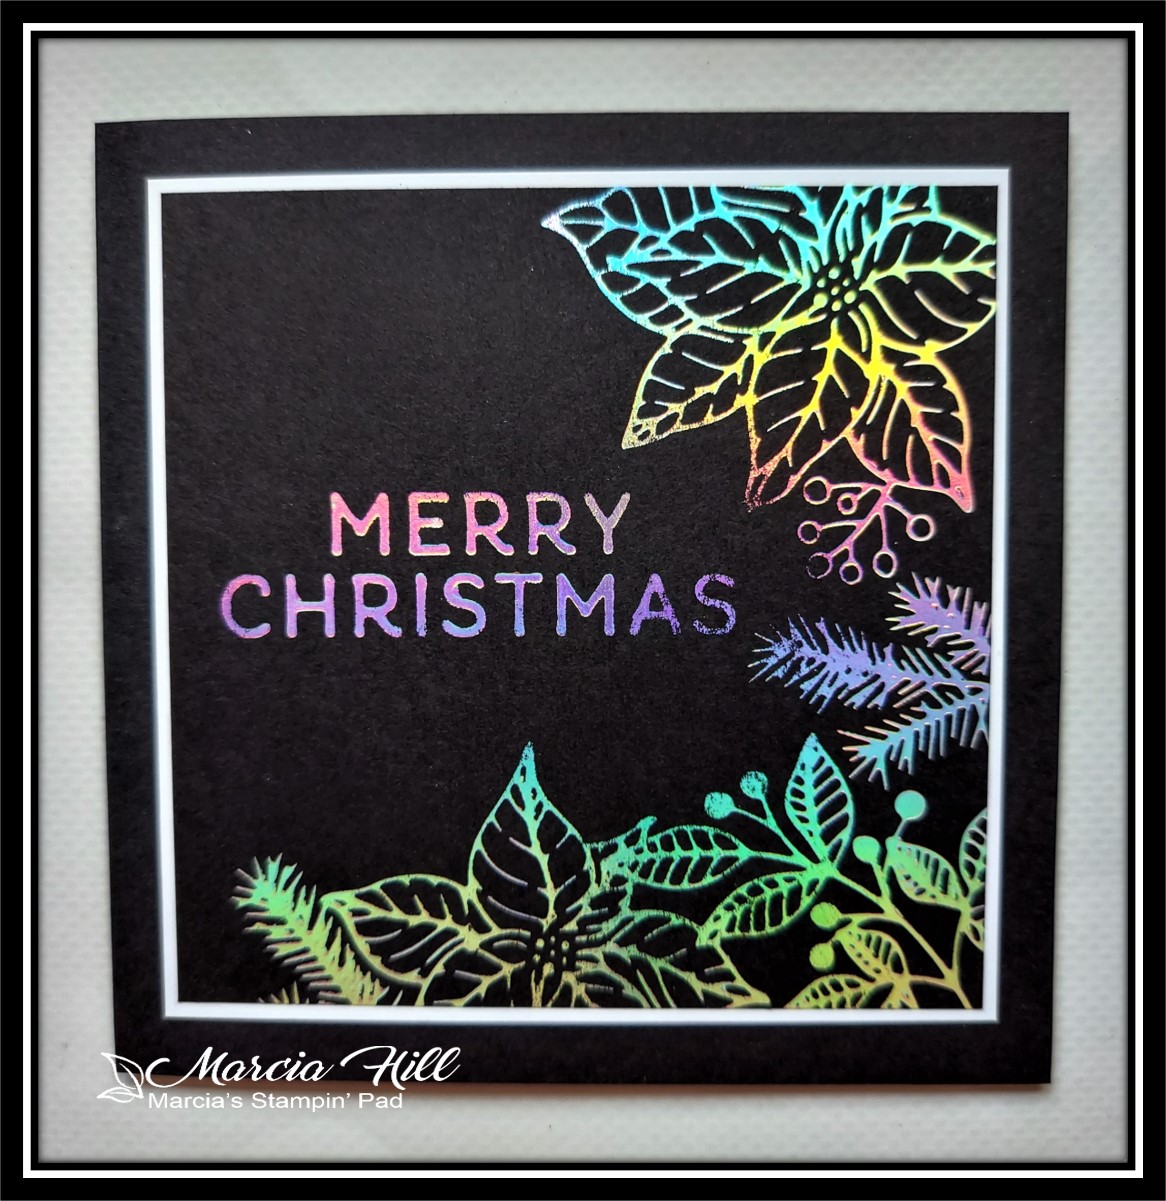
My last card was done in shades of purple (Light, Medium & Dark Lilac - Gina K), with yellow flower centers and the same greens as my 2nd card for the leaves.  I did some fussy cutting on one side of my panel before attaching to a card base that I added black & white striped dsp (PTI) to at the bottom.  


My "thanks" was foiled in silver on black cs using PFS Fancy Script Words and was also stacked with additional die cuts for a bit of dimension.  I added a piece of black & silver ribbon (SU!) to the side, and then finished with a few silver metallic pearls added to the flower centers and a few randomly on the dsp.  

OK, that's it for me this time, but please, PLEASE go over to Michele's Blog to see what she has done with this same set of stencils...it will definitely be worth your time!  Thanks Michele for coming my way this time, and for the FUN day and wonderful dessert...and of course the AWESOME friendship!!  Aren't stamping friends just the BEST??!!

Thanks for stopping by today ... I love it when you do!


Saturday, September 3, 2022

CAS Christmas Sept. 2022 - SPARKLE and/or SHINE

Hello friends.  It's time for another CAS Christmas Challenge, and this month Hideko is our hostess, and she would like to see SPARKLE and/or SHINE on your CAS Christmas cards!


For REAL SPARKLE, I like to pull out my glass bead gel (Faber Castell) and a stencil, and I just happened to have a new (to me!) stencil from Trinity Stamps called Tree of Lights that I thought would work beautifully with the glass bead gel.  Take look...


Can you see the SPARKLE??!!  This is a 4 step stencil and it was definitely made for a regular size slimline card, but I like the mini-slimline size sooooo much better, so part of the tree is cut off at the bottom, but it still worked beautifully with the smaller size!  I used PFS's set of 4 green ink cubes to do my blending over the 4 stencils, and then went back to stencil #3 to add my glass bead gel.  Once it was dry, I used Gina K's Master Layouts #7 die set to cut my stenciled layer and the black layer behind it, before attaching it to my card base.


  To finish my card I simply added a pre-printed sentiment strip (Gina K) with foam tape on the back for some dimension.  A pretty simple card...the hardest part of this one was waiting for the glass bead gel to dry (over night)!!

Have you started your Christmas cards yet??  Let us help by joining our challenge...you can find all kinds of FABULOUS inspiration from our talented DT and Special GD, and then play along right HERE.  This challenge is open till the 24th. 

Thanks for stopping by today ... I love it when you do!