Monday, December 27, 2021

Peace On Earth Challenge #6

Hello friends.  Hope you all had a wonderful Christmas!  Ours was was a small and quiet one as we had celebrated with all the girls and grandkids a week ago, but it was still a lovely day!  And with temps in the low 50's and even a little bit of sunshine...NOT your typical Christmas Day weather in Michigan!  One more Christmas card to share with you today (maybe...you know I love, LOVE making Christmas cards all year long!!) and I'm playing along with the Peace On Earth Challenge where I fell in love with all the greenery and berries on their mood board!


I especially fell in love with the bottom right photo of the red, white, & green mason jars filled with greenery, and came up with this card inspired by the photo...


I used PTI's Farm Fresh Trees stamp & die set to come up with the red, white, & green containers and the small trees.  I used The Greetery's Nordic Frame Dies to add a decorative edge to my card, and my sentiment was embossed with Altenew's Rose Gold embossing powder on vellum.  I finished this simple card with a few small die cut snowflakes (Impression Obsession), some twine bows, and a couple gold sequins.  

This challenge is still open for a couple more days, so check out all the beautiful inspiration from Diane and Darlene and their talented DT, and then play along to get a head start on next year's Christmas cards.  You can find all the details right HERE.  

Thanks for stopping by today ... I love it when you do!


Tuesday, December 14, 2021

Peace On Earth Challenge #5

Hello friends.  Needed a couple more Christmas cards and the mood board over at the Peace On Earth Challenge inspired me to make a BLUE Christmas card!


Using one of my favorite stamp sets from this year at The Greetery, I made this card using the stamp & stencil combo called Winterberry Bouquet...


 I'm not usually much of a blue fan, but have to admit I like the blue berries on this one!  I used an older snowflake embossing folder from SU! (Winter Snow) for part of my background and also the Cathedral Die from The Greetery.  I love a white on white look!!  


My sentiment is foiled in silver (another one of my new loves this year!!) using Perfect Sentiments: Holiday from PFS.  

And because I had everything out and the Christmas Kickstart Challenge is looking for "Anything Christmassy", I made another card using the same Winterberry Bouquet stamp and stencil set and just changed up the colors!


I did another white on white background using The Greetery's Inside & Out Berry Branch die, and then added the Winterberry Bouquet over top.


My foiled sentiment on this card is gold and from the same PFS set as the previous card.  I also added a few white crystal gems (PFS) to finish off this card.


So all my cards are sent out and now I'm getting ready for Sunday when we will celebrate Christmas with all 3 of our daughters and grandkids and my mom.  Then next week I'll be free to play with whatever stamp set I feel like.  Will it still be Christmas??  I love making Christmas cards all year long, and nothing wrong with getting a head start on next years cards, so we'll see...you'll just have to stay tuned!  :0)  

Thanks for stopping by today ... I love it when you do!


Wednesday, December 8, 2021

Christmas with Michele!

Hello friends.  Last week it was my turn to travel to my sweet friend Michele's house and play cards.  As usual, we did a lot more hugging, talking, and laughing than we did making cards, but never fear...we do have a few to share with you today!  And let me not be remiss in mentioning that Michele served a FABULOUS lunch of Thanksgiving leftovers that still has my mouth watering!!  I don't know how many of you know that Michele used to be a caterer, and boy can that girl cook!  I rounded off our lunch with my peanut butter brownies, and even Michele's hubby gave them a 2 thumbs up!  But then, what's not to love about chocolate and peanut butter...the two just go together!!

OK, enough chatter and let's get to the cards.  I have two to share with you today, using a SSS die called Etched Berry Branch and a 3D embossing folder from Tim Holtz called simply Poinsettia.  


My Etched Berry Branch die cut was colored with sponge daubers and Distress Oxide inks, and then splattered with white acrylic paint.  My dry embossed background uses a MB embossing folder called Gracious Leaves that is probably one of my favorite buys of this year!  I matted this layer with a piece of black cs and mounted both to top folding white card base.  My sentiment is a die also from MB called Special Merry Christmas and was die cut from gold mirror cs.


Pretty simple, but I really like the way it turned out!  My 2nd card uses the Tim Holtz 3D embossing folder called Poinsettia and is also a very simple card.


This card would be a very easy one to mass produce, and still looks so elegant and like you spent a lot of time on it!  I used Altenew's blending brushes for this card, and their brushes are flat and not curved and rounded like most other companies.  I inked two of the brushes up with Bundled Sage and Victorian Velvet Distress Oxide inks and then brushed the inside of the embossing folder on the depressed side of the folder (NOT the raised side).  I then simply added my cs and ran it through my Big Shot, and voila!  A colored AND embossed Poinsettia!!  


I matted my embossed layer with a piece of Sweet Blush cs (PTI) and then adhered both to a top folding white card base.  I finished simply with a die cut sentiment from Gina K using a scrap of sparkling silver cs.

Make sure you head on over to Michele's blog to see what she created using the same die and embossing folder...she never disappoints, so make sure you check out her awesome creativity!  I hope you enjoyed our play time together as much as Michele and I love getting together and playing cards!

Thanks for stopping by today ... I love it when you do!


Monday, December 6, 2021

Color Hues #31 (RED & GREEN) and The Flower Challenge #63 (Christmas)

Hello friends.  Just a quick post sharing a card I made for the current Color Hues Challenge that is looking for cards made with RED and GREEN, and also for The Flower Challenge that is looking for a CHRISTMAS card with a flower on it.  


Here's what I came up with for both challenges...


I'm usually much more of a CAS card maker, but I really layered it on for this particular card!  All of my dies are from PTI...Bold Borders: Flurries, Into The Blooms: Dahlia, & Silver White Winters (Snowflake), and my cardstock is all SU!...Real Red, Evening Evergreen, & Soft Succulent.  I also ink blended on the flowers and the leaves, and even added some white splatters too.


The flower centers and part of the JOY die cut were embossed with Altenews Rose Gold embossing powder, and although it doesn't show up very well in either of my photos, I used Tim Holtz's Distress Mica Flakes on the one snowflake, which really sparkles in real life.  This is a pretty busy card, but I love how it turned out!

Lots of great cards from both DT's if you need some inspiration to finish up those Christmas cards...just follow my links at the beginning of my post!  

Thanks for stopping by today ... I love it when you do!


Tuesday, November 30, 2021

Inspired By #197 - Color Challenge

Hello friends.  There's a color challenge going on over at the Inspired By Challenge, and I do LOVE playing along with color challenges!!  Take a look at all the BEAUTIFUL colors in this inspiration photo they provided...


I love the deep reds, the greens, the blues on the dishes, and what I'm going to call gold on the table runner and the 2 candles.  And here's what I came up with using those colors in an attempt to finish up the last of my Christmas cards!


Back in the beginning of the Summer I won a gift certificate to Concord & 9th, and bought the Mistletoe Messages Dies and the Mistletoe Messages Stamp Set, and then completely forgot about them until I was looking for something else the other day and came upon them.  This set was so easy to use that I made a couple cards and even a couple tags too!  Better late than never!!  Anyway, I started this card by stenciling some light blue snowflakes (The Greetery - Frosty Flakes Stencils) on my background as a nod to the dishes in the photo.  For the Mistletoe, I used some of SU!'s Shimmer Vellum in Evening Evergreen and also die cut one just from plain white cardstock to give the vellum piece a bit more sturdiness.  Once the 2 were glued together, I ran the edges of the leaves across my Versamark pad and then sprinkled with gold embossing powder and heat set.  Between the shimmer of the vellum and the shine of the gold embossing, this Mistletoe is soooo pretty!!  I added the bow using some matte gold cs (Gina K) and the berries are die cut from Cherry Cobbler cs.  


 The sentiment is part of the stamp set, and I finished by adding a few gold pearls and a few gems (PFS) that have a touch of pink in them when the sun hits them just right.  Pretty easy and I love how festive it came out!  

Only a couple more days to play along with this challenge, but check out all the fabulous inspiration from the DT, and then if you're not finished with your Christmas cards, play along (HERE) to get them finished up!!

Thanks for stopping by today ... I love it when you do!


Friday, November 26, 2021

Filled Embossing Folder Technique

Hello friends and happy black Friday!!  Have you all been up since the crack of dawn, shopping all the great online crafting sales??!!  I've shopped so much this whole year that I told myself NO BLACK FRIDAY SHOPPING for me!!!  We'll see how long before I cave!  Haha!!

A few weeks back I watched a Jennifer McGuire video (HERE) where she used embossing folders and filled the backside of her embossed cardstock with glitter paste, that gave an incredibly beautiful sparkle and shine to the embossed cardstock!  So, like any self- respecting crafter, I went straight to SSS to check out how much glitter paste cost, because of course I didn't have any!  Well, it comes as a 6 pack at SSS and costs $30, which was a little more than I wanted to pay for a technique I might not like or not want to play with again, so I kinda gave up.  Kept thinking about it though, and finally had the thought that maybe glitter glue would work and you can get that at the dollar store!  And 3 bottles for a buck at that!!  I think the glitter paste would probably work better as far as the glitter staying where you put it, but for a dollar, I'm very happy with my results and I spent an enjoyable day making a bunch of Christmas cards!  Let's take a look...


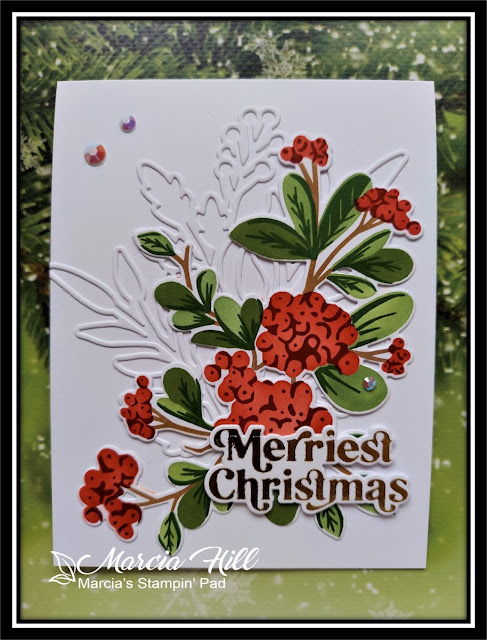
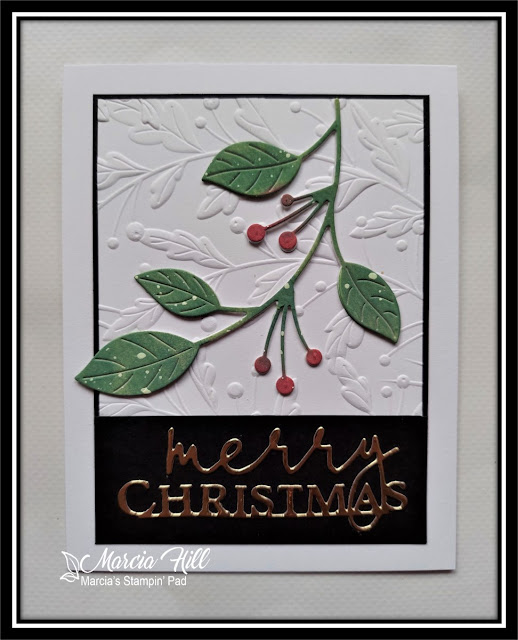
  For this card I started with a piece of Soft Succulent cardstock (SU!) and embossed it with a MB embossing folder...Gracious Leaves.  I used the gold glitter glue and spread it over the back recessed side of my embossed cardstock, and then waited for it to dry.  Once dry, I trimmed it down and added a strip of gold mirror cardstock and a strip of Evening Evergreen (SU!) cardstock to a white card base.  I decorated the card with a die cut sentiment from MB called Special Merry Christmas and some stamped and die cut holly leaves and berries from SU!'s Poinsettia Petals stamp & die set.


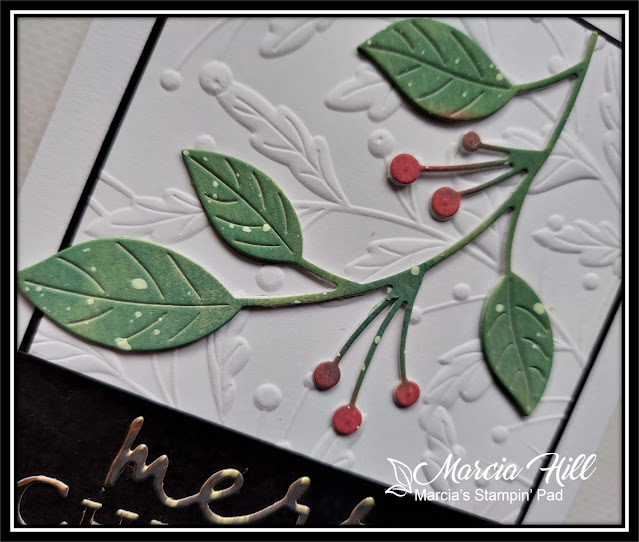
Here's a close up so you can better see what the glitter looks like on the recessed side of the embossed cardstock...isn't it pretty?!


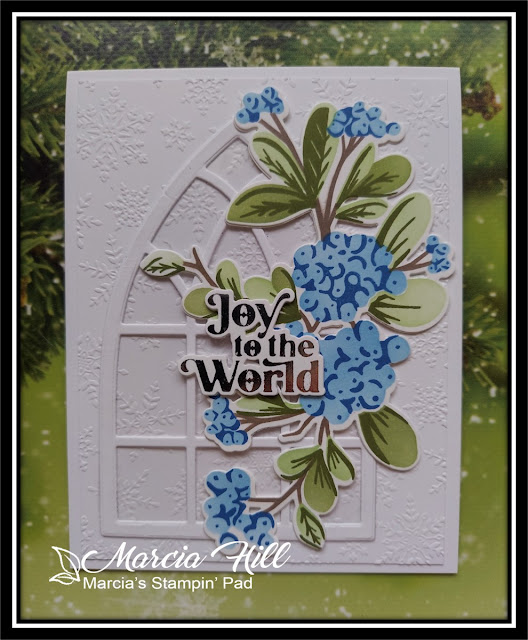
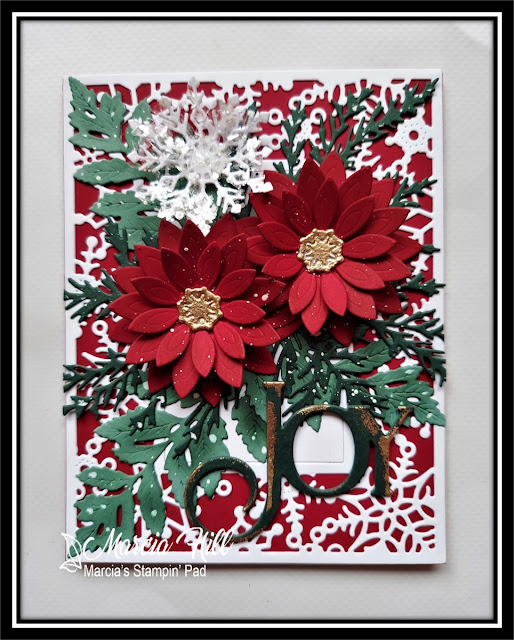
My 2nd card is basically the same as the first, but portrait orientation, and the embossing folder I used on this one is SSS's Holiday Greenery and the sentiment is MB's Joy & Cheer.

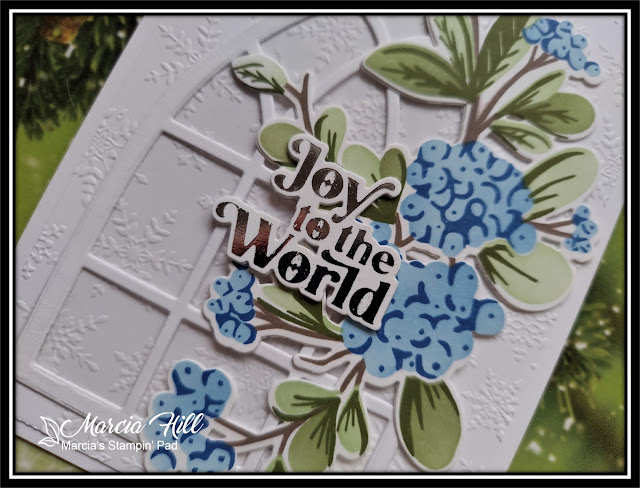
Another closeup so you can see the details better!


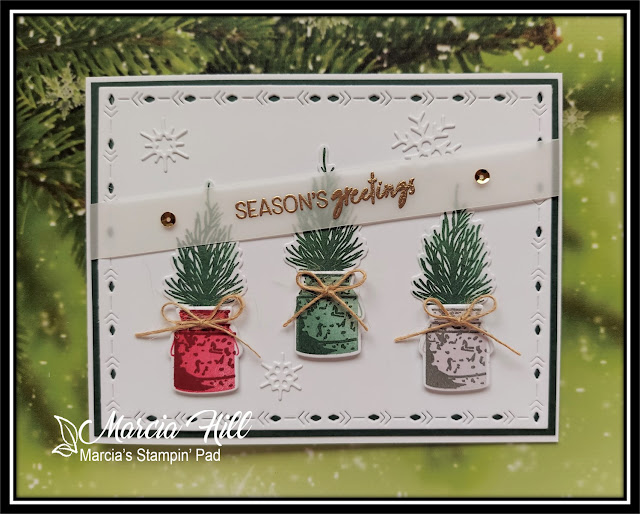
My 3rd card uses a FSJ Evergreen embossing folder, and I also embossed the card base on this one too!  I used an evergreen spray from PTI's Sprigs & Sprays stamp & die set, with a little die cut "string" from The Greetery's Fit to Be Tied set in gold mirror cardstock.  I used the same gold for my sentiment which is from MB's Merry Christmas Posh Script die.


I finished this card with just a few red gems on the evergreen sprigs.


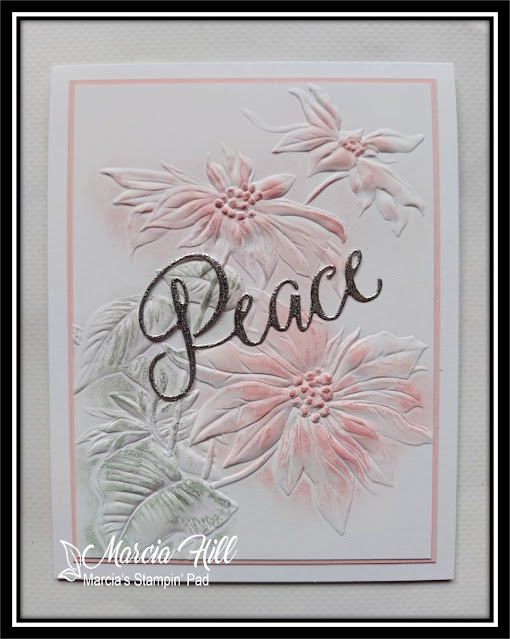
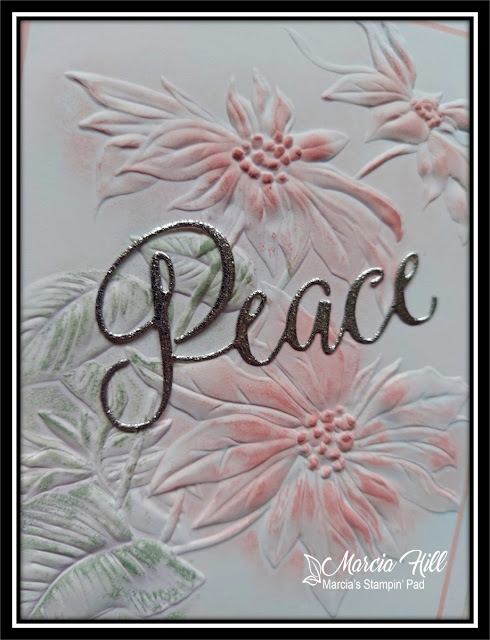
OK, totally different color family for my last card...Misty Moonlight cardstock (SU!) with the Winter Snow embossing folder (also SU!) and silver glitter glue!  As much as I love the gold and green cards, I absolutely LOVED how the silver glitter showed up in the recessed little snowflakes...when the sunlight catches it, it is absolutely beautiful!!


The sentiment is from MB's Let it Snow Posh Script die, and the die cut snowflake is from Poppystamps Giovanna Snowflake die.  A couple silver pearls from PFS finished off this card.

I even decorated the insides of all my cards with the pieces that were left over from cutting down the embossed backgrounds!  This really was a FUN technique, and quite addicting too...I'll definitely be doing it again!  Thanks so much for sticking with me through this looooooong post, and hope you all have a wonderful weekend!!  Time to start decorating for Christmas at our house!!  :0)

Thanks for stopping by today ... I love it when you do!


Wednesday, November 24, 2021

Color Hues #30 - SILVER & GOLD

Hello friends.  Playing along with the Color Hues Challenge today where they are looking for cards with SILVER & GOLD.


I have a pretty simple but dramatic card to share with you using silver foiling and gold embossing on a black card base.  Take a look...


I'll apologize up front for my photography skills...I always thought WOS and glitter were hard to photograph, but Silver & Gold on black is even harder!  The shimmer from the silver foiling and the shine of the gold embossing in real life is much brighter!!  But anyway, I started with a black card base, and then added a panel of black that I foiled in silver using The Greetery's Deco Triangles Hot Foil Plate. (I added foam strips behind this layer to add some dimension from the card base.)  For my next layer, I used one of The Greetery's Deco Frame Dies and also foiled that in silver, before adding foam strips and adding it over the first layer.  (Did you know that you can use your dies to foil with?  The outlines are not as bold as an actual foiling plate, but it still comes out shiny just like regular foiling.  Try experimenting with some of your dies to stretch their use even more...it's FUN!!)  For my sentiment, I used The Greetery's Everyday Labels stamp set, and embossed it in gold and then used the coordinating die to cut it out.  I die cut 2 extra of the sentiment shapes to add a bit of sturdiness to this layer before attaching it to the 2nd layer.  


 To finish my card I added a few silver & gold pearls from PFS.  This will be going to my brother who has a December birthday, so I refrained from adding any more bling or anything else to dress it up!  :0)

There is lots of FABULOUS inspiration from the DT using Silver & Gold, so check it all out right HERE and then play along.

And for my American friends, I wish all of you and your families a very blessed and Happy Thanksgiving!  And now I'm off to start prepping for my feast for tomorrow!!

Thanks for stopping by today ... I love it when you do!


Monday, November 22, 2021

Playing House Cards with Birgit

Hello friends.  A few weeks ago I spent the weekend with Pinkfresh Studios and the Create & Connect Event they held.  It consisted of 5 two hour classes teaching us new tip and tricks in stamping, and the classes included a box filled with brand new Pinkfresh Studio stamps, dies, stencils, large roll of washi tape, a hot foil plate, and gems. It was seriously like Christmas opening up that box!!  Anyway, one of the stamp, die, and stencil sets was a set called Built on Dreams and my sweet friend Birgit (who also signed up for that weekend) and I decided to have our own little challenge using this stamp set.  I have 3 cards to share with you today, and then hop on over to Birgit's blog and see what she did with the exact same stamp set!


I used the stencils and 4 shades of blue inks to blend the floral images in the house shape, and then stamped the outline image before die cutting the house image.  I used the hot foil plate they included in the kit to dry emboss my white background, and then added a blue layer and attached all to a white card base.  The sentiment was cut from MB's Posh Script Big Hugs Die from glittery silver cardstock.  The silver is much brighter IRL!  Also added a few silver pearls to finish off this card.


 My 2nd card came out a bit different than I was picturing in my head.  I was picturing a gingerbread house in my mind, and used all 5 stencils to blend the design on in white pigment ink first.  Once it dried, I went back in again with the 5 stencils and added colors that I thought would look like gumdrop colors (like when you make a gingerbread house), but instead it ended up looking more Spring like to me!  Hard to tell in the photo, but I did spray Sheer Shimmer Gold Mist over the card, so it really has a nice shimmer to it in real life!  I used the die to make a side folding card, and love that it's a shaped card.  The thank you was heat embossed in white on kraft and die cut...this was all part of the kit too!  A few sequins finished off this one.


 As soon as I saw this set, I knew I wanted to make a Christmas card with the house shape, so I did my stenciling with a couple shades of green and red on kraft, and like the 2nd card, die cut it so it was a side folding shaped card.  I also foiled my sentiment (PFS but not part of the kit) and added a few gold pearls to finish it off.


 That's it from me today, but make sure you check out Birgit's post to see what she did using these same stencils, stamp set, and dies!  I know she will blow you away with her creations!!  Thanks for playing along with me Birgit...just like old times!!  :0)

Thanks for stopping by today ... I love it when you do!


Friday, November 19, 2021

Inspired By #196 - Neighbor Tag

Hello friends.  The inspiration photos at the Inspired By Challenge lately have been wonderful, and are really helping me to finish those last Christmas cards up!


 Wouldn't you love to have an Advent calendar like this with all the sweet little houses?!  While I didn't make an Advent calendar card, I did use houses, pine trees, and the colors from the inspiration photo to come up with this mini slimline card...


The houses and trees are both from a new Gina K set Winter Whimsy and I also used a new set from one of Gina's designers (Melanie Muenchinger) called Slimline Starters which allowed me to stamp the double frame border before die cutting the stitched rectangle.  After stamping my houses in Evening Evergreen (SU!), I used a glue pen which ended up spreading the coloring around a bit like water coloring, and I love how that turned out!  Before the glue dried, I added some Distress Glitter (Tim Holtz) and tiny star gems.  The red houses I pop dotted for some dimension, and the kraft colored houses were glued directly onto the tree stamped layer.


  To finish my card I added a layer of Evening Evergreen cardstock behind the stamped layer, and also did a sentiment strip with the Evening Evergreen cardstock and white embossed using SSS's Tiny Words Christmas.  Really like how this one turned out!!

You can check out all the FABULOUS cards from the DT right HERE and then play along...especially if you need to get crackin' on those cards!!  Thanks Inspired By for the great inspiration...I loved it!!

Thanks for stopping by today ... I love it when you do!


Thursday, November 18, 2021

Christmas Kickstart #56 - Christmas Snippets

Hello friends.  Playing along with the Christmas Kickstart Challenge where Jo and her guest elf Di are looking for Christmas cards made with SNIPPETS.


Are you a saver of all those tiniest pieces of DSP and cardstock?  I'm one of those that do and then hardly use them, but just can't bear to throw them away, just in case...  Well, this is the perfect challenge to use some of those little snippets up, and here's what I came up with using a couple pieces from my SU! stash...


I used a Penny Black die called Ornament Branch to cut my snippets from a piece of Soft Succulent Shimmer Vellum for the branch and a piece of leftover DSP from SU! called Expressions in Ink for the ornament.  I used one of the Spellbinders Hemstitched Rectangle Dies to cut a white layer that I added to a white card base, and then glued my vellum branch and pretty pink and gold ornament to the die cut layer.  I also added a tiny snippet of gold mirror cardstock for the hanger part of the ornament.


I thought about adding a sentiment, but I really loved the CAS look to this card and decided to leave my sentiment for the inside.

Are your Christmas cards done and ready to mail out in the next few weeks?  I am soooo close...just a few more!  If you need to play catch up, check out all the inspiration from Jo and Di and all the beautiful cards already in gallery HERE and then play along.  This challenge is open till the 30th.

Thanks for stopping by today ... I love it when you do!