Tuesday, April 10, 2018

CAS Mix Up April 2018 - Rubber Band Technique

Hello friends.  Playing along with this month's challenge over at CAS Mix Up where the challenge is to do the RUBBER BAND Technique.


This was a really FUN technique once I got the hang of it!  I have 3 cards to share with you today...my first try is just ok, but I really like how my 2nd and 3rd tries came out!


 I used Versamark on my rubber bands to make my background on this first try, and while it's not terrible, it just didn't thrill me!  The leaf is from PTI's Leave It Be stamp set, and the sentiment from PTI's Keep It Simple: Thank You.  The dry embossed background was from my sweet friend Bonnie.  Again, not a terrible card and I will definitely use it, but I like how my next 2 came out much better!

 
I used GinaK's Jelly Bean Green ink on thicker rubber bands and stamped it multiple times for my background on this card.  The stamp is from Alesa Baker Designs (Impression Obsession F8726) and I just simply stamped it in black over the background and then used a wonky stitched die frame (Gina Marie Designs) to cut it out.  I layered it with a piece of Pear Pizazz cardstock and mounted to a white card base.  The sentiment is from PTI's Winter Woods.


For my last card I used the same thicker rubber bands and stamped multiple times again, but used 2 colors of ink...GinaK's Jelly Bean Green and Ocean Mist.  Used another silhouette stamp from Impression Obsession...this one is from Tara Caldwell (F16147).  I used a larger wonky stitched die frame (Gina Marie Designs) this time and simply mounted to my white card base.  The sentiment on this one is also from PTI's Winter Woods.  These cards were so simple and easy to create and I just LOVE how they turned out!!  FUN, FUN technique!!

There's still quite a bit of time to play along with this challenge, so check out all the FABULOUS cards from the DT, and then play along!  You can find it all right HERE.

Thanks for stopping by today ... I love it when you do!


Monday, April 9, 2018

Merry Monday #285 - Use A Ribbon On Your Card

Hello friends.  This week Nina is hosting our Merry Monday challenge, and she would like to see you use a RIBBON on your Christmas card.


There was a time in my stamping life where I added ribbon and bows to EVERY card I made...kind of gotten away from that, but every once in awhile it really does add a nice touch to a card!  

I've been kind of hooked on Lindy's Magicals and Finetec Pearls lately as I just LOVE the shimmer and shine they give, but I can't photograph them for the life of me!!  So anyway, try to imagine my card with LOTS of shimmer and shine!!


I started by embossing the image from PTI's Botanical Blocks III in silver onto Basic Gray (SU!) cardstock and then coloring the flower with Autumn Maple Crimson (Lindy's Magicals) and the leaves with green Finetec Pearls.  I mounted this layer to a layer of Smokey Slate cs that I stamped with SU!'s retired En Francais background stamp and a layer of white cs.  These were mounted to a piece of Cherry Cobbler cs that I dry embossed with a retired SU! Poinsettia ef.  I added a piece of seam binding ribbon along with a Tiny Tag from PTI.  LOT'S of layers on this card, but I'm pretty happy with the way it turned out!

We hope you'll take time to play along with us this week...you will be so happy you did come Nov./Dec. when you have a stack of Christmas cards ready to go!  So add a RIBBON to your card this week and play along with us right HERE.  If you need more inspiration, just check out what the rest of the DT came up with HERE!   

Thanks for stopping by today ... I love it when you do!


Saturday, April 7, 2018

CAS Christmas April 2018 - Ornament

Hello friends.  Playing along with this month's challenge at CAS Christmas where they are looking for an ORNAMENT on your card!


I used an ornament die from AliExpress and a scrap of cardstock I had used Lindy's Magicals on to come up with my card.


I die cut the ornament twice with just plain white cardstock and also the scrap of Lindy's Magicals (Tibetan Poppy Teal) so that I could inlay the pieces.  I dry embossed another layer of white cardstock with the SU! Pine Branches ef and then added the ornament over top of that.  The sentiment is from PTI's Beautiful Berries: Winter and was stamped with Delicata Silvery Shimmer ink.

 
I wish I knew how to capture the sparkle and shimmer of the Lindy's Magicals, but you'll just have to use your imagination instead.  I really LOVE the way this one turned out!

There are some absolutely GORGEOUS cards from the DT and also in the gallery already, so if you're looking for some inspiration for Christmas cards, make sure you check out the CAS Christmas site HERE.  This challenge is open until the 24th.

Thanks for stopping by today ... I love it when you do!


Thursday, April 5, 2018

Color Throwdown #487 and Double D Twine Challenge

Hello friends.  Playing along with 2 challenges today...Color Throwdown is looking for the colors Mint, Red, & Pink, and Double D is looking for TWINE on your cards.  And don't you just love it when you can make 2 challenges work together?!!  I LOVE the colors again this week for the Color Throwdown challenge, and I use twine on most of my cards these days...I think it's replacing the ribbon I used to add to ALL my cards!  :0)


Here's what I came up with using this week's colors and an outlining technique from Stephanie Gold:

 
I used Altenew's Beautiful Day stamp set to stamp the solid image of the flowers in Red and Pink, and the leaves in Mint Green.  Then using Stephanie's technique, I offset the outline image in black to give a more "artsy" feel to my card.  I added a little strip of DSP from MFT's Black & White Stripes 6 x 6 Paper Pack and a piece of black Baker's Twine (SU!) to finish off my card.


You can check out both of these challenges right HERE (Color Throwdown) and HERE (Double D - Twine).  LOT'S of beautiful inspiration from both teams!!  :0)


Thanks for stopping by today ... I love it when you do!


Wednesday, April 4, 2018

Make It Monday #317 - Using Outline Images

Hello friends.  Playing along with Stephanie Gold and this week's Make It Monday challenge, and it's a FUN one!!  Stephanie shows us a great technique for outlining solid colored images and making really beautiful "artsy" cards.  Check out her great video and FABULOUS card HERE.

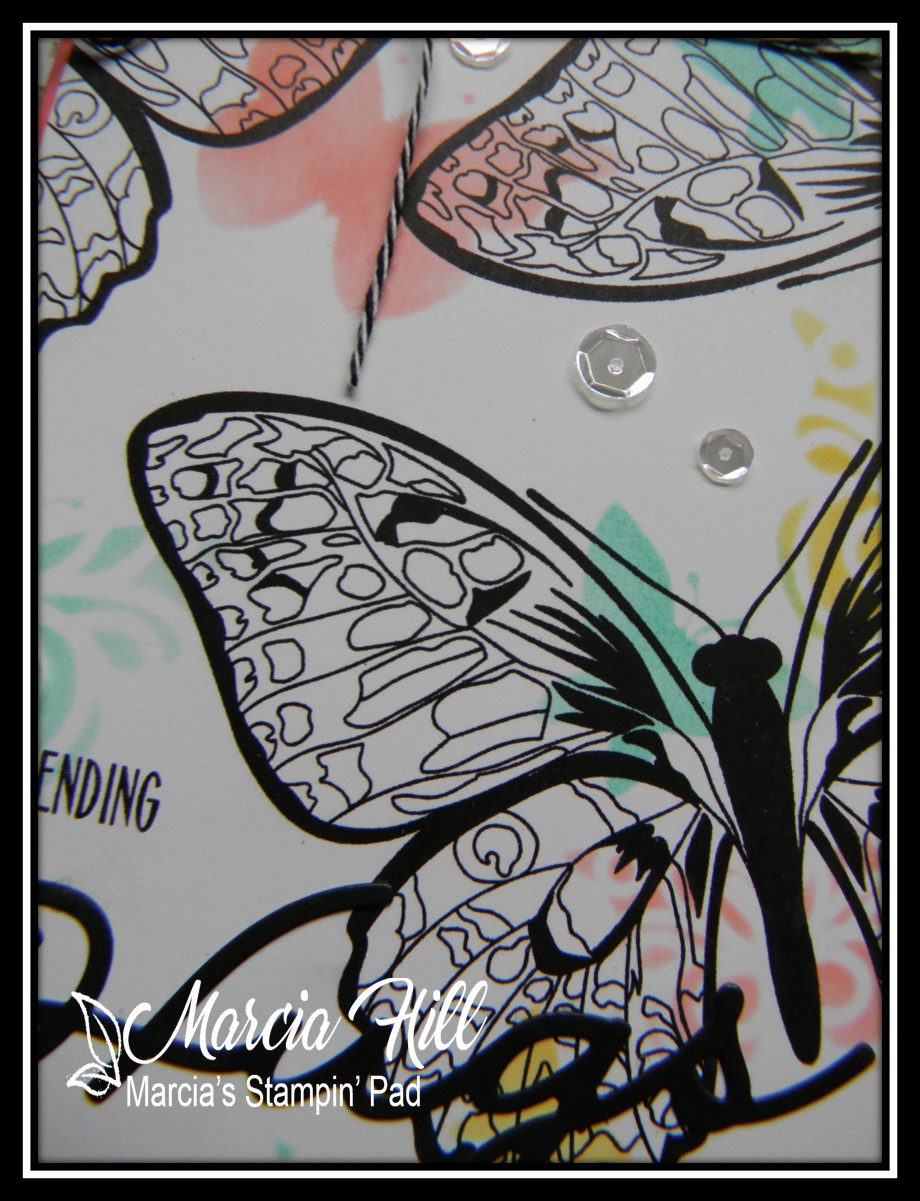
I have been wanting to use the Ever So Much stamp set since it came out last year as a freebie, but the main image (butterfly) is so large that I was just never quite sure what to do with it!  Until I watched Stephanie's video and this set popped into my brain right away!  Take a look:


I started by using a butterfly stencil with Berry Sorbet, Hawaiian Shores, & Harvest Gold inks, and then stamped the large butterfly image in black several times over the smaller stenciled butterflies.  I used Big Hugs for my stamped and die cut sentiment, and finished with some clear sequins and bakers twine.


I love the way this card turned out and can't wait to try this technique with some of my other stamp sets!  Make sure you check out Stephanie's beautiful card and video, and all the other cards in the gallery too, and then play along.  You can find all the details right HERE.

Thanks for stopping by today ... I love it when you do!


Monday, April 2, 2018

CAS Watercolour April 2018 - Bird

Hello friends.  This month at CAS Watercolour Bonnie is our hostess and is challenging us to use a bird (or birds) on our cards.


I love birds...watching them, feeding them (we have lots of feeders at our house!), and listening to them too.  While Jill Foster I am not, I had fun colouring up a PB stamp called The Sweetest Sound using distress inks and an Aqua Painter.

 
 I actually stamped the image in Antique Linen Distress Ink first and then did the no line water colouring technique with the rest of my colours of distress inks.  I was pretty pleased with the way the birds came out, but not as happy with my berries.  I think that's where my impatience comes in...need to learn to wait for my colour to dry before adding another layer!!  A simple white frame finished off my card and I purposely left a sentiment off so I can use this for what ever occasion arises.

The DT has outdone themselves this month to inspire you, so check them out and then play along with us.  You have until the 24th to play.  All the information you need to play along can be found right HERE.
 
Thanks for stopping by today ... I love it when you do!


Merry Monday #284 - A Color Challenge With RED & WHITE

Hey Merry Monday fans...this week I'd like to challenge you with a color challenge using RED & WHITE on your Christmas cards.


I just LOVE red and white for Christmas cards...there's just something very CAS about that color combination!  I have a twofer for you today using a PB stamp (Ornately) that I've had for a billion years (or close!) and have never used.  I embossed the image first in WOW Metallic Red and decided I didn't like it because it looked a little pink to me, so re-stamped another one using Real Red ink.  After I finished the card, the embossed Metallic Red piece sat there staring at me, so I decided to finish it into a card and ended up liking it better than the other.  Here's the embossed WOW Metallic Red one:

I matted the card with Real Red cs and then the embossing didn't look so pink anymore.  I also added a layer of dry embossing using SU!'s Holly folder and then used the WOW Metallic Red embossing powder on vellum for my sentiment (PTI Think Big Favorites: #21).

And here's the one using Real Red ink:

This one is actually embossed too...SU! inks stay wet for a few seconds, so I added some clear embossing powder over the image and then heat set it...gives it a nice shine IRL.  I layered it with some Bitty Big DSP (Pure Poppy from PTI) and then added a few snowflakes using PTI's Fancy Flakes dies.  A few sequins, some bakers twine, and a Tiny Tag (PTI) finished off this card.

So what will YOU come up with this week using RED & WHITE??!!  We can't wait to see your cards in the gallery!!  Make sure you check out what the DT came up with using RED & WHITE for more inspiration and then play along with us right HERE.  We would LOVE to help you get those Christmas cards done on time this year!!  :0)

Thanks for stopping by today ... I love it when you do!