Monday, March 11, 2024

Double D - First Signs of Spring

Hello friends.  I'm playing along with the Double D Challenge where they are looking for cards depicting the first signs of Spring.


Isn't that just the prettiest mood board?!  Oh how I am longing for color outside!  I shouldn't be complaining though as we have had a pretty mild Winter here in Michigan, but it's the up and down of having a few nice and mild sun shiny days and then cold & wet! But anyway, one of the first signs of Spring in my yard is the Snowdrops, and as pretty as they are, my favorite is my big Lilac bush with all the wonderful fragrance and the beautiful purple blooms!  The Greetery just had a new release and put out a new die set called BotaniCuts: Lilacs and it practically jumped right into my cart...HAD TO HAVE IT!!  Here's what I came up with for my card...


 I started with a softly stenciled plaid (The Greetery) in light gray for my background and then added my focal point...the Lilacs.  I ink blended several shades of Lilac inks from Gina K over my die cut flowers and then assembled them...very easy to put together!!  The leaves were ink blended with Peeled Paint & Rustic Wilderness DOX inks. (And then splattered with a bit of water.)


I added my Lilacs to one of my favorite Greetery stamp & die sets...Sprinkled With Kindness.  I think the Lilacs fit beautifully in the watering can!


I had also just gotten a few new dies from Poppystamps and one of them was this bunny from their Thoughtful Bunny Duo set, and I thought he looked right at home sniffing at those Lilacs!  A little hard to tell in my photos, but I did add a bit of glitter to the Lilacs to add some sparkle and shine.  I left a sentiment off the outside as I'm not sure what I'll use it for yet, and also the card is busy enough as it is.

The DT has once again WOW'd with all their inspiration cards, so check it all out right HERE and then play along with what your 1st signs of Spring are where you live!  This challenge is open till Sunday, March 17th @ 8:00PM.

I am also adding this card to Darnell's NBUS Challenge as this is the 1st time using the Lilac dies and the bunny die.


Thanks for stopping by today ... I love it when you do!


Monday, March 4, 2024

The Flower Challenge #89 - MAKE A SQUARE CARD

Hello friends.  It's time for another Flower Challenge and this month we're looking for SQUARE cards...and flowers of course!

Here's what I came up with using a new (to me!) stencil from The Ton called Gentle Peonies...


This is a large 6x6 stencil and after inking it all up in shades of lilac (Gina K) I used a 3 3/4" square die (Gina K - Master Layouts 3) to cut out the center.  I matted the square with a piece of black and added foam tape to the back before adding it back to the center of the 6x6 piece.  


  I went a little rogue at this point and stenciled just the center of the stencils again and then used a circle die instead of a square to add my sentiment to (Penny Black - Better with Age).  A few PFS gems and a sparkly white ribbon finished off my square card.  Think I'll be giving this one to my mom whose 92nd birthday is coming up next month, and by hand delivering it, I won't have to pay the extra postage required of square cards!  

The DT has outdone themselves once again to inspire you, and you can check it all out right HERE.  You have until March 25th @ 5:00PM to play along with us and we'd love to see all of you and your SQUARE FLORAL cards in the gallery!!

Thanks for stopping by today ... I love it when you do!


Friday, March 1, 2024

Color Hues #82 - Turquoise & Green

Hello friends.  A new month and a new challenge at Color Hues and for the next two weeks our hostess Tracey would like to see TURQUOISE and GREEN on our cards.  Sounds like SPRING to me!!

I had found a piece of cs that I had used Lindy's Magicals on in Tibetan Poppy Teal and Ponderosa Pine Olive in the package that my Jumbo Curiosity Dragonfly Die (The Greetery) was in, so it was an easy choice to die cut it out since the colors were exactly what I needed for this challenge!  Here's what I came up with...


For my background I did some smooshing with a piece of acetate and Turquoise Sea and Lucky Clover inks (Gina K), and then when dry added the Script (retired SU! background stamp) over the top with Delicata Silver Shimmer ink.  I used an oval die on my top panel and then ran it through my machine with SU!'s Subtle embossing folder, before adding foam strips to the back and adding to my card base.


 This close up shows the shimmer a bit better of the Magicals on the dragonfly and the silver Delicata ink in the background.  I added a few PFS Iridescent Clear Gems and a silver foiled sentiment to finish off this CAS card.

We have lots of beautiful inspiration to share with you from the DT and our Special GD Tenia using these colors, so check it all out right HERE and then play along with us...we'd love to see YOU in the gallery!  This challenge is open till Thursday, March 14th @ 9:00AM.

Thanks for stopping by today ... I love it when you do!


Wednesday, February 28, 2024

Double D Challenge - Patterned Paper

Hello friends.  The Double D Challenge has a FUN one going on right now...to use Patterned Paper (DSP) on our cards.


Now unfortunately, I don't have any DSP...Bahahahahahahahaha!!  Let's get real here...we ALL hoard it!  I know I am not alone here!!  It's so pretty and I have to have it...and then it sits there!  I have enough to last well over a 100 years, so I guess I really better get busy and use some of it!  

I'm still on a LOTV (Lily of the Valley) stamp kick, so here's another classic one that I think was probably one of the first stamp images they came out with.  It sure is still one of my favorites!


I just don't know how anyone can not fall in love with these sweet images!  And who doesn't remember picking dandelions when they get to this stage and making a wish before blowing on them and watching all the little pieces fly into the air?!  My memory may not be much these days, but I sure do remember making wishes and blowing on the dandelions!  I colored this sweet little girl up with my Copics, and although you can't see, I used quite a bit of WOS on the dandelions, the ruffled layer of her skirt and her wings.  I used Spellbinders Hemstitched Rectangle Dies to cut and frame out this image and then added a piece of DSP from LOTV called Promises (from the NitWit Collection by Mary Fran.  Copyright from 2012, so I've had this DSP for awhile!).  


 I added both panels to a top folding Pool Party (SU!) card base and then stamped my sentiment from SSS's Tiny Words.  I finished with a sheer Pool Party ribbon (SU!) and a few PFS light turquoise gems.

I actually have a twofer for you today with another LOTV image that my 9 year old granddaughter Addy colored up this past weekend.  She LOVES to play in my craft room when she comes over and has been asking for years to play with my Copic markers, and I've always told her she has to be a bit older before she can use them.  I decided to be brave and let her try them and she did awesome and was so gentle with them!  And here's the image she colored up...


  Didn't she do a great job?!  She forgot the image when she left, so I turned it into a card for her and will be putting it in the mail to surprise her with!  The orange polka dotted DSP is from PTI and the wonky stitched die is from Gina Marie Designs, and I also ran the image through with a really old cuttlebug ef with the large dots to coordinate with the DSP.  Don't ya just LOVE her orange shoes?!  :0)

Lots of inspiration using DSP from the talented DT, and you can check it all out right HERE.  This challenge is open till Sunday, March 3 @ 8:00PM.

Thanks for stopping by today ... I love it when you do!


Monday, February 26, 2024

Peace On Earth #58 Challenge

Hello friends.  Figured it was high time I get back into making some Christmas cards and the Peace On Earth Challenge has the most awesome mood board with all kinds of PLAIDS!


How do you say no to a mood board like that?!  I certainly couldn't!!  One of my DT mates used a LOTV stamp (Lily of the Valley) and reminded me that I have quite a collection of them and haven't used a single one in probably 2 years!  Finally found them and picked out a couple to ink up for different challenges, and here's what I came up with for a Christmas card...


Isn't she a cutie?!  I colored her up with my Copics and then fussy cut her out.  I used some nesting oval dies to cut out the center of this snowflake and plaid dsp from SU! and a piece of plain black cs and mounted both layers onto a white card base that I had used SU!'s Winter Snow ef on. 


You can see the embossed background a bit better in this close up.  I added a bit of glitter to the snow that this little gal is walking on and used a pre-printed sentiment strip from SSS with a silver metallic pearl to finish off this sweet card.

You can check out this challenge HERE and play along till Thursday, Feb. 29th @ 8:00PM.


Thanks for stopping by today ... I love it when you do!


Friday, February 23, 2024

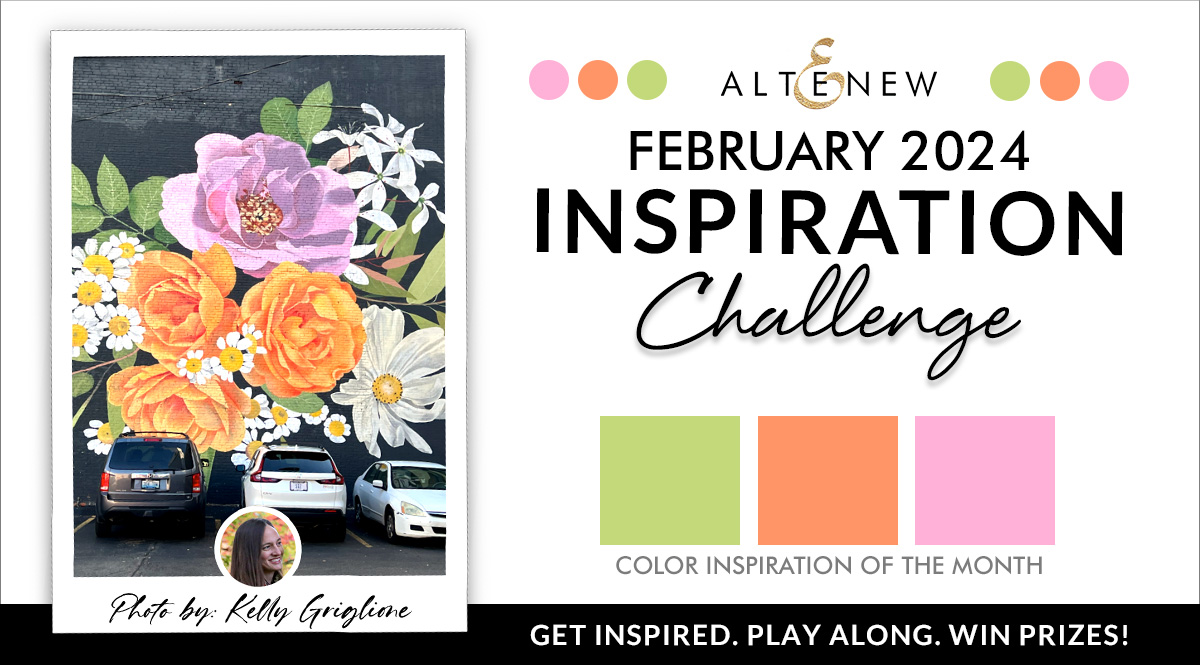
Altenew's February 2024 Inspiration Challenge

Hello friends.  It's been a loooooong while since I've played in Altenew's Inspiration Challenge, but the sweet Kelly Griglione is hosting this month and has a FABULOUS inspiration photo, and I just couldn't resist!


Totally makes me think Spring Kelly...THANK YOU!!  I had a birthday last week, and my sweet friend Birgit spoiled me with a bunch of new crafty gifts, including a new (to me) die set from Altenew called Craft-A-Flower: Bellflower Layering Die Set.  This challenge was the perfect way to break in this set of dies!  Take a look...


I just love how colors POP off of a black background, don't you?!!  I die cut everything from white cardstock (except the "bloom" sentiment) and then ink blended all the pieces.


I sprinkled some water onto my flowers and leaves after coloring them to add the water spots, and then when dry, also added a bit of shading with my Prismacolor pencils.  I ran my black panel through Altenew's Waffled Diamonds EF and attached to a white card base before adding my flowers and leaves.


 In this close up you can see the embossed background a bit better.  After adding my sentiment, I decided it still needed something, so I added the white splatter's and a few clear water droplet gems from Trinity Stamps.  

Kelly has some absolutely GORGEOUS cards to inspire you and there are also so many beauties already in the gallery, so check it all out right HERE, and then play along.  This challenge is open till Feb. 28th @ 11:55PM

Thanks for stopping by today ... I love it when you do!


Tuesday, February 20, 2024

A Valentine's Day Play Time with Michele

Hello friends.  Michigan Winter weather played nice with us this Valentine's Day and my sweet friend Michele was able to come over and spend the day playing.  We did our usual hugging, laughing, talking and eating, all without consuming any calories!  Well, kinda...  We had veggies, fresh fruit, and for dessert, more fruit!  And veggies and fruit don't have any calories, RIGHT??!!  Of course the veggies were on a crust with cream cheese and ranch dressing and the fruit dessert was on a pie crust with a crumbled topping, so maybe a few calories.  But hey, when you're with friends, they don't count!  That's my story and I'm sticking with it!!  

We did manage to get some stamping and stenciling done, and started with a new to me stencil set from Altenew called Stencil Art: Playful Watercolor Flowers.  


 The flowers and leaves really do look watercolored, don't they?  I used shades of coral ink (PFS) for the flowers and a couple shades of green for the leaves (also PFS).  


 I ran my panel through with SU!'s Cane Weave embossing folder before matting it to a panel of Berry Sorbet cs (PTI) and a white card base.  My little label die cut is from a Spellbinders die set that Michele had brought called Essential Four Petal Label Dies and the sentiment is from a Greetery set.  I finished with a piece of bakers twine and a few Disco Ball sequins (Gina K).


Same stencil set for this card, just different colors...light, medium & dark orchid inks (Gina K) for the flowers and Eucalyptus & Green Tea inks for the leaves (CP).  I fussy cut off the right side of the panel and added foam tape to the back before adding it to a card base that I had stenciled using Gina K's Brick Wall stencil and Green Tea ink.


I finished this one off with a silver foiled sentiment on black using Spellbinder's Everyday Sentiments II set and a few PFS gems.


 Michele pulled out my Kaleidoscope stencil (PFS) next, so we both had a play with this too.  This stencil was part of a Create & Connect Christmas event 2 Christmas's ago, so I decided to keep the card Christmas like using the Modern Snowflake Die & Stencil & Stamp set from this past Christmas from PFS.  I heat embossed in silver the snowflake twice and then stenciled it in the same turquoise and teal inks that I had used for the Kaleidoscope background.  


 I die cut one of the snowflakes from Tranquil Teal cs and sandwiched it in between the two embossed and stenciled snowflakes before adding it to the stenciled background, along with a sentiment from the coordinating stamp set.  It is a little busy, but my last card is pretty CAS, so it makes up for the busyness of this one.  (Don't you love how I justify things??!!  Haha!!)


I started by once again using the Kaleidoscope stencil and inking it very softly with light blue, light turquoise & light purple, and then die cutting a star shape from it.  I used The Greetery's Rustic Star Small die to place over the die cut star that I had stenciled, and then slipped a little die cut Baby Face Swaddle Die underneath a part of the star.  


This close up is a little washed out from enlarging it, but it shows the dimension of the Rustic Star die cut better.  I used a holographic cs for the inside silver star part that really shines when the light hits it.  I finished this card very simply with a sentiment from The Greetery's Baby Face Stamp Set and called it good.  I need to do another one in pinks and then I'm good for either a boy or girl if I need a baby card.

I know this was a loooooong post and I hope I didn't lose any of you, but when Michele and I get going, the ideas start flying and there's just no stopping the fun!  Sure hope you enjoyed tagging along and I know you'll be blown away as usual by what Michele created from our play day...you can find it all right HERE.  As always, thanks again for another FUN play day Michele and for your YUMMY cherry and blueberry fruit pizza too! :0)       

Thanks for stopping by today ... I love it when you do!