Monday, September 5, 2022

Playing Cards with Michele

Hello friends.  My sweet friend Michele and I got together again to play cards a couple weeks ago...and talk and laugh and laugh and have lunch (I made the lunch and Michele provided the yummy dessert!!), and even more laughing and talking, and yes, even some crafting!  We discovered that we each had just purchased PFS's Grow Wild Stencils and decided to share what we each had made using them.  Let's get started!


I love PFS stencils because of the ease of use in lining everything up, and this stencil set lined up so beautifully I didn't even mind that I hadn't purchased the coordinating stamp set and die!  I used 3 shades of yellow inks (Lemon Whip, Sunshine, & Sweet Mustard - all PFS) to stencil the flower layers with some leftover orange on my blending brush for the flower centers.  The leaves were done with Light & Medium Spruce inks (Gina K).  


I used an older MFT hello die (I think it was a freebie with an order) to die cut the word towards the bottom of my card panel, and then die cut the word again twice more from just plain white cardstock to stack beneath the stenciled cut before replacing back into the stamped layer.  I added a few gold metallic pearls (PFS) to finish off this simple card.


 My 2nd card is my favorite I think.  I used shades of pink this time (Ballet Slipper, Sparkling Rose, & Bubble Gum - PFS) with yellow for the flower centers, and Jelly Bean Green & Fresh Asparagus inks for the leaves (Gina K).  Next I used PFS Slim Ornate Banner Dies to die cut the decorative edges of my stenciled panel and then placed on a white card base that I had embossed with SU!'s Subtle embossing folder.  


  My birthday die was cut twice...once from white and once from black and then I offset them a bit so they would show up better on my stenciled part of the card.  I added a few Disco Ball Sequins (Gina K) and some black & white baker's twine to finish off this card.


My last card was done in shades of purple (Light, Medium & Dark Lilac - Gina K), with yellow flower centers and the same greens as my 2nd card for the leaves.  I did some fussy cutting on one side of my panel before attaching to a card base that I added black & white striped dsp (PTI) to at the bottom.  


My "thanks" was foiled in silver on black cs using PFS Fancy Script Words and was also stacked with additional die cuts for a bit of dimension.  I added a piece of black & silver ribbon (SU!) to the side, and then finished with a few silver metallic pearls added to the flower centers and a few randomly on the dsp.  

OK, that's it for me this time, but please, PLEASE go over to Michele's Blog to see what she has done with this same set of stencils...it will definitely be worth your time!  Thanks Michele for coming my way this time, and for the FUN day and wonderful dessert...and of course the AWESOME friendship!!  Aren't stamping friends just the BEST??!!

Thanks for stopping by today ... I love it when you do!


Saturday, September 3, 2022

CAS Christmas Sept. 2022 - SPARKLE and/or SHINE

Hello friends.  It's time for another CAS Christmas Challenge, and this month Hideko is our hostess, and she would like to see SPARKLE and/or SHINE on your CAS Christmas cards!


For REAL SPARKLE, I like to pull out my glass bead gel (Faber Castell) and a stencil, and I just happened to have a new (to me!) stencil from Trinity Stamps called Tree of Lights that I thought would work beautifully with the glass bead gel.  Take look...


Can you see the SPARKLE??!!  This is a 4 step stencil and it was definitely made for a regular size slimline card, but I like the mini-slimline size sooooo much better, so part of the tree is cut off at the bottom, but it still worked beautifully with the smaller size!  I used PFS's set of 4 green ink cubes to do my blending over the 4 stencils, and then went back to stencil #3 to add my glass bead gel.  Once it was dry, I used Gina K's Master Layouts #7 die set to cut my stenciled layer and the black layer behind it, before attaching it to my card base.


  To finish my card I simply added a pre-printed sentiment strip (Gina K) with foam tape on the back for some dimension.  A pretty simple card...the hardest part of this one was waiting for the glass bead gel to dry (over night)!!

Have you started your Christmas cards yet??  Let us help by joining our challenge...you can find all kinds of FABULOUS inspiration from our talented DT and Special GD, and then play along right HERE.  This challenge is open till the 24th. 

Thanks for stopping by today ... I love it when you do!


Wednesday, August 31, 2022

Lovely Silhouettes

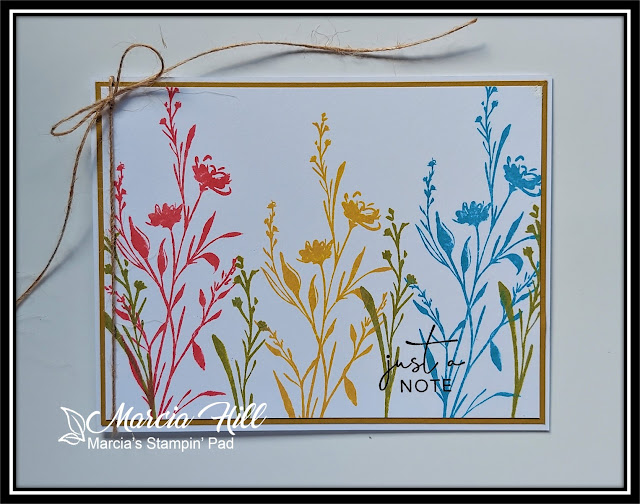
Hello friends.  Just a fun post today sharing a set of notecards I made using The Greetery's Lovely Silhouettes stamp set and a beautiful color combination and inspiration from Dawn of WPlus9 (HERE).

The first 3 cards all use the same stamps, colors, and sentiment...the colors are DOX inks (Abandoned Coral, Fossilized Amber, Broken China, & Peeled Paint) and the sentiment is a freebie from Taylored Expressions that I received with an order several years ago that I just love!  Take a look... 


The cards are all basically the same with just a few differences.  This one uses The Greetery's Crimped Rectangle Dies and Crimped Circle Dies, and a bit of black & white baker's twine.


This one is simply matted with a piece of C&9th Peacock cardstock and a tiny twine bow for a embellishment.  Once again, very CAS!


My only horizontal card, this one is matted with a piece of Gina K's Prickly Pear cs, and also has a twine bow wrapped around the side. 


My last card is different only in that it uses a different sentiment.  My "just a NOTE" sentiment just didn't fit on this card the way it did the others, so I used a pre-printed sentiment strip from Gina K.

I am so tickled with the way this set of CAS cards came out and want to thank Dawn of WPlus9 so much for the lovely, lovely inspiration!   

Thanks for stopping by today ... I love it when you do!


Monday, August 29, 2022

Christmas Kickstart #65 - Never In A Nativity

Hello friends.  Playing along with the Christmas Kickstart Challenge where they have a FUN one going on this month called Never In A Nativity...so in other words, a Christmas design that you wouldn't find in a nativity scene!

I have a twofer for you today, using a new Spellbinders die set called Parcel & Post Mailbox.  Take a look...


 I fell in LOVE with these sweet mailboxes and just HAD to have them!  Let's start with the one on the left...


I started with a Real Red card base and added a white panel that was embossed using a SU! Winter Snow embossing folder.  I die cut the mailbox from Real Red cs and sponged all the edges with Cherry Cobbler ink.  The sentiment was gold foiled using an additional set from Spellbinders called Christmas Mailbox Greetings.  The mailbox set comes with all the decorating dies too, and I die cut all the flowers and leaves from white cs and then used sponge daubers and DOX inks, pretty much following the photo on the front of the die set.  I did add the little Tweet Cardinal (also Spellbinders) that I die cut and sponged and WOS'd, just because I thought he was a FUN addition!!


   My 2nd card also started with a Real Red card base and then I added an embossed background using a gold shimmery cardstock and a Spellbinders embossing folder called Tufted 3D that my sweet friend Michele let me borrow.  I gold foiled another sentiment from the Christmas Mailbox Greetings, and then added a mix of different leaf, snowflake, and Poinsettia die cuts from different sets to decorate up my mailbox.


Another 2 cards to add to my Christmas card stash...YAY!!  Although I wish I could say my Christmas card stash is pretty much finished, I am waaaaaay behind this year!!  How about you??  Almost done or barely started??  I guess we all need to get moving, right??!!  Good reason to play along with the Christmas Kickstart Challenge where there's LOTS of inspiration from Jo and her Guest Elf Gail, and also cards that are already in the gallery!  :0)


Thanks for stopping by today ... I love it when you do!


Wednesday, August 24, 2022

Krafty Chicks Challenge - ALL OCCASIONS

Hello friends.  It's week 4 of my Guest Designer spot here at the Krafty Chicks Challenge, and this week is called ALL OCCASIONS.


So this week is all about OCCASIONS, and it can be any occasion...birthday, anniversary, graduation, new baby, holiday, etc.  I know it's still technically Summer, but I thought I'd jump ahead a little bit and start working on some Halloween cards for the grands.  I mean Halloween is an occasion, right??!!  Take a look at what I came up with...


I used a couple new "In Colors" from SU! for my card...Orchid Oasis and Parakeet Party, and then Mango Melody for the orange piece.  A little hard to see, but I stamped my background with the haunted house image from MFT's Spooktacular Friends stamp set, and also used the cute little bunny all wrapped up like a mummy from the same set on my green tag.  (He was colored with Copics)  


My orange tag was embossed with a spider web embossing folder from SU! (retired), and I lightly ran my black ink pad over the raised part and also along the edges.  I wanted some sparkle on this card, so I used a 2 way glue pen to add glue along the lines of the web and then added some TH Distress Glitter...really sparkles BIG TIME in real life!!  My sentiment comes from a PTI set called Boo Black Cat and I finished the card by adding some black & white bakers twine to both of the tags.  Colorful and fun and I'm sure one of the grands will love it...along with some treats of course!!

We look forward to seeing what you add to the gallery this week with your OCCASION card, and if you need some inspiration, the DT has you covered right HERE!  Would like to thank Lori and the team for asking me to play along with them this month...it's been a blast and I had a great time!!  Thank you, THANK YOU!!

Thanks for stopping by today ... I love it when you do!


Monday, August 22, 2022

Color Hues #47 - Chocolate & Mint

Hello friends.  Playing along with the fun challenge over at Color Hues today where they're looking for the colors CHOCOLATE & MINT.


My first thought was chocolate chip mint ice cream, and I just had to pull out a new set from Lisa Hetrick/Gina K called Treat Yourself that I thought fit this challenge perfectly!  Here's what I came up with...


  Doesn't the cone wrap look just like a waffle cone??!  I thought it was perfect for this challenge with Charcoal Brown ink (Gina K) that I used my Aqua Painter on to spread the color around, and then fussy cut it out.  I stamped 2 of the outline lilies in the same brown ink onto a white panel and then used the solid stamp and Applemint ink to fill in the flowers.  I stamped a 3rd lily and fussy cut it out to add to my bouquet with a couple foam dots to add a little dimension.  (I also used the Bodacious Bloom stencil (Gina K) to add the design down the center of the card panel before I attached the cone and extra flower.)  


My sentiment also comes from the Treat Yourself stamp set and was die cut with a couple circle dies from Gina K's Master Layout #3 die set.  I added a couple Disco Ball Sequins (Gina K) to my card to finish it off.  So instead of a chocolate chip mint ice cream cone, my card is a chocolate chip mint flower cone, and while not too realistic, I love the whimsy of it!!

Lots of awesome cards using this color combo from the DT for inspiration, and you can check it all out and play along right HERE.  This challenge is open till the 28th @ 9:00AM
 

Thanks for stopping by today ... I love it when you do!


Wednesday, August 17, 2022

Krafty Chicks Challenge - CAS

Hello friends.  I'm back as Guest Designer for week 3 of the Krafty Chicks Challenge, and this week it's all about CAS (Clean & Simple) cards.

I actually have 2 cards to share with you today, because after I made the 1st card, I started doubting myself that it was CAS enough!  Oh brother!!  Anyway, here's the 1st card I made...


I used a stencil from The Ton called Precious Poppies and used shades of orange ink to color up these gorgeous flowers.  My sentiment is from a Gina K set called Heartfelt Hydrangeas.  I did a simple matting with black and layered both to a white card base.  Like I said earlier, after I finished this card I wondered if there was too much of the floral/leaves on the card to make it CAS, so I made another, although I really do love the way this card turned out!!  Here's card 2...


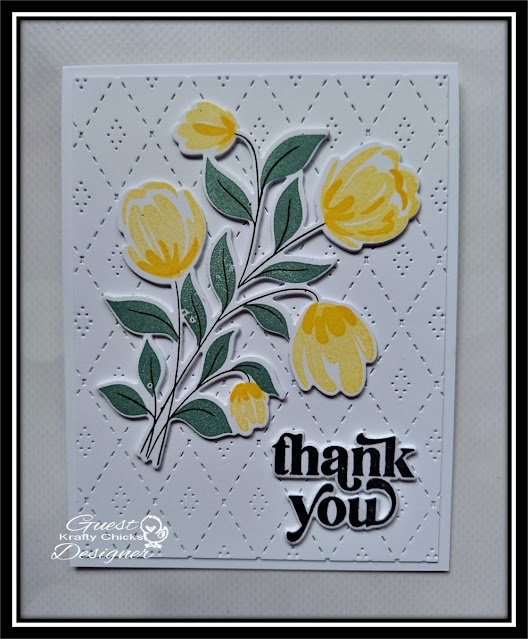
  This card uses PFS's Layered Bouquet stamp, stencil, & die set, and after stamping and stenciling it, I die cut it out, and then die cut 2 more blank images to layer beneath the stamped and stenciled layer to give some dimension.  I used a Stitched Diamond Coverplate Die (PFS) for my background layer, and then added a thank you sentiment from PFS's Perfect Sentiments that was also die cut and stacked 3 times for dimension.  Definitely a little more CAS than the 1st card, but I think they both still qualify!

Hope you'll all play along with us this week, and you only need to make ONE card...not 2!!  Check out the wonderful cards the DT came up with for inspiration, and then play along right HERE.

Thanks for stopping by today ... I love it when you do!